58th Meijin Match Game 1
Black: Sato Yasumitsu, Meijin
White: Maruyama Tadahisa, Challenger
58th Meijin-sen, Game 1, April 11th and 12th 2000
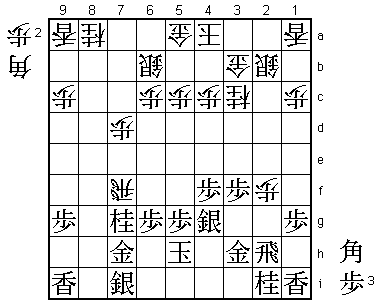
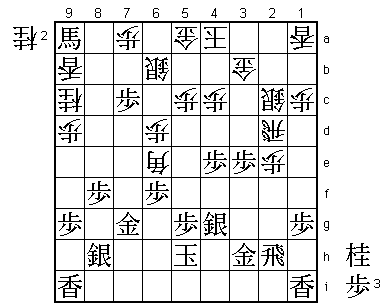
1.P7g-7f 3/3 0/0
The furigoma showed four pawns and only one tokin, so Sato had black in the
first game of this year's Meijin match. The match was expected to be close,
since Maruyama has had a great season with a winning percentage of more than
73% and challenging Sato by losing only one game in the A class Junisen this
year. However, the head to head strongly favours Sato. He has an 11-6 lead
against Sato, winning seven of their last ten encounters. After the Oza
title match, Maruyama also has to play his second title match against a
player he does not have a good record against...
2.P3c-3d 0/3 2/2
3.P2g-2f 8/11 0/2
4.P8c-8d 0/11 3/5
5.P2f-2e 3/14 0/5
6.P8d-8e 0/14 3/8
7.G6i-7h 1/15 0/8
8.G4a-3b 0/15 2/10
9.P2e-2d 1/16 0/10
10.P2cx2d 0/16 3/13
11.R2hx2d 0/16 0/13
12.P8e-8f 0/16 1/14
13.P8gx8f 0/16 0/14
14.R8bx8f 0/16 0/14
15.R2dx3d 0/16 0/14
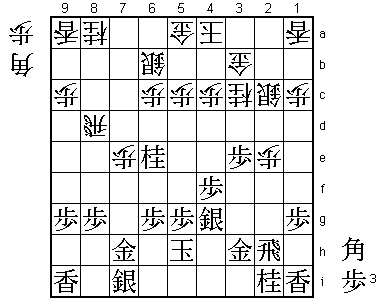
The Yokofudori is no surprise. The last six games between Sato and Maruyama
were Yokofudori games. In five games Maruyama was white, played the R8e
variation and lost. In one game Maruyama was black and successfully fought
Sato's N3c variation. Yokofudori fights were expected to be the big theme
of this year's Meijin title match.
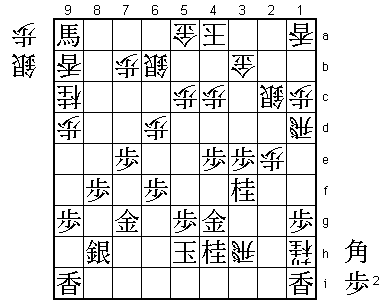
16.B2b-3c 0/16 0/14
17.R3d-3f 25/41 0/14
18.S3a-2b 0/41 3/17
19.P*8g 6/47 0/17
20.R8f-8e 0/47 3/20
Maruyama is a specialist in this fashionable opening. Despite his five
previous losses with this variation against Sato, he is not afraid to try
again.
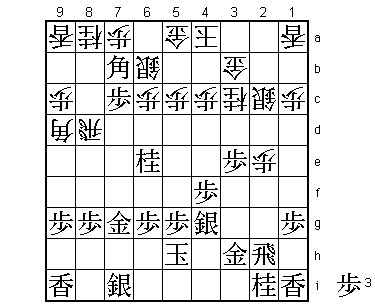
21.R3f-2f 2/49 0/20
22.K5a-4a 0/49 5/25
23.K5i-5h 4/53 0/25
24.S7a-6b 0/53 19/44
25.G4i-3h 10/63 0/44
26.G6a-5a 0/63 11/55
27.S3i-4h 2/65 0/55
28.P7c-7d 0/65 2/57
29.P3g-3f 11/76 0/57
30.P*2e 0/76 8/65
31.R2f-2h 1/77 0/65
32.P*8f 0/77 2/67
33.P8gx8f 10/87 0/67
34.R8ex8f 0/87 1/68
35.P4g-4f 7/94 0/68
36.R8fx7f 0/94 8/76
37.B8hx3c+ 2/96 0/76
38.N2ax3c 0/96 1/77
39.S4h-4g 0/96 0/77
40.P2e-2f 0/96 56/133
41.N8i-7g 136/232 0/133
42.R7f-8f?! 0/232 58/191
The sealed move. So far the game was exactly the same as the 4th game of
the Kio match between Habu and Moriuchi. Habu played 42.N7c here, and after
N3g B*4d P6f Bx6f K6g P7e S5f N8e, white was attacking and black was
defending. Even though it was not clear whether white's attack was strong
enough, Moriuchi could not stop it and lost the game and the match. This
game seems to show that 42.R8f is not better than what Habu played. Another
possibility is 42.R7e P*8c R2e P8b+ P2g+ with an unclear but violent fight
ahead.
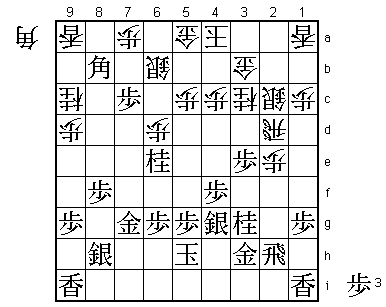
43.P*8g 110/342 0/191
44.R8f-8d 0/342 22/213
45.P3f-3e 2/344 0/213
46.P7d-7e 0/344 18/231
47.R2hx2f 1/345 0/231
48.P*2e 0/345 28/259
49.R2f-2h 5/350 0/259
50.S2b-2c 0/350 51/310
51.N7g-6e! 48/398 0/310
Now it is clear that black's strategy has been a success. This knight move
is nasty and white can not attack it with 52.P6d because of 53.P*2d Sx2d
P*3d. "A complete loss" as Maruyama remarked after the game. Of course,
he has no choice but to try and make the best of it.

52.B*9d      0/398     103/413
53.P*7c      14/412    0/413
54.P7e-7f    0/412     13/426
55.B*7b      61/473    0/426
56.P7f-7g+   0/473     5/431
57.G7hx7g    2/475     0/431
58.P*7a      0/475     0/431
Realising that his position is bad, Maruyama bides his time. Making his
position as difficult to attack as possible, he waits for mistake by Sato.

59.B7bx9d+   0/475     0/431
60.P9cx9d    0/475     0/431
61.S7i-8h    1/476     0/431
62.N8a-9c    0/476     10/441
63.P8g-8f    0/476     0/441

Black can not allow this knight to jump to 8e, so this is the only move. The
knight on 9c looks like it will die soon, but surprisingly it will still be
there in the final position.

64.R8d-2d    0/476     0/441
65.N2i-3g    5/481     0/441
66.P6c-6d    0/481     2/443
67.B*8b      2/483     0/443
Seems to win both lance and knight and the game...

68.L9a-9b!   0/483     51/494

Maruyama is trying to make things as hard as possible.

69.B8b-9a+   26/509    0/494
70.B*7d      0/509     1/495
71.N3g-4e    0/509     0/495
72.N3cx4e    0/509     8/503
73.P4fx4e    0/509     0/503
74.B7dx6e    0/509     0/503
75.P6g-6f?   0/509     0/503
The key point of the game. Sato completely overlooked the next move. Had he
seen it, he would have played the correct 75.N*3f R5d P6f B7d P7b+ Px7b
P*7e B8c +B8b N*7a +Bx8c Nx8c B*7d with a big advantage for black.

76.N*3f!     0/509     3/506

This move rocked Sato's confidence. 77.Sx3f Bx3h+ Rx3h N*4f loses the rook.

77.R2h-1h    7/516     0/506
78.B6e-7d    0/516     2/508
79.P7c-7b+   0/516     0/508
80.P7ax7b    0/516     0/508
81.P*7e      0/516     0/508
82.B7dx4g+   0/516     1/509
83.G3hx4g    0/516     0/509
84.N*2f      0/516     0/509
85.N*4h!     1/517     0/509

This is a good move. Black is still better, but it is hard to make the
mental adjustment from an overwhelming position to a slightly better
position, even for a Meijin.

86.N2fx1h+   0/517     2/511
87.N4hx3f    0/517     0/511
88.R*3h      0/517     0/511
89.N*4h      0/517     0/511
90.R2d-1d    0/517     0/511
91.L1ix1h?   0/517     0/511
A blunder that loses the game. Handing over this lance gives white a deadly
attack. After the simple 91.+Bx9b things are very complicated: Rx1g+ P*2d
S1b P4d and white's attack is by far not as strong as in the game.

92.R3hx1h+   0/517     0/511
93.+B9ax9b   0/517     0/511
94.R1dx1g+   0/517     0/511
95.P*2d      0/517     0/511
96.S2c-1b    0/517     0/511
97.P4e-4d    15/532    0/511
98.L*4e!     0/532     0/511

Painful. White's attack is stronger.

99.B*7d      0/532     0/511
100.K4a-3a   0/532     2/513
101.P4dx4c+  0/532     0/513
102.L4ex4g+  0/532     0/513
103.B7dx4g   0/532     0/513
104.G3bx4c   0/532     0/513
105.N*5e     7/539     0/513
106.P*4f     0/539     3/516
107.B4g-8c+  0/539     0/516
108.G*6h     0/539     14/530

Here Maruyama had calculated everything until the end. He knows black has
not mate.

109.K5hx6h   0/539     0/530
110.+R1hx4h  0/539     0/530
111.K6h-7i   0/539     0/530
112.S*6h     0/539     2/532
113.K7i-8i   0/539     0/532
114.S6hx7g+  0/539     0/532
115.N5ex4c=  0/539     0/532
116.K3a-4b   0/539     1/533
117.G*3c     0/539     0/533
118.K4bx3c   0/539     0/533
119.L*3d     0/539     0/533
120.K3cx4c   0/539     0/533
121.L*4e     0/539     0/533
122.K4c-5b   0/539     2/535
123.N3f-4d   0/539     0/535
124.K5b-6a   0/539     0/535
Resigns      0/539     0/535
Time:        08:59:00  08:55:00
After 125.+Bx7b Kx7b G*8b K6c +B8a K7c +B7b K8d +B8c Kx7e there is no mate
and black can no longer defend. During the post-mortem analysis Sato was
clearly very upset with himself for losing this game. This was showed in
his language, where he sometimes changed his usual formal "watashi"
to the much more informal "ore". Both words are used to describe oneself,
but the feeling in Japanese is vastly different. Game 2 will show if he will
manage to pick himself up after such a disappointing loss.