57th Oza Match Game 3
[Black "Yamasaki Takayuki, Challenger"]
[White "Habu Yoshiharu, Oza"]
[Event "57th Oza-sen, Game 3"]
[Date "September 25th 2009"]
1.P2g-2f 00:00:00 00:00:00
2.P3c-3d 00:00:00 00:00:00
3.P7g-7f 00:00:00 00:00:00
4.P8c-8d 00:00:00 00:03:00
5.P2f-2e 00:01:00 00:03:00
6.P8d-8e 00:01:00 00:05:00
7.G6i-7h 00:02:00 00:05:00
8.G4a-3b 00:02:00 00:07:00
9.P2e-2d 00:02:00 00:07:00
10.P2cx2d 00:02:00 00:09:00
11.R2hx2d 00:02:00 00:09:00
12.P8e-8f 00:02:00 00:15:00
13.P8gx8f 00:03:00 00:15:00
14.R8bx8f 00:03:00 00:16:00
15.R2dx3d 00:03:00 00:16:00
16.B2b-3c 00:03:00 00:20:00
17.R3d-3f 00:16:00 00:20:00
18.S3a-2b 00:16:00 00:22:00
19.P*8g 00:19:00 00:22:00
20.R8f-8e 00:19:00 00:31:00
21.R3f-2f 00:20:00 00:31:00
22.K5a-4a 00:20:00 00:36:00
23.S3i-4h 00:28:00 00:36:00
24.S7a-6b 00:28:00 00:43:00
25.P3g-3f 00:41:00 00:43:00
26.G6a-5a 00:41:00 00:51:00
27.N2i-3g 00:51:00 00:51:00
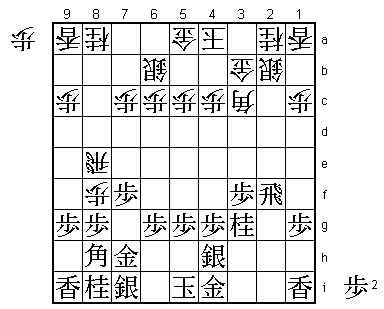
This is the standard position of the New Yamasaki Style strategy against the R8e
Yokofudori. As the name suggests, this is a way of playing introduced by Yamasaki
and it can be called one of his special strategies. For a while, it was considered
so strong that a number of professionals stopped playing the R8e Yokofudori. Recently,
a number of improvements have been found for white and the strategy is not considered
as strong as before, but it is still one of the best strategies against the R8e
Yokofudori. It is typical of Habu that he meets his opponent head-on without shying
away from their favorite opening strategies. Habu may be 2-0 up, but he is looking
to impose as much psychological damage as he can.
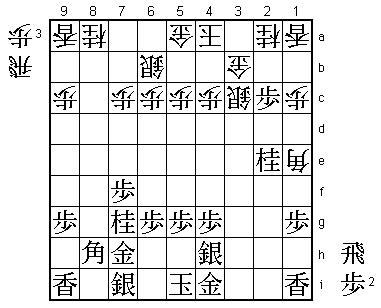
28.P*8f 00:51:00 01:09:00
This is not a new move, but here the overwhelming majority of white players chose
28.P7d. There are more than a 100 games with 28.P7d and only about a dozen games with
28.P*8f. The obvious target is the pawn on 7f, but it can also suddenly lead to a very
sharp fight, so it is a difficult move to play without proper preparation at home. One
wonders where Habu, who is always the most busy player, finds the time to study these
positions.
29.P8gx8f 00:55:00 01:09:00
30.R8ex8f 00:55:00 01:10:00
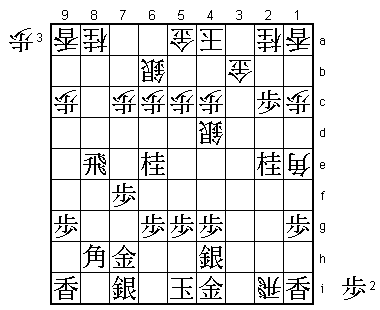
31.P3f-3e 00:57:00 01:10:00
Defends the pawn on 7f, but now the pawn on 3e becomes the target...
32.R8f-8e 00:57:00 01:13:00
33.N8i-7g 01:05:00 01:13:00
Yamasaki doesn't shy away from the fight. This is the first time he has played this move.
34.R8ex3e 01:05:00 01:48:00
35.R2f-2e 01:39:00 01:48:00
36.R3ex2e 01:39:00 02:01:00
37.N3gx2e 01:39:00 02:01:00
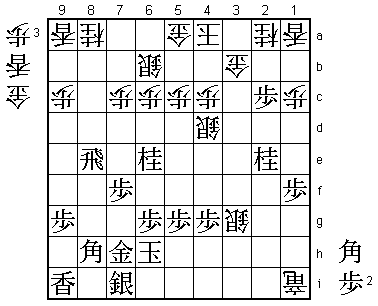
This rook exchange seems to be good for black, but Habu shows that things are not so easy.
38.B3c-1e 01:39:00 02:03:00
39.P*2c 01:45:00 02:03:00
40.S2b-3c! 01:45:00 02:04:00
It seems like white is losing material after 41.Nx3c+ Nx3c, but the threat N*3f next
is very strong, because the black king has nowhere the run with the wall formation on
the left.

41.R*8e      02:27:00  02:04:00

Black wants to play 41.N6e, but after Bx4h+ Kx4h R*2h K5i Rx2e+ one cannot say that
black is doing well. Habu agreed and after the game he called R*8e "the move that felt
like it was the best".

42.S3c-4d    02:27:00  02:41:00
43.N7g-6e    03:06:00  02:41:00
So far, so good. Yamasaki has learned an important lesson from the first game where
his bishop was blocked throughout the game.

44.R*2i      03:06:00  02:47:00
45.P1g-1f?   03:35:00  02:47:00

However, this is an important mistake. Black should have played 45.Rx8a+ Rx2e+ P1f
here with good chances. For example, Bx4h+ Kx4h +R2i P*3i P*3h is answered by P2b+
Gx2b Bx4d Px4d S*4c which is very good for black.

46.B1ex4h+   03:35:00  03:15:00
47.K5ix4h    03:36:00  03:15:00
48.S*3g      03:36:00  03:18:00
49.K4h-5i    03:39:00  03:18:00
50.R2ix4i+   03:39:00  03:20:00
51.K5i-6h    03:39:00  03:20:00
52.+R4ix1i   03:39:00  03:20:00
53.R8ex8a+?  03:44:00  03:20:00

Yamasaki was still disgusted with himself about 45.P1f, which has lead to white
picking up all kinds of pieces with tempo. If Yamasaki had been able to think
positively here, he would have played 53.P2b+ first and only after Gx2b take the
knight with Rx8a+. This is an important difference with what happened in the game,
because if black plays like in the game with +R2h P*3h +Rx2e then Bx4d Px4d Nx5c+
Sx5c B*4c and black turns the tables. After +Rx3h instead of +Rx2e, white still
seems to have the advantage after K7g S2f+, but it was the only chance black had
to force the gold to the bad square 2b.

54.+R1i-2h   03:44:00  03:48:00
55.P*3h      03:45:00  03:48:00
56.+R2hx2e   03:45:00  03:49:00
57.P2c-2b+   03:57:00  03:49:00
58.+R2ex2b   03:57:00  03:52:00
59.N*8e      04:10:00  03:52:00
60.+R2b-2i!  04:10:00  04:14:00

Habu displays his famous flexibility. After pulling back the promoted rook, it
seems like white is slowing down the pace of the game to avoid rushing the attack.
However, Habu immediately moves the rook back in to go for the king. Furthermore,
it would have been an obvious choice to put the rook on 2h instead of 2i, because
this indirectly defends the silver on 3g. Habu doesn't care about this silver, he
cares about the enemy king.

61.K6h-7g    04:12:00  04:14:00
62.P*8d!     04:12:00  04:20:00

This is a great one-two combination with 60.+R2i. This invites 63.N8ex7c+, but
after Sx7c Nx7c+ N*6e the pawn on 8d becomes a great anchor for the white attack.

63.+R8ax8d   04:16:00  04:20:00

Yamasaki decides to take the pawn on 8d, but now there is another problem.

64.G*7d      04:16:00  04:24:00

This stops the king from escaping up the board. The game (and the match) is over.

65.+R8d-8a   04:20:00  04:24:00
66.P*8g      04:20:00  04:26:00
67.G7hx8g    04:26:00  04:26:00
68.N*9e      04:26:00  04:26:00
69.G8g-9f    04:32:00  04:26:00
70.P*8g      04:32:00  04:29:00
71.N8ex7c+   04:33:00  04:29:00
72.P8gx8h+   04:33:00  04:29:00
73.+N7cx7d   04:33:00  04:29:00
74.+R2ix7i   04:33:00  04:30:00
75.K7g-8f    04:33:00  04:30:00
76.L*7a      04:33:00  04:31:00
77.G*7c      04:37:00  04:31:00
78.B*8g      04:37:00  04:38:00
Resigns      04:39:00  04:38:00
White is threatening mate here with Bx7f+ etc., but black has no proper defense.
79.Kx9e leads to mate after 80.P9d, 79.+N7e fails to Lx7c and 79.B*8e or +R8e
fail to S*9d. Yamasaki resigned here, giving Habu an amazing 18th consecutive
Oza title. Not only that, he has now won five Oza matches in straight games.
Truly amazing.