57th Oza Match Game 2
[Black "Habu Yoshiharu, Oza"]
[White "Yamasaki Takayuki, Challenger"]
[Event "57th Oza-sen, Game 2"]
[Date "September 16th 2009"]
1.P7g-7f 00:00:00 00:00:00
2.P3c-3d 00:00:00 00:01:00
3.P2g-2f 00:02:00 00:01:00
4.G4a-3b 00:02:00 00:05:00
5.G6i-7h 00:05:00 00:05:00
6.P8c-8d 00:05:00 00:09:00
7.P2f-2e 00:13:00 00:09:00
8.B2bx8h+ 00:13:00 00:11:00
9.S7ix8h 00:13:00 00:11:00
10.S3a-2b 00:13:00 00:11:00
11.S3i-3h 00:25:00 00:11:00
12.S2b-3c 00:25:00 00:12:00
13.K5i-6h 00:30:00 00:12:00
14.S7a-6b 00:30:00 00:20:00
15.S8h-7g 00:34:00 00:20:00
16.P6c-6d 00:34:00 00:24:00
17.S3h-2g 00:35:00 00:24:00
18.S6b-6c 00:35:00 00:27:00
19.S2g-2f 00:36:00 00:27:00
20.P1c-1d 00:36:00 00:32:00
21.P3g-3f 00:42:00 00:32:00
22.P4c-4d 00:42:00 00:41:00
23.P3f-3e 00:43:00 00:41:00
24.S6c-5d 00:43:00 01:02:00
25.P3ex3d 00:58:00 01:02:00
26.S3cx3d 00:58:00 01:02:00
27.K6h-7i 00:59:00 01:02:00
28.G6a-5b 00:59:00 01:23:00
29.G4i-5h 01:04:00 01:23:00
30.P9c-9d 01:04:00 01:56:00
31.S2f-3g 01:59:00 01:56:00
32.G5b-4c 01:59:00 02:16:00
33.P2e-2d 02:01:00 02:16:00
34.P2cx2d 02:01:00 02:19:00
35.R2hx2d 02:01:00 02:19:00
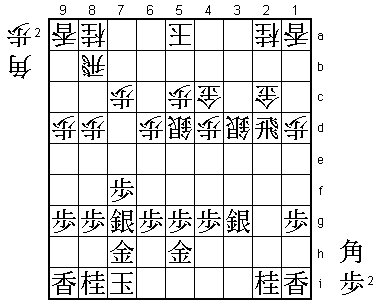
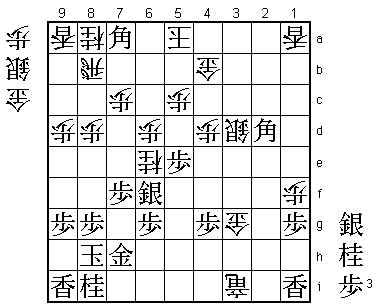
36.G3b-2c!? 02:01:00 02:50:00
Yamasaki has selected the Kakugawari opening with tempo loss in this game that
he needs to win with white to avoid going 2-0 down with three to play. It is one
of the openings where white has the best winning percentage and one of the reasons
for this we can see in this game. After 36.P*2c R2h K4b the game will become a
strategic battle, but with 36.G2c Yamasaki takes the first opportunity to use the
pawn exchange on the second file to his own advantage and start a strong counter
attack.
37.R2d-2h 02:12:00 02:50:00
38.P*2g 02:12:00 02:53:00
39.R2hx2g 02:14:00 02:53:00
40.B*3h 02:14:00 02:54:00
41.R2g-2h 02:20:00 02:54:00
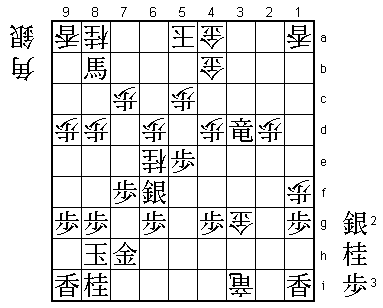
42.B3h-4i+ 02:20:00 02:54:00
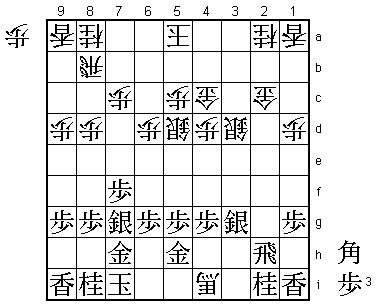
White has made a promoted bishop near the black rook and seems to have more than
enough compensation for the lost pawn. However, Habu is prepared...
43.B*1f! 02:21:00 02:54:00
Habu pulls no punches and answers Yamasaki's sharp opening play with an even sharper
counter. 44.+Bx1f is of course out of the question because it would just give black
the extra pawn, but white has a tough choice here between 44.+B3i and 44.P*2g.
44.P*2g 02:21:00 02:57:00
Yamasaki decides to throw in an extra pawn because he didn't like 44.+B3i Bx3d
+Bx2h Bx2c+ +Bx1i, but the resulting position is very hard to judge.
45.B1fx2g 02:24:00 02:57:00
46.+B4i-3i 02:24:00 02:58:00
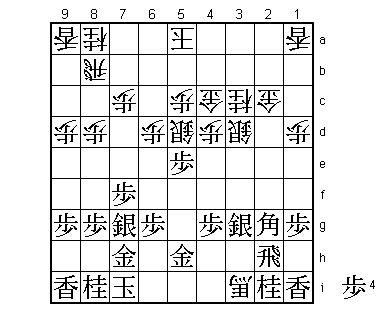
This give white the option of taking the rook on 2h at any time and keeps the
promoted bishop active, but black now has two pawns for it and more importantly,
white has no pawns in hand.
47.P5g-5f 02:26:00 02:58:00
48.N2a-3c 02:26:00 03:12:00
This threatens to break the brittle connection between rook, bishop and silver
by playing 49.N4e next, but again Habu has seen it all.
49.P5f-5e! 02:53:00 03:12:00
50.S5d-4e 02:53:00 03:46:00
Of course 50.Sx5e fails to B6c+, but the razor sharp 50.N4e seems not so clear.
After 51.Px5d Nx3g+ the whole board is on fire: Px5c+ Gx5c (+Nx2h Bx8a+!) Bx8a+
Rx8a Rx2c+ Sx2c P*5d Gx5d N*4f and even though black is without major pieces, it
looks like he can keep his attack going.
51.B2g-1f 03:22:00 03:46:00
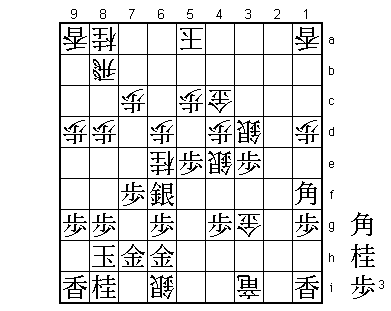
52.N3c-2e?! 03:22:00 03:48:00
Probably better was 52.+Bx2h Sx2h G2d and there is no immediate attack for either
player and white seems to have enough fighting chances in a prolonged battle.
53.R2h-2f 03:24:00 03:48:00
54.G2c-2d 03:24:00 03:50:00
55.S3g-4h 03:42:00 03:50:00
56.G2d-1e 03:42:00 03:51:00
57.S4hx3i 03:42:00 03:51:00
58.G1ex2f 03:42:00 03:51:00
59.B1f-4i 03:42:00 03:51:00
60.N2e-3g= 03:42:00 04:31:00
61.N2ix3g 03:43:00 04:31:00
62.G2fx3g 03:43:00 04:31:00
63.K7i-8h 03:43:00 04:31:00
64.R*2i 03:43:00 04:34:00
65.P*3e 03:56:00 04:34:00
66.R2ix3i+ 03:56:00 04:50:00
67.B4i-1f 03:57:00 04:50:00
68.S*6i 03:57:00 04:54:00
69.G5h-6h 04:02:00 04:54:00
70.N*6e 04:02:00 04:58:00
71.S7g-6f? 04:16:00 04:58:00
An uncharacteristic mistake by Habu. Black doesn't have time for this kind of
defense-only move.

72.P1d-1e?   04:16:00  04:58:00

Yamasaki wastes the opportunity. Here he could have added the second rook to
the attack by playing 72.R2b. Then after 73.P*2c Rx2c P*2g and only now P1e and
if the bishop on 1f is gone, there is nothing that can stop the white rook from
promoting.

73.P3ex3d!   04:19:00  04:58:00

The difference. If black plays 73.Bx3d here, white can again play R2b and get a
good position, but after 73.Px3d there is no time as we will see.

74.S6ix7h+   04:19:00  04:59:00
75.G6hx7h    04:19:00  04:59:00
76.P1ex1f    04:19:00  04:59:00
77.B*2d      04:24:00  04:59:00

After this check, white has to block the line of the rook, so this rook can
no longer move to the other side of the board.

78.B*4b      04:24:00  04:59:00
79.S*3c      04:24:00  04:59:00
80.S4ex3d    04:24:00  04:59:00
81.S3cx4b+   04:28:00  04:59:00
82.G4cx4b    04:28:00  04:59:00
83.B*7a      04:51:00  04:59:00
This bishop attacks the rook and puts pressure on the king from both sides, so
the game seems over...

84.P*2c?     04:51:00  04:59:00

And now it is over. Here Yamasaki could still have made things difficult for Habu
by playing 84.S*6i. Then after 85.Bx8b+, white can play 86.Sx7h+ Kx7h +R2h P*3h
+Rx2d and without the bishop on 2d it is not so easy to get to the white king.
Yamasaki's 84.P*2c was based on a deep, but flawed calculation.

85.B7ax8b+   04:52:00  04:59:00
86.P2cx2d    04:52:00  04:59:00
87.R*3a      04:52:00  04:59:00
88.G*4a      04:52:00  04:59:00

Here Yamasaki thought that he could play 88.G4a Rx3d+ B*6i which threatens mate
and wins because there is no mate against the white king. Here the young challenger
realized that there actually is a mate after N*6c K5b S*4c K6b +B7a K6c S*7b K7d
S7e K8e S8f!. Yamasaki in his earlier calculations had overlooked this final move,
thinking black had to play P8f followed by G8g here, which is not possible with
the bishop on 6i. In byoyomi he drops a gold on 4a, but that doesn't do anything.

89.R3ax3d+   04:52:00  04:59:00
Resigns      04:52:00  04:59:00
Threatening mate with N*6c K5b S*6a Kx6a +B7a etc. and there is no proper defense,
so Yamasaki resigned here. A game where he seems to have some chances, but Habu again
prevails as he almost always does. He is now one win away from his 18th consecutive
Oza title.