57th Oza Match Game 1
[Black "Yamasaki Takayuki, Challenger"]
[White "Habu Yoshiharu, Oza"]
[Event "57th Oza-sen, Game 1"]
[Date "September 4th 2009"]
1.P2g-2f 00:02:00 00:00:00
On the day before the start of this match, both players seemed very relaxed and
especially Yamasaki didn't give the impression of appearing in his first title
match game. However, it seemed that Habu was the one who was looking forward mostly
to this match. He played Yamasaki in the Asahi Open tournament five years ago
(winning 3-0), but a real title match encounter is a different story and Yamasaki
has long been viewed has the hope of the new generation (a role largely taken by
Ryu-O Watanabe recently). Still, in the pre-match interview Yamasaki seemed to be
in awe of Habu's incredible record of 17 consecutive Oza titles, which doesn't
seem like the right mind set to make sure that Habu doesn't get number 18...
2.P8c-8d 00:02:00 00:01:00
The furigoma led to three tokins, so challenger Yamasaki has the black pieces in
this first game. His specialty is the Ai-gakari opening, so 1.P2f is no surprise.
Habu is known to meet his challengers head-on, so it was also not a big surprise
that he answers with 2.P8d and the first game indeed develops into an Ai-gakari
opening.
3.P2f-2e 00:02:00 00:01:00
4.P8d-8e 00:02:00 00:03:00
5.G6i-7h 00:04:00 00:03:00
6.G4a-3b 00:04:00 00:05:00
7.P2e-2d 00:04:00 00:05:00
8.P2cx2d 00:04:00 00:07:00
9.R2hx2d 00:04:00 00:07:00
10.P*2c 00:04:00 00:09:00
11.R2d-2h 00:04:00 00:09:00
12.P9c-9d 00:04:00 00:14:00
13.P9g-9f 00:06:00 00:14:00
14.P3c-3d 00:06:00 00:19:00
15.S3i-3h 00:11:00 00:19:00
16.S7a-7b 00:11:00 00:27:00
17.S3h-2g 00:51:00 00:27:00
18.P8e-8f 00:51:00 00:57:00
19.P8gx8f 00:51:00 00:57:00
20.R8bx8f 00:51:00 00:57:00
21.P*8g 00:54:00 00:57:00
22.R8f-8e 00:54:00 00:59:00
23.S7i-6h 01:20:00 00:59:00
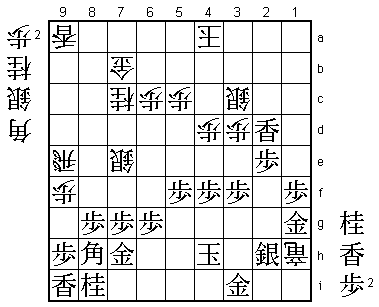
24.P9d-9e!? 01:20:00 01:57:00
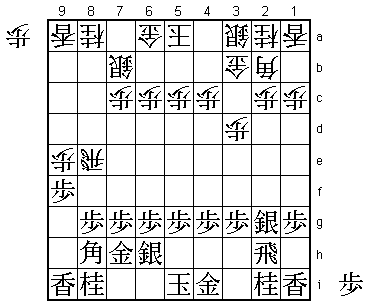
A new move that requires quite some courage as such an early edge attack can easily
be an overplay. However, Habu has some recent experience with this position, because
the position after 23.S6h is identical to the 4th game of this year's Meijin match
between Habu and Goda. Habu had the black pieces here and Goda played 24.P7d here,
but Habu must have been thinking about the possibilities of a white edge attack here.
He took quite a long time (almost an hour) to play 24.P9e, but it seems like it is
a very interesting idea.
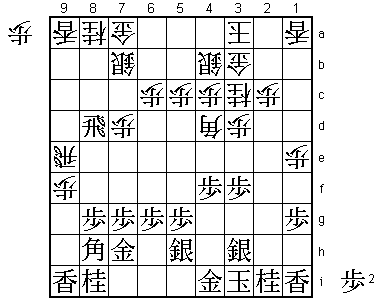
25.P9fx9e 01:34:00 01:57:00
26.P*9f 01:34:00 01:57:00
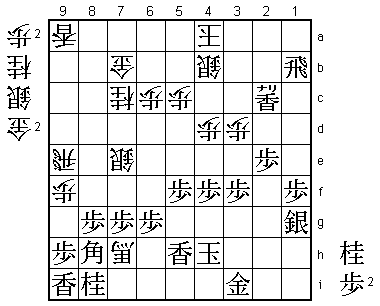
27.S2g-3h!? 02:32:00 01:57:00
Yamasaki replies with an interesting idea himself. His plan is to give white the edge,
but avoid playing P*9h as long as possible, using the extra moves to bring the rook
into play. It is hard to play 27.S3h because this silver had just been pushed up and
was supposed to become a climbing silver. The alternative here (which was preferred
by the majority of the professionals in the press room) was 27.Lx9f. However, after
28.Lx9e Lx9e Rx9e P*9g white has the clear plan of using the lance for an attack at
the head of the bishop with R9b-R8b-L*8c and it seems difficult for black to find a
good counter to that.
28.R8ex9e 02:32:00 02:24:00
29.R2h-2f 02:35:00 02:24:00
30.S3a-4b! 02:35:00 02:33:00
This is the problem. If white decides to start the fight, the black position also
has many ways to counter. However, Habu decides to quietly strengthen his position
and that is something that is not so easy for black to do. The boxed in bishop is
now becoming a liability.
31.R2f-8f 02:51:00 02:33:00
32.G6a-7a 02:51:00 02:33:00
33.K5i-4h 02:55:00 02:33:00
34.K5a-4a 02:55:00 02:34:00
35.K4h-3i 03:01:00 02:34:00
36.P1c-1d 03:01:00 02:49:00
37.R8f-8d 03:36:00 02:49:00
38.B2b-4d 03:36:00 03:07:00
39.S6h-5i 03:39:00 03:07:00
40.K4a-3a 03:39:00 03:14:00
41.S5i-5h 03:39:00 03:14:00
42.P1d-1e 03:39:00 03:24:00
43.P4g-4f 03:46:00 03:24:00
44.N2a-3c 03:46:00 03:34:00
45.P3g-3f 03:52:00 03:34:00
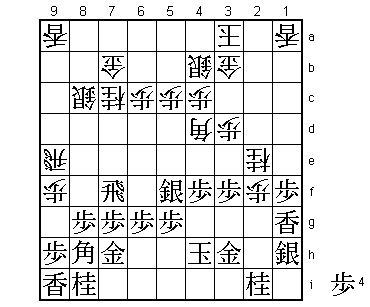
46.P7c-7d! 03:52:00 03:55:00
This move was played just after the dinner break. Yonenaga was in the playing room
when play was suspended for dinner and after the players left said to the record
keeper that P7d was the only move in this position. It takes some deep understanding
of the position to realize that 46.P7d is the right move. At first glance, it seems
that white is just giving up a pawn. However, this position is not about pawns but
about the activity of the pieces. 46.P7d allows the activation of the knight on 8a
and with both the right side knight and the left side knight ready to jump into
the fight, the white position becomes much easier to play. On the other hand, black
still is nowhere near a solution for the inactive bishop on 8h.
47.S5h-4g 04:01:00 03:55:00
48.N8a-7c 04:01:00 03:56:00
49.P*9h 04:02:00 03:56:00
Because black can take an extra pawn on 7d at any time, it is no longer important
to keep a pawn in hand, so Yamasaki finally drops a pawn to close the edge, which
takes a lot of pressure away.
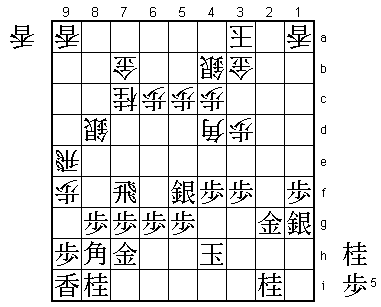
50.P1e-1f 04:02:00 04:03:00
51.P1gx1f 04:02:00 04:03:00
52.P*1g 04:02:00 04:03:00
53.S3h-2g 04:04:00 04:03:00
54.P2c-2d 04:04:00 04:03:00
55.R8dx7d 04:21:00 04:03:00
56.P2d-2e 04:21:00 04:12:00
57.L1ix1g 04:24:00 04:12:00
58.P2e-2f 04:24:00 04:13:00
Even though he didn't give an alternative, Habu regretted this move. It seems like
the black pieces are being pushed back until they drop off the board, but surprisingly
the black position is not so easy to break down.
59.S2g-1h 04:24:00 04:13:00
60.N3c-2e 04:24:00 04:22:00
61.G4i-3h 04:28:00 04:22:00
62.G7a-6b 04:28:00 04:22:00
63.K3i-4h 04:29:00 04:22:00
64.S7b-8c 04:29:00 04:30:00
65.R7d-7f 04:29:00 04:30:00
66.G6b-7b 04:29:00 04:30:00
67.S4g-5f 04:32:00 04:30:00
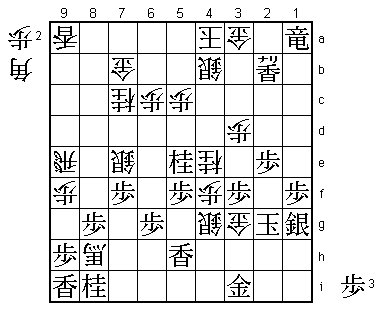
68.P2f-2g+!  04:32:00  04:37:00

This must have come as a surprise to Yamasaki. Just when it seemed that Habu was
entering another phase of strengthening his position, white suddenly starts the
attack. This sudden "shifting gears" (as it was called by Sato Yasumitsu) may
have invited the Yamasaki mistake.

69.G3hx2g    04:32:00  04:37:00
70.N2ex1g+   04:32:00  04:37:00
71.S1hx1g    04:34:00  04:37:00
72.S8c-8d    04:34:00  04:37:00
73.S5f-4e?   04:41:00  04:37:00

This is an important mistake. Habu is aiming for the black rook and even though
this rook cannot be saved, the way to give it up is vital here. Black should have
played 73.R8d here. Then, after 74.G8c Rx4d Px4d B*6a G7d P7f the position of the
white silver and gold is very bad, black has finally managed to open the bishop
diagonal and black is threatening moves like B5b+, B8c+ and Bx4d.

74.S8d-7e    04:41:00  04:37:00
75.R7f-5f    04:41:00  04:37:00
76.L*5e      04:41:00  04:37:00
77.S4ex4d    04:41:00  04:37:00
78.L5ex5f    04:41:00  04:37:00
79.P5gx5f    04:41:00  04:37:00
80.P4cx4d    04:41:00  04:37:00

The difference is clear. Black has only gotten a lance in exchange for the rook
and the white gold is still in a strong defensive position on 7b. Of course, Yamasaki
didn't play this without a plan. He thought that he could use the lance to build a
strong attack on the second file.

81.P*2c      04:41:00  04:37:00

Yamasaki's original plan was to play 81.P*2d here, but here he realized that this
would not work so well against an early escape by the white king. Here he thought
that P*2c would avoid this, but he had overlooked white's reply.

82.G3bx2c!   04:41:00  04:42:00

For some reason Yamasaki thought that this was impossible, but Habu shows that
it can be played.

83.P*2d      04:41:00  04:42:00
84.G2cx2d    04:41:00  04:42:00
85.P*2e      04:45:00  04:42:00
86.G2d-2c    04:45:00  04:43:00
87.L*2d      04:52:00  04:43:00
88.G2c-3c    04:52:00  04:44:00
89.B*2b      04:52:00  04:44:00
90.K3a-4a    04:52:00  04:44:00
91.B2bx1a+   04:52:00  04:44:00
92.R*1i?     04:52:00  04:47:00

Uncharacteristically, Habu lets Yamasaki back in. If he would have played the
early escape with 92.K5b here, this game would never have become interesting.

93.+B1ax3c   04:57:00  04:47:00
94.S4bx3c    04:57:00  04:48:00
95.S1g-2h    04:57:00  04:48:00
96.R1ix2i+   04:57:00  04:50:00
97.G*3i      04:57:00  04:50:00
98.+R2i-1h   04:57:00  04:50:00
99.G2g-1g    04:57:00  04:50:00
Now the white rook dies and the position is suddenly very close.

100.B*6i     04:57:00  04:51:00
101.L*5h     04:58:00  04:51:00
102.+R1hx1g  04:58:00  04:53:00
103.S2hx1g   04:58:00  04:53:00
104.B6ix7h+  04:58:00  04:53:00
105.L2d-2c+  04:58:00  04:53:00
106.S3c-4b   04:58:00  04:53:00
107.R*1b?    04:58:00  04:53:00
This loses quickly. Yamasaki should have played 107.R*1a here, as he himself
pointed out after the game. For example, 108.N*3a (G*3a L2b+) N*2d K5b N3b+ S5a
Rx3a+ P6d is answered by N*5e or P7f +Bx8h P7e and it seems that black has good
chances. In the post-mortem analysis it was found that the final move N*5e can
be answered by +Bx8h and P7f +Bx8h P7e by Rx7e and R7i+ next is still enough for
white, but with time running out, Yamasaki should have taken his chances with
this variation.

108.G*3a     04:58:00  04:53:00
109.P7g-7f   04:58:00  04:53:00

On the 109th move, black has finally managed to open the bishop diagonal. It is
ironic that it is actually white who can make the most use of this open diagonal.

110.P*1a     04:58:00  04:54:00
111.R1bx1a+  04:58:00  04:54:00
112.+B7hx8h  04:58:00  04:54:00
113.+L2c-2b  04:58:00  04:54:00
114.P4d-4e   04:58:00  04:56:00

The point. The white bishop on 8h now points straight into the own defense.

115.N*5e     04:58:00  04:56:00
116.P4ex4f   04:58:00  04:56:00
117.K4h-3h   04:58:00  04:56:00
118.S*4g     04:58:00  04:57:00
119.K3h-3g   04:58:00  04:57:00
120.N*4e     04:58:00  04:57:00
121.K3g-2g   04:58:00  04:57:00
122.G*3g     04:58:00  04:57:00
Resigns      04:58:00  04:57:00
Mate after 123.K1h B*2g K2i B3h+ K1h G2g K1i +B3g etc. and 123.K2f is answered by
B*4d and white takes the promoted lance on 2b next which leaves black without any
hope. Habu takes the first game of this match with the white pieces, which
immediately puts a lot of pressure on the young challenger to do the same in
game 2 or face an almost insurmountable 2-0 deficit.