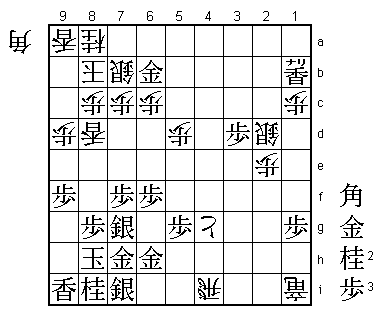
57th Osho Match Game 4
[Black "Habu Yoshiharu, Osho"]
[White "Kubo Toshiaki, Challenger"]
[Event "57th Osho-sen, Game 4"]
[Date "February 19th and 20th 2008"]
1.P7g-7f     00:00:00  00:00:00
2.P3c-3d     00:00:00  00:05:00
3.P2g-2f     00:02:00  00:05:00
4.P5c-5d     00:02:00  00:08:00
5.P2f-2e     00:10:00  00:08:00
6.R8b-5b     00:10:00  00:11:00

Like in game 2, Kubo plays the Gokigen Nakabisha.

7.B8hx2b+    00:16:00  00:11:00

This move is interestingly called the Maruyama Vaccine. One of the aims of the
Gokigen Nakabisha is to force black into an early fight. Former Meijin Maruyama
is known for his dislike of all-out fighting openings where the kings are not
properly castled. To avoid these toxic positions, where a small mistake can lead
to disaster, Maruyama came up with this early exchange of the bishop. After that,
the game will be much more strategic in nature, taking the sting out of the position.

8.S3ax2b     00:16:00  00:11:00
9.P9g-9f     00:17:00  00:11:00
10.P9c-9d    00:17:00  00:14:00
11.S7i-7h    00:20:00  00:14:00
12.K5a-6b    00:20:00  00:21:00
13.S3i-4h    00:24:00  00:21:00
14.K6b-7b    00:24:00  00:34:00
15.P4g-4f    00:30:00  00:34:00
16.K7b-8b    00:30:00  00:49:00
17.K5i-6h    00:34:00  00:49:00
18.S2b-3c    00:34:00  00:50:00
19.K6h-7i    00:39:00  00:50:00
20.R5b-2b    00:39:00  00:53:00
21.S4h-4g    00:45:00  00:53:00
22.S3c-4d    00:45:00  01:06:00
23.G4i-5h    01:07:00  01:06:00
24.S7a-7b    01:07:00  01:21:00
25.P6g-6f    01:27:00  01:21:00
26.N2a-3c    01:27:00  02:01:00
27.S7h-7g    01:49:00  02:01:00
28.G4a-4b?!  01:49:00  03:03:00

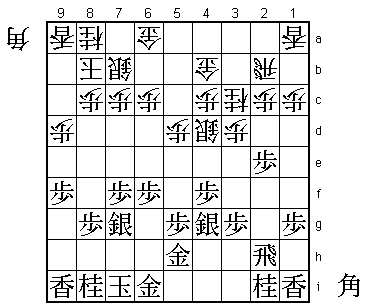
In this position, the plan R2a followed by G4b is often played. Kubo's plan is to
reverse the order of these two moves, keeping the option open of suspending R2a or
foregoing R2a altogether. A subtlety, but one that could be important. Unfortunately
for him, this new idea has far reaching consequences.

29.P2e-2d    03:21:00  03:03:00

It is still the first day of play, but after 92 minutes Habu decides to go for it.
29.G7h or 29.P3f were considered the most natural moves and Kubo will have spent most
of his time thinking about these. Opening up the game here requires deep calculation,
because black is not finished building his position yet. Of course, Kubo did see this
attack, but he didn't think it could be good.

30.P2cx2d    03:21:00  03:17:00
31.B*3a      03:21:00  03:17:00
32.R2b-3b    03:21:00  03:18:00
33.B3ax4b+   03:22:00  03:18:00
34.R3bx4b    03:22:00  03:21:00
35.R2hx2d    03:22:00  03:21:00

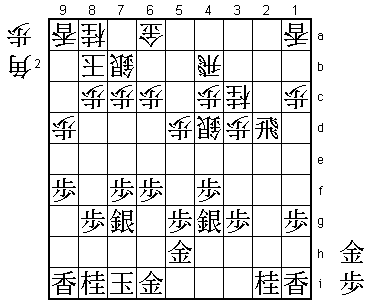
This is a forced line. Black has used the formation of G4b and R2b to sacrifice a
bishop against a gold and the threat to break through on the second file. One can
see why Kubo wasn't too concerned at first, because he is ahead in material and
there seem to be a lot of options for counter attacking here.

36.B*1b?     03:22:00  03:54:00

This is a typical move of a Furibisha player. The bishop is not only defending
against the rook promotion, but also aiming indirectly at the black king. In the
future, white can have great hopes for this bishop to work both in attack and defence.
However, in the rest of this game Habu will squash the white hopes for this bishop,
something he must have seen during the 92 minutes he spent on 29.P2d. Instead of
36.B*1b, Kubo should have played the simple 36.P*2b. Then after 37.P*2c B*1d Px2b+
S3e R2h white has the surprising Sx4f!. This is a move that even surprised Habu, but
after Sx4f P*2g Rx2g B*4i R2h B1dx5h+ Gx5h Bx5h+ Rx5h G*6g white has sacrificed a lot
of material, but the white attack cannot be stopped so easily. In the post-mortem
analysis no good defence for black was found. This doesn't mean that there isn't any,
but considering what happened in the game, Kubo admitted that this is what he should
have played.

37.P*2c      03:29:00  03:54:00
38.S4d-3e    03:29:00  04:19:00

The sealed move.

39.R2d-2h    03:44:00  04:19:00
40.P*2e      03:44:00  04:22:00
41.G*5c      03:50:00  04:22:00
42.R4b-3b    03:50:00  04:22:00
43.G5cx4c    03:50:00  04:22:00
44.B1bx2c    03:50:00  04:22:00
45.P3g-3f    03:53:00  04:22:00
46.S3e-2d    03:53:00  04:25:00
47.G4cx3b    03:53:00  04:25:00
48.B2cx3b    03:53:00  04:25:00
49.G6i-7h    03:53:00  04:25:00
50.P*4e      03:53:00  05:06:00
51.K7i-8h    03:59:00  05:06:00
52.P3d-3e    03:59:00  05:17:00

53.G5h-6h!   05:07:00  05:17:00

This is the move that the main commentator Kobayashi Hiroshi liked most. With the
pawns on the third and fourth file colliding, it seems that black has no time to
play a quiet defensive move, but Habu plays it anyway. He correctly judges that after
Px3f, black has the counter attack P*3d and Px4f Sx4f is also not a big problem.
Still, this decision also needed careful calculation, so Habu used 68 minutes for it.

54.B3b-2c    05:07:00  05:38:00
55.R*2a      05:31:00  05:38:00
56.B*1b      05:31:00  05:52:00
57.R2a-2b+   05:31:00  05:52:00
58.G6a-5a    05:31:00  06:04:00
59.+R2b-3a   06:07:00  06:04:00
60.G5a-4a    06:07:00  06:05:00
61.+R3ax1a   06:07:00  06:05:00
62.G*2a      06:07:00  06:05:00
63.+R1ax1b   06:07:00  06:05:00
64.B2cx1b    06:07:00  06:05:00

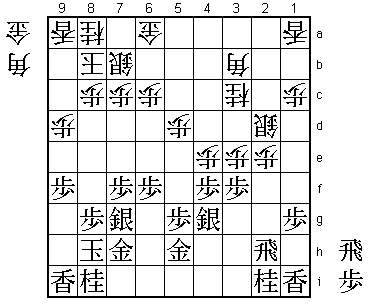
The black rook has forced the gold away from the king and the white position is now
in complete disarray. Habu has a big advantage, but he needs one more good play to win
this game.

65.P3fx3e    06:08:00  06:05:00
66.P4ex4f    06:08:00  06:16:00
67.S4gx4f    06:11:00  06:16:00
68.R*4i      06:11:00  06:21:00

Kubo finally is able to set up some kind of attack against the black king.

69.S4f-3g!   06:14:00  06:21:00

Kubo is known as the "Sabaki artist" because of his great ability to activate major
pieces in the Furibisha. Here Habu gives him a taste of his own medicine by pulling
back the silver to activate the rook on 2h.

70.P*4f?     06:14:00  06:29:00

A natural move to threaten to make a tokin on 4g, but this is the decisive mistake.
The only hope for white was 70.N4e, which is naturally answered by 71.R4h and then
white must play 72.Rx2i+ (72.Nx3g= is bad for white after 73.Rx4i Nx4i+ R*4d R*4h
Rx2d) B*5f +R3i Bx4e +Rx3g Bx1b+ +Rx4h +Bx2a. It is clear that the black king position
is much more solid than the white king position, but white still has some hope to
launch an attack here.

71.R2h-4h    06:18:00  06:29:00
72.R4ix2i+   06:18:00  06:35:00
73.R4hx4f    06:18:00  06:35:00

This rook now has found a very good file, especially with the poor white gold on 4a.

74.N*4e      06:18:00  06:38:00

It is painful to have to drop a knight here. Not only is it the only piece white
has in hand, but the combination of the knight on 3c and 4e is very ineffective
(knights should not be in each other's way like this). Still, 74.N4e also fails
to 75.S3f followed by P3d.

75.S3g-3f    06:21:00  06:38:00
76.+R2ix1i   06:21:00  06:41:00
77.P3e-3d    06:30:00  06:41:00
78.B1bx3d    06:30:00  06:42:00
79.L*3e      06:31:00  06:42:00
80.B3d-1b    06:31:00  06:44:00
81.L3ex3c+   06:33:00  06:44:00
82.P*4d      06:33:00  07:02:00
83.P*3d      06:53:00  07:02:00
84.G4a-5a    06:53:00  07:04:00
85.P*2c      07:02:00  07:04:00

The white pieces on the left side are now a sorry sight and will be captured one by one.

86.G5a-6a    07:02:00  07:04:00
87.S3fx4e    07:04:00  07:04:00
88.S2d-3e    07:04:00  07:04:00
89.R4f-1f    07:05:00  07:04:00
90.P4dx4e    07:05:00  07:04:00
91.P2c-2b+   07:06:00  07:04:00
92.P4e-4f    07:06:00  07:04:00
93.R1fx1c+   07:08:00  07:04:00
94.S*2d      07:08:00  07:04:00
95.+R1c-1d   07:10:00  07:04:00
96.G2ax2b    07:10:00  07:04:00
97.+L3cx2b   07:10:00  07:04:00
98.P*1c      07:10:00  07:05:00
99.+R1dx2d   07:10:00  07:05:00
100.S3ex2d   07:10:00  07:05:00
101.+L2bx1b  07:10:00  07:05:00
102.R*4i     07:10:00  07:05:00
103.S*7i     07:12:00  07:05:00
104.L*8d     07:12:00  07:05:00
105.B*5c     07:14:00  07:05:00
106.P4f-4g+  07:14:00  07:06:00
107.G*6b     07:20:00  07:06:00
108.G6ax6b   07:20:00  07:08:00
109.B5cx6b+  07:20:00  07:08:00
110.G*6a     07:20:00  07:08:00
111.G*5b     07:20:00  07:08:00
112.G6ax6b   07:20:00  07:09:00
113.G5bx6b   07:20:00  07:09:00
Resigns      07:20:00  07:09:00

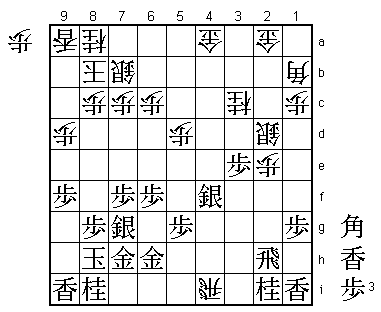
Black still has a full castle with four generals and threatens simple mate with B*7a.
The only way to defend is 114.B*7a, but after Gx7a Kx7a B*4d the black attack cannot
be stopped. Great judgment by Habu to launch an early attack when everybody else
(including Kubo) thought that this would be an overplay. His reward is a 3-1 lead
in the match and three chances to defend his Osho title.
