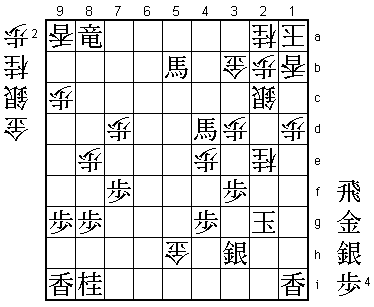
57th Osho Match Game 3
[Black "Kubo Toshiaki, Challenger"]
[White "Habu Yoshiharu, Osho"]
[Event "57th Osho-sen, Game 3"]
[Date "February 6th and 7th 2008"]
1.P7g-7f     00:00:00  00:00:00
2.P8c-8d     00:00:00  00:02:00
3.S7i-6h     00:04:00  00:02:00
4.P3c-3d     00:04:00  00:03:00
5.P6g-6f     00:04:00  00:03:00
6.S7a-6b     00:04:00  00:06:00
7.S6h-6g     00:04:00  00:06:00
8.K5a-4b     00:04:00  00:11:00
9.R2h-6h     00:05:00  00:11:00

Kubo hasn't had much success against Habu in recent games. At the start of this game,
he had lost 8 times in a row and in this Osho match he is already 2-0 down. Not only
that, he lost the first two games in the Ai-Furibisha and the Gokigen Nakabisha,
openings in which he wins most of his games recently. In this must-win situation
(if he drops this game the match is virtually over) he goes back to his old favourite,
the Fujii System of the Shikenbisha.

10.K4b-3b    00:05:00  00:13:00
11.P1g-1f    00:08:00  00:13:00
12.P5c-5d    00:08:00  00:21:00
13.S3i-3h    00:11:00  00:21:00
14.G6a-5b    00:11:00  00:34:00
15.P1f-1e    00:17:00  00:34:00
16.S6b-5c    00:17:00  00:58:00
17.G6i-5h    00:18:00  00:58:00
18.P8d-8e    00:18:00  01:16:00
19.B8h-7g    00:18:00  01:16:00
20.B2b-3c    00:18:00  01:16:00
21.P4g-4f    00:19:00  01:16:00
22.P7c-7d    00:19:00  01:17:00
23.K5i-4h    00:22:00  01:17:00
24.K3b-2b    00:22:00  01:18:00
25.P3g-3f    00:31:00  01:18:00
26.P4c-4d    00:31:00  01:23:00
27.N2i-3g    00:50:00  01:23:00
28.G5b-4c    00:50:00  01:26:00
29.P6f-6e    01:00:00  01:26:00
30.G4a-3b    01:00:00  01:28:00
31.S6g-5f    01:13:00  01:28:00

32.R8b-7b    01:13:00  01:30:00

The Fujii System was very popular a couple of years back as a counter to the Anaguma
by the Ibisha side. However, many new ways of playing for the Ibisha side have been
found and these days it is considered to be a tough opening with the white pieces and
only playable with black. The move 32.R7b is Habu's new idea. The simple plan is to
exchange pawns on the 7th file.

33.R6h-7h    01:21:00  01:30:00

The natural reply. White can no longer exchange pawns now because after 34.P7e Px7e
Rx7e N2e B2d black can play Bx4d followed by Rx7e. The point of Habu's 32.R7b is that
the black rook is now in a less active position, so that it is easier for white to
move in the Anaguma formation.

34.P2c-2d    01:21:00  02:19:00

Defends against N2e.

35.P2g-2f    01:50:00  02:19:00
36.L1a-1b    01:50:00  02:20:00
37.P2f-2e    01:54:00  02:20:00
38.K2b-1a    01:54:00  02:22:00
39.P4f-4e    02:24:00  02:22:00
40.S3a-2b    02:24:00  02:27:00

While white has moved into the Anaguma, black has set up his attack on the 2nd and
4th files. This looks threatening, but there is no immediate breakthrough, so the
opinion in the press room was that the tension would build up a little more and that
the real fighting would start on the second day.

41.P4ex4d    03:10:00  02:27:00
42.S5cx4d    03:10:00  02:59:00
43.P6e-6d    03:18:00  02:59:00
44.P6cx6d    03:18:00  03:24:00
45.R7h-6h    03:21:00  03:24:00

46.P5d-5e?   03:21:00  03:40:00

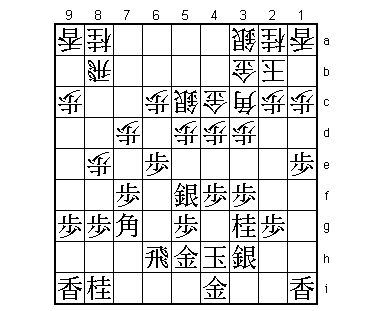
We are nearing the end of the first day of play, but here Habu makes an important
mistake that will make the second day a long one for him. It is clear that white
cannot allow Rx6d followed by the promotion of the rook. However, the simple 46.R6b
is not very appealing after 47.Px2d Bx2d S4e Sx4e Nx4e and the black attack seems
to continue. Maybe Habu was counting on 47.S4g or 47.S6g after 46.P5e, but he
definitely underestimated the power of Kubo's next move. He should have played
46.P3e instead. After 47.Rx6d Px3f R6a+ Px3g+ Sx3g R4b +Rx8a S3e white has a strong
attack. With the strong Anaguma this is more important than the material deficit.

47.S5f-4e!   03:59:00  03:40:00

The sealed move and a very strong one.

48.S4dx4e    03:59:00  03:45:00
49.N3gx4e    03:59:00  03:45:00
50.B3c-4b    03:59:00  03:45:00
51.P2ex2d    04:02:00  03:45:00
52.P*4d      04:02:00  03:47:00
53.S*2c      04:22:00  03:47:00

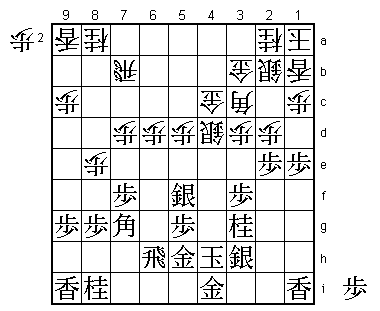
White now has a very strong attack at the weak point of the Anaguma. In the press
room a quick end to the game was expected, but Habu shows again why he is not like
anyone else.

54.S*3a      04:22:00  03:59:00
55.S2cx3b+   04:41:00  03:59:00
56.S3ax3b    04:41:00  03:59:00
57.G*2c      04:41:00  03:59:00
58.S3bx2c    04:41:00  04:19:00
59.P2dx2c+   04:42:00  04:19:00
60.S2bx2c    04:42:00  04:19:00
61.P*2d      04:44:00  04:19:00
62.B4bx2d    04:44:00  04:19:00
63.R6hx6d    04:50:00  04:19:00
64.P4dx4e    04:50:00  04:25:00
65.R6d-6a+   05:05:00  04:25:00
66.R7b-9b    05:05:00  05:10:00
67.P*2e      05:57:00  05:10:00
68.B2d-3c    05:57:00  05:58:00
69.S*2d      06:04:00  05:58:00
70.S2cx2d    06:04:00  06:00:00
71.P2ex2d    06:04:00  06:00:00
72.P*2b      06:04:00  06:00:00
73.+R6ax8a   06:10:00  06:00:00
74.B3cx2d    06:10:00  06:01:00
75.P1e-1d    06:23:00  06:01:00
76.P1cx1d    06:23:00  06:02:00
77.B7gx5e    06:25:00  06:02:00
78.S*2c      06:25:00  06:10:00
79.S*2e      06:32:00  06:10:00
80.B2d-4f    06:32:00  06:13:00

Habu has managed to ride the waves of Kubo's attack without succumbing. This game
shows how strong the Anaguma is with the proper defence, even if it is attacked at
its weakest point. Habu finally finds some time to set up some kind of attack by
himself.

81.N*3c!     06:45:00  06:13:00

Ignoring the attack on the bishop is the best move, although in the press room
there were some doubts.

82.G4cx3c    06:45:00  06:17:00
83.B5ex3c+   06:46:00  06:17:00
84.G*3b      06:46:00  06:17:00
85.+B3c-4d   06:58:00  06:17:00

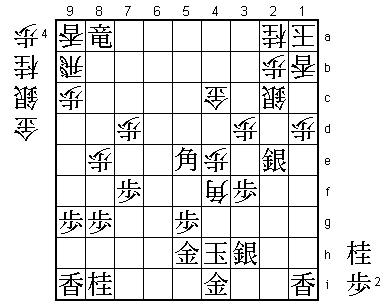
This is the reason why some in the press room thought that Kubo would again crumble
under Habu's pressure. This looks like a bad move, because white has strengthened
its defence while chasing away the promoted bishop. Therefore, it is white's turn
to attack, while black needs at least two more moves to give his attack decisive
strength.

86.P*5f      06:58:00  06:28:00
87.P*4g!     07:02:00  06:28:00

This time Kubo has calculated deep enough. White cannot move the bishop because of
P*2d, which would make the black attack unstoppable. Kubo has judged correctly that
after the bishop sacrifice on 5g, the black king is safe enough in the middle of
the board.

88.P5fx5g+   07:02:00  06:29:00
89.G5hx5g    07:02:00  06:29:00
90.B4fx5g+   07:02:00  06:29:00
91.K4hx5g    07:02:00  06:29:00
92.P*5f      07:02:00  06:29:00
93.K5gx5f    07:08:00  06:29:00
94.P*5e      07:08:00  06:29:00
95.K5f-5g    07:14:00  06:29:00
96.R9b-5b    07:14:00  06:39:00

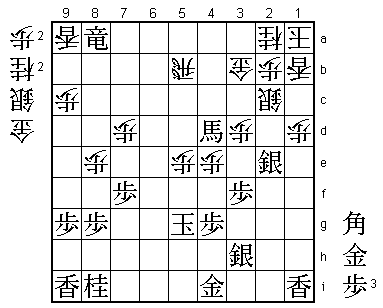
Habu has managed to bring his rook back into the attack, but Kubo has a nice counter.

97.B*4c!     07:20:00  06:39:00

This is mating threat: +Rx2a Kx2a N*3c etc. White cannot take this bishop because of
98.Gx4c +Rx2a Kx2a +Bx4c and mate again. Black wins, but Habu has one more trick upon
his sleeve.

98.P5e-5f    07:20:00  06:41:00
99.K5g-4h    07:20:00  06:41:00
100.P5f-5g+  07:20:00  06:41:00
101.K4h-3i   07:21:00  06:41:00
102.S*4h     07:21:00  07:16:00
103.G4ix4h   07:22:00  07:16:00
104.+P5gx4h  07:22:00  07:16:00
105.K3ix4h   07:22:00  07:16:00
106.G*5h     07:22:00  07:16:00
107.K4h-3g   07:27:00  07:16:00
108.N*3c     07:27:00  07:25:00
109.B4cx5b+! 07:32:00  07:25:00

Kubo avoids the final trap. Black can take the knight on 3c for free with 109.+Bx3c,
but then white can play 110.P*5a! and suddenly it is difficult to find a good way to
attack the white king. Black is probably still winning, but with limited time left
on the clock it would have been easy to make a mistake.

110.N3cx2e   07:32:00  07:25:00
111.K3g-2g   07:32:00  07:25:00
Resigns      07:32:00  07:25:00

There is no mate against the black king. Furthermore, black threatens mate after
+Rx2a Kx2a N*3c. White can defend against this with G*3a, but that would give up
all hope of attacking while the black attack cannot be stopped anyway, so Habu resigned
here. A very strong performance by Kubo. He is still 2-1 behind, but has stopped the
rot against Habu after eight consecutive losses and will feel much better about himself
going into the next game.
