57th Meijin Match Game 7
Black: Sato Yasumitsu, Meijin
White: Tanigawa Koji, Challenger
57th Meijin-sen, Game 7, June 16th and 17th 1999
1.P7g-7f           2/2          0/0

I wonder how Sato felt about the result of the furigoma. Black seems to be
an advantage for him, but in the final game of the Meijin tournament last
year, he won with white. Would it be the other way around this time?

2.P3c-3d           0/2          4/4
3.P2g-2f           4/6          0/4
4.P8c-8d           0/6          9/13
5.P2f-2e           2/8          0/13
6.P8d-8e           0/8          0/13
7.G6i-7h           0/8          0/13
8.G4a-3b           0/8          0/13
9.P2e-2d           0/8          0/13
10.P2cx2d          0/8          0/13
11.R2hx2d          0/8          0/13
12.P8e-8f          0/8          3/16
13.P8gx8f          0/8          0/16
14.R8bx8f          0/8          0/16
15.R2dx3d          0/8          0/16
16.B2b-3c          0/8          1/17
17.R3d-3f          59/67        0/17
18.S3a-2b          0/67         3/20
19.P*8g            11/78        0/20
20.R8f-8e          0/78         1/21

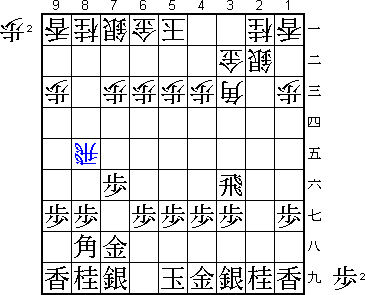
Tanigawa decides to play the popular R8e Yokofudori again. He also chose
that opening in game 2, which he lost. More importantly, however, he played
this against Sato just a couple of weeks earlier in the final game of the
Oi league. That was a convincing win and Tanigawa seems to feel pretty
comfortable in this complicated variation.

21.G4i-3h          18/96        0/21
22.K5a-4a          0/96         26/47
23.K5i-5h          0/96         0/47
24.S7a-6b          0/96         23/70
25.B8hx3c+         33/129       0/70
26.N2ax3c          0/129        7/77
27.N8i-7g          1/130        0/77
28.R8e-8b          0/130        53/130
29.R3f-2f          64/194       0/130
30.P5c-5d          0/194        44/174
31.S3i-4h          22/216       0/174
32.P7c-7d          0/216        18/192
33.S7i-6h          21/237       0/192
34.P5d-5e          0/237        12/204
35.P3g-3f          13/250       0/204

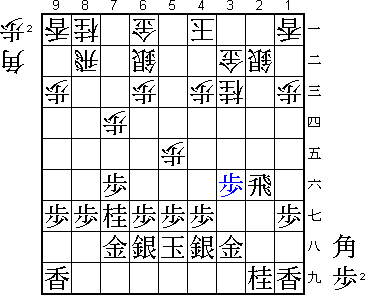
Aiming for the weak head of the white knight on 3c. If black is allowed to
play P3e-P3d, he will get a big advantage. Of course, Tanigawa does not
allow that.

36.P*2e            0/250        5/209
37.R2f-1f          4/254        0/209
38.P5e-5f!         0/254        109/318

The best move. Going for the rook with 38.P1d would not have been good after
P3e B*2f P3d.

39.P3f-3e          15/269       0/318
40.P*8f            0/269        6/324
41.P8gx8f          40/309       0/324
42.R8bx8f          0/309        1/325
43.P*8g            4/313        0/325
44.R8fx7f          0/313        0/325
45.P5gx5f          0/313        0/325
46.N3c-4e          0/313        42/367
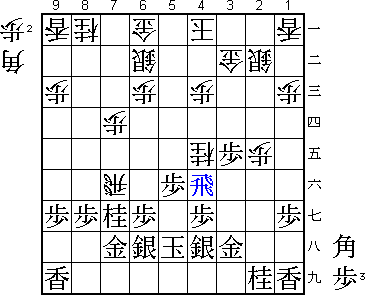
47.R1f-4f!         77/390       0/367

After the knight jump to 4e it seemed that white had a better position, but
this moves shows that it is all still unclear. White gets a silver for a
knight, but with only one pawn in hand there is no good way to continue.

48.P*5g            0/390        21/388
49.S4hx5g          1/391        0/388
50.N4ex5g+         0/391        0/388
51.S6hx5g          0/391        0/388
52.G6a-5b          0/391        1/389
53.S5g-6f          32/423       0/389
54.B*6d            0/423        9/398
55.P5f-5e          5/428        0/398
56.N8a-7c          0/428        34/432

56.P*5g is also looking good, but after Sx5g Rx4f Sx4f white has no pawns.

57.G7h-6h          33/461       0/432
58.P*8f            0/461        35/467

An alternative is the nice 58.N6e, but after the cool defence P*7h there is
nothing. White could also try the violent 58.S*7e N*8h Sx6f Nx7f Sx7g+ Nx6d
+Sx6h Kx6h Px6d R*8a P*5a Rx9a+ N6e, but after S*6f black seems to survive
the attack and his extra material will be decisive.

59.B*5d            4/465        0/467
60.R7fx6f          0/465        1/468
61.R4fx6f          15/480       0/468
62.B6dx5e          0/480        0/468
63.R*6a?           19/499       0/468

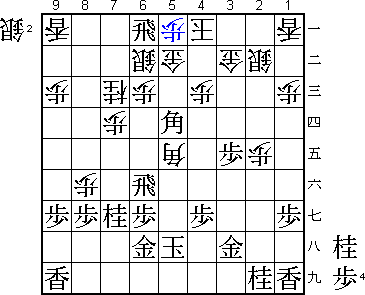
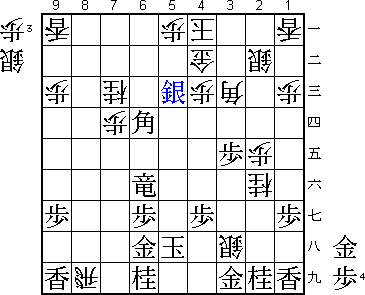
This is a mistake. Better was 63.Rx8f Bx1i+ R8a+ P*5a N3g L*5c P*5e, but
even then it is impossible to say who is better.

64.P*5a            0/499        0/468

Sato thought this pawn drop was not good and played 63.R*6a based on the
assumption that white had to play S*5a.

65.P*5c            1/500        0/468
66.S6bx5c          0/500        20/488
67.B5dx6c+         13/513       0/488

After 67.Rx6c+ S*6b black also has to retreat.

68.B5ex6f          0/513        2/490
69.+B6cx5b         0/513        0/490
70.K4ax5b          0/513        0/490
71.R6ax6f+         0/513        0/490
72.R*8i            0/513        2/492
73.N*6i            9/522        0/492
74.K5b-4a          0/522        6/498
75.P*5d?!          4/526        0/498

In the press room the variation 75.P*5b K3a Px5a+ Px8g+ +P5b K2a +Px5c
+Px7g was expected, leading to a position that is very hard to judge.

76.S5c-4b          0/526        3/501
77.B*6d            7/533        0/501
78.P8fx8g+         0/533        4/505

Tanigawa-style shogi. He is always looking for the shortest route to a win.
Sato expected 78.B*4d +Rx8f Rx9i+ Bx7c+ L*5e +Bx5e Bx5e P5c+ Sx5c L*5g,
which seems to better for black.

79.P5d-5c+         0/533        0/505
80.+P8gx7g         0/533        0/505
81.+P5cx4b         0/533        0/505
82.G3bx4b          0/533        0/505
83.+R6fx7g         0/533        0/505
84.N*2f            0/533        17/522
85.G3h-3i          2/535        0/522
86.S*3h            0/535        0/522
87.+R7g-6f         0/535        0/522
88.B*3c            0/535        4/526
89.S*5c            1/536        0/526

90.G4bx5c?         0/536        4/530

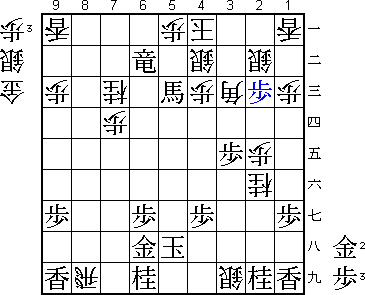
A big mistake that ends Tanigawa's hopes of getting another Meijin title. If
he would have played 90.S*3a instead, he will win. "Too quick. I thought I
was winning. Terrible." (Tanigawa)

91.B6dx5c+         0/536        0/530
92.S3hx3i=         0/536        0/530
93.+R6f-6b         1/537        0/530
94.S*4b            0/537        6/536

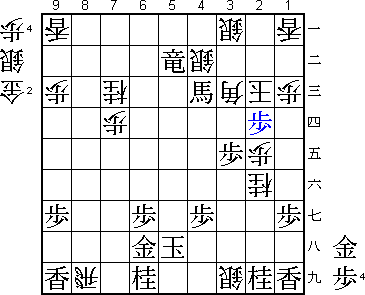
Tanigawa thought he could win here with 94.S*4i, but here he realised that
his calculations were wrong.

95.P*2c!           0/537        0/536

This is a mating threat. 96.Sx2c fails to +Rx5a and on all attacking moves
black can play +Bx4b.

96.S2b-3a          0/537        1/537
97.G*5b            0/537        0/537
98.P5ax5b          0/537        0/537
99.+R6bx5b         0/537        0/537
100.K4a-3b         0/537        0/537
101.+B5cx4c        0/537        0/537
102.K3bx2c         0/537        0/537
103.P*2d           0/537        0/537
Resigns            0/537        1/538
Time:              08:57:00     08:58:00

Tanigawa can choose between mate after 104.Bx2d +Bx3d or 104.Kx2d +R5d P*4d
+Rx4d Bx4d +Bx3d or the defenceless 104.K1d +Bx3c. He decides to resign.

A lucky win for Sato, who showed great mental strength to get back from
3-2 down by winning two gruelling games. Also, he cleared another
psychological barrier by defending a title. The previous title he held
(Ryu-O) he lost the next year. For Tanigawa, this must be a disappointing
loss. However, he has shown in the past that he has the ability to quickly
forget a match like this and get on with business at hand. He is 1-0 up
in the Kisei match against Goda and also in the running for the Oi title.
I do not think Tanigawa will be without a title for long.
