57th Meijin Match Game 6
Black: Sato Yasumitsu, Meijin
White: Tanigawa Koji, Challenger
57th Meijin-sen, Game 6, June 7th and 8th 1999
1.P7g-7f 2/2 0/0
2.P3c-3d 0/2 2/2
3.P2g-2f 2/4 0/2
4.P4c-4d 0/4 3/5
5.P2f-2e 2/6 0/5
6.B2b-3c 0/6 0/5
7.S3i-4h 0/6 0/5
8.R8b-4b 0/6 5/10
9.P5g-5f 2/8 0/10
10.S7a-7b 0/8 6/16
11.K5i-6h 2/10 0/16
12.P9c-9d 0/10 4/20
13.K6h-7h 5/15 0/20
14.S3a-3b 0/15 4/24
15.G4i-5h 5/20 0/24
16.P9d-9e 0/20 8/32
17.S4h-5g 6/26 0/32
18.S3b-4c 0/26 7/39
19.P3g-3f 15/41 0/39
20.K5a-6b 0/41 6/45
21.B8h-7g 2/43 0/45
22.K6b-7a 0/43 8/53
23.K7h-8h 3/46 0/53
24.K7a-8b 0/46 9/62
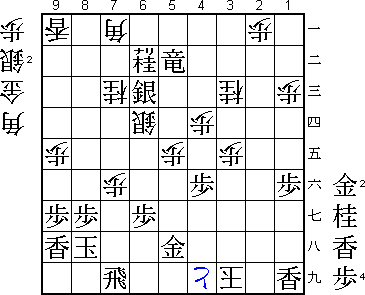
25.L9i-9h 20/66 0/62
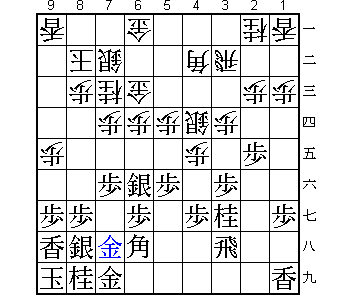
To keep his Meijin title, Sato needs to win this game. With that much at
stake, he turns back to his specialism, the Ibisha Anaguma against Tanigawa's
4th File Rook. In game 4 he tried to surprise Tanigawa by playing the S5g
Quick Attack, but that turned out to be a mistake.
26.R4b-3b 0/66 68/130
This is a well-known variation. White aims for a quick attack after 27.K9i
P3e Px3e P4e. However, Sato has something prepared for this.
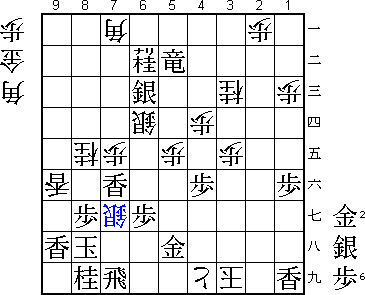
27.S5g-6f! 24/90 0/130
This, followed by B6h next, takes away all the danger of the quick attack.
28.B3c-4b 0/90 15/145
29.B7g-6h 24/114 0/145
30.G4a-5b 0/114 2/147
31.K8h-9i 1/115 0/147
32.P5c-5d 0/115 20/167
33.S7i-8h 7/122 0/167
34.P4d-4e 0/122 33/200
35.N2i-3g 43/165 0/200
36.S4c-4d 0/165 67/267
37.R2h-3h 7/172 0/267
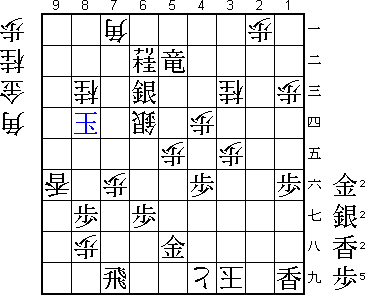
38.P6c-6d 0/172 52/319
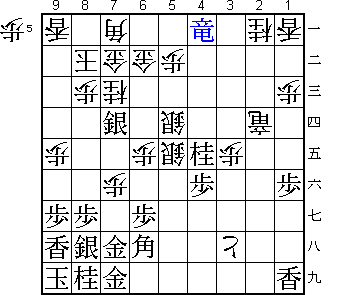
Admitting the strategic defeat. By slowing down the pace of the game, Tanigawa
admits that there is no way to continue his attack. He could have tried the
attack 38.P3e Px3e B1e, but after R3i B2f P2d Px2d R2i or even the simple
G7i B2f Nx4e Sx4e P4f, black has a big advantage. After 38.P6d, black gets
the time to complete his Anaguma and all white can do is see how it happens.
Black is already much better here.
39.G6i-7i 12/184 0/319
40.G5b-6c 0/184 1/320
41.G5h-5i 13/197 0/320
42.P7c-7d 0/197 3/323
43.G5i-6i 0/197 0/323
44.N8a-7c 0/197 4/327
45.G6i-7h?! 4/201 0/327
Not the best move. Better would have been 45.P2d Px2d P4f Px4f R4h, and
after the only white attack P6e S6f-7g B5c, black can just play Bx4f.
Aono, 9-dan, thinks that black does not have to hurry G6i-7h. He can
play it later when the time is right.
46.P6d-6e 0/201 29/356
47.S6f-7g 11/212 0/356
48.P5d-5e 0/212 4/360
49.P5fx5e 66/278 0/360
50.S4dx5e 0/278 0/360
51.P2e-2d 30/308 0/360
52.P2cx2d 0/308 2/362
53.R3h-2h 0/308 0/362
54.R3b-2b 0/308 37/399
55.P*2e 4/312 0/399
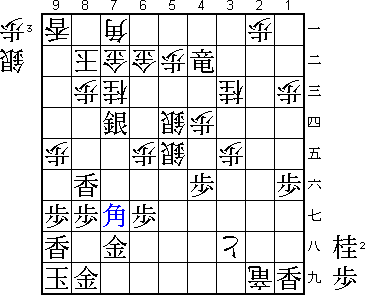
56.B4b-5c! 0/312 0/399
A good defence that Sato might have underestimated. Black now finds it hard
to continue and the game is now about whether or not black can keep his
attack going. Black's king position is much stronger, but he is out of
pawns soon, so it is far from easy.
57.P2ex2d 1/313 0/399
58.P*2f 0/313 0/399
59.P3f-3e 39/352 0/399
60.P*5g 0/352 30/429
61.B6hx5g 16/368 0/429
62.P4e-4f 0/368 0/429
63.P4gx4f 37/405 0/429
64.B5cx3e 0/405 3/432
65.N3g-4e 0/405 0/432
66.R2bx2d 0/405 7/439
67.R2h-3h 4/409 0/439
68.B3e-7a 0/409 28/467
69.P*2e 4/413 0/467
70.R2d-1d 0/413 0/467
71.P*5d 12/425 0/467
72.P2f-2g+ 0/425 1/468
73.P5d-5c+ 2/427 0/468
74.+P2gx3h 0/427 1/469
75.+P5cx6c 0/427 0/469
76.S7bx6c 0/427 0/469
77.P*5d 3/430 0/469
78.P*5b 0/430 13/482
79.P1g-1f 4/434 0/482
80.P3d-3e 0/434 2/484
81.G*2d 0/434 0/484
82.R*2g 0/434 2/486
83.B5g-6h 6/440 0/486
84.R1dx2d 0/440 0/486
85.P2ex2d 0/440 0/486
86.R2gx2d+ 0/440 0/486
87.P7f-7e 6/446 0/486
88.P7dx7e 0/446 0/486
89.S7g-8f 0/446 0/486
90.P7e-7f 0/446 8/494
91.S8f-7e 2/448 0/494
92.G6a-7b 0/448 5/499
93.R*6a 12/460 0/499
94.S6cx5d 0/460 2/501
95.S7e-7d 7/467 0/501
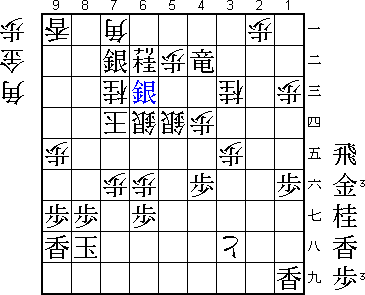
96.G*6b? 0/467 11/512
A bad move that gives black the clear advantage again. It is vital that
white removes the silver on 7d, which is the stronghold for black's attack.
Therefore, 96.G*6c Sx6c+ Sx6c was necessary, answering B8f next with S*6d.
Now white's pieces are working well and black will find it hard to find any
holes in the defence. 96.G*6b blocks the white bishop, which can now
only look on helplessly.
97.R6a-4a+ 10/477 0/512
98.P*4d?           0/477        9/521

Could have been the losing move. Shukan Shogi does not give an alternative
here though.

99.N4e-3c=?!       11/488       0/521

Keeps it complicated. After 99.B8f instead, white would be quickly lost
after 100.Px4e B4b+ +R4d Px4e +Rx4e P*4c. Still, after 99.N3c=, black also
keeps his advantage.

100.N2ax3c         0/488        0/521
101.+R4ax1a        0/488        0/521
102.P*2a           0/488        1/522
103.+R1a-1b        0/488        0/522
104.+R2d-2i        0/488        7/529
105.+R1b-4b        7/495        0/529
106.N*7g           0/495        2/531
107.L*8f!          4/499        0/531

Keeps up the pressure. Black is still winning.

108.N7gx8i+        0/499        2/533
109.G7ix8i         1/500        0/533
110.N*7g           0/500        0/533
111.S8hx7g         13/513       0/533
112.P7fx7g+        0/513        0/533
113.B6hx7g?        2/515        0/533
A bad move that makes the game suddenly very close. Tanigawa said after
the game that he had already given up hope here. Rightly so, if Sato would
have taken with the gold here. After 113.Gx7g P*7f N*7e S*9d Gx7f white
has no more moves. Also, with the gold in this high position, white's king
can not escape like in the game. However, objectively black still can win
after 113.Bx7g.

114.P*7f           0/515        0/533

This nasty pawn make life very hard for black.

115.N*7e           9/524        0/533
116.S*9d           0/524        0/533
117.B7g-6h         1/525        0/533
118.S5e-6d         0/525        0/533
119.N7ex8c+        4/529        0/533
120.S9dx8c         0/529        0/533
121.S7dx8c+        0/529        0/533
122.G7bx8c         0/529        0/533
123.N*7d           0/529        0/533
124.K8b-9c         0/529        0/533
125.L8fx8c+        0/529        0/533
126.K9cx8c         0/529        0/533
127.N7dx6b+        0/529        0/533
128.N*7g           0/529        1/534
129.S*7b           3/532        0/534
130.K8c-7d         0/532        1/535
131.G8i-7i         0/532        0/535
132.+R2ix7i        0/532        3/538
133.G7hx7i         0/532        0/538
134.G*8i           0/532        0/538
135.G7ix8i         0/532        0/538
136.N7gx8i+        0/532        0/538
137.K9ix8i         0/532        0/538
138.P*8h           0/532        0/538
139.K8i-7i         0/532        0/538
140.L*7g           0/532        0/538
141.P*7h           2/534        0/538
142.L7gx7h+        0/534        0/538
143.K7ix7h         0/534        0/538
144.S*7g           0/534        0/538
145.B6hx7g         0/534        0/538
146.P7fx7g+        0/534        0/538
147.K7hx7g         0/534        0/538
148.P*7f           0/534        0/538
149.K7gx8h?!       4/538        0/538

Much safer would have been either 149.K6h or 149.K7h.

150.P6e-6f         0/538        0/538
151.S*6c?          1/539        0/538
A blunder that could have cost Sato his Meijin title. Black loses his cool
here and decides to play for a mate that is not there. 151.G*5f is still
winning since white has no mate.

152.S5dx6c         0/539        0/538
153.S7bx6c=        0/539        0/538
154.K7d-6e         0/539        0/538
155.P6gx6f         0/539        0/538
156.K6ex6f         0/539        0/538
157.P*6g           0/539        0/538
158.K6f-5g         0/539        1/539
159.S*6h           0/539        0/539
160.K5gx6h         0/539        0/539
161.R*7h           0/539        0/539
162.K6h-5i         0/539        0/539
163.+R4bx5b        0/539        0/539
164.P*5e           0/539        0/539
165.G*5h           0/539        0/539
166.K5i-4i         0/539        0/539
167.G*4h           0/539        0/539
168.K4i-3i         0/539        0/539
169.R7h-7i         0/539        0/539
170.G*4i           0/539        0/539
171.G4hx4i         0/539        0/539
172.+P3hx4i        0/539        0/539
White has escaped from the checks and enough material to finish off black's
king. Sato must have felt really bad here.

173.R7ix7f         0/539        0/539

If resignation would not have cost him his Meijin title, Sato might have
bowed his head here. He will be very glad he decided to play on for a while
in this desperate situation.

174.N7c-8e         0/539        0/539
175.N*8i           0/539        0/539
176.P*7e           0/539        0/539
177.R7f-7i         0/539        0/539
178.P9e-9f         0/539        0/539
179.P9gx9f         0/539        0/539
180.S*7f?          0/539        0/539

In byoyomi Tanigawa does not find the right path to the win. 180.Lx9f Lx9f
S*9g Nx9g S*7g would have been winning.

181.L*7h           0/539        0/539
182.L9ax9f         0/539        0/539
183.L7hx7f         0/539        0/539
184.S*7g??         0/539        0/539
A blunder. 184.B*7g instead and white wins.

185.N8ix7g         0/539        0/539
186.L9fx9h+        0/539        0/539
187.K8hx9h         0/539        0/539
188.L*9a           0/539        0/539
189.P*9f           0/539        0/539
190.L9ax9f         0/539        0/539
191.K9h-8i         0/539        0/539
192.P*8h           0/539        0/539
193.K8i-7h         0/539        0/539
194.N8ex7g+        0/539        0/539
195.K7hx7g         0/539        0/539
196.P7ex7f         0/539        0/539
197.K7g-8f         0/539        0/539
198.L*8a           0/539        0/539
199.N*8d           0/539        0/539
200.L8ax8d         0/539        0/539
201.K8f-9e         0/539        0/539
202.N*8c           0/539        0/539
203.K9ex8d         0/539        0/539
Resigns            0/539        0/539
Time:              08:59:00     08:59:00
A game with everything that shogi has to offer. Fine opening play followed
by a long fight where chances change a couple of times before the final
result. This game will go down in history as one of the hardest fought
battles in Meijin history, ending just before 12 o'clock. (NB: the first
game of this match ended at 5:30 in the afternoon.) Even though Sato had
the better chances for most of the game, he is lucky that he gets another
chance. Just like last year, the Meijin match will be decided in the final
game.