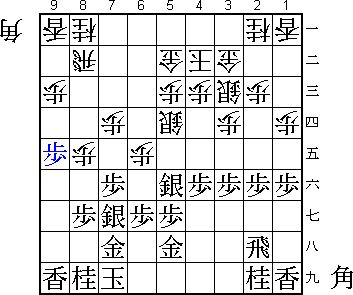
57th Meijin Match Game 5
Black: Tanigawa Koji, Challenger
White: Sato Yasumitsu, Meijin
57th Meijin-sen, Game 5, May 27th and 28th 1999
1.P7g-7f 0/0 0/0
2.P8c-8d 0/0 6/6
Stubborn or brave? In the combined Meijin matches of 1998 and 1999 Sato has
lost four consecutive games against the Kakugawari opening. On the other
hand, he won both game 1 and 2 of this match with the Yokofudori opening.
Still, Sato again elects to try his luck against Tanigawa's speciality.
3.P2g-2f 14/14 0/6
Tanigawa must have been surprised, since he took 14 minutes for this move.
His opening preparation will have been against the Yokofudori.
4.G4a-3b 0/14 6/12
5.G6i-7h 1/15 0/12
6.P8d-8e 0/15 0/12
7.B8h-7g 1/16 0/12
8.P3c-3d 0/16 0/12
9.S7i-8h 1/17 0/12
10.S3a-4b 0/17 4/16
11.B7gx2b+ 6/23 0/16
12.G3bx2b 0/23 0/16
13.S8h-7g 0/23 0/16
14.G2b-3b 0/23 4/20
15.S3i-3h 2/25 0/20
16.S7a-7b 0/25 1/21
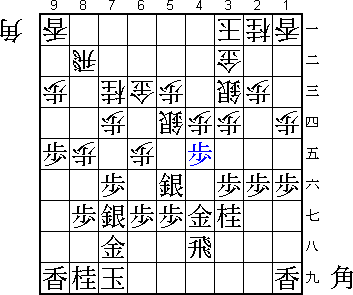
17.P9g-9f 16/41 0/21
18.S4b-3c 0/41 9/30
This is Sato's plan. By not answering the pawn push on the edge, he hopes
to give himself time to strengthen his position.
19.P4g-4f 26/67 0/30
20.P6c-6d 0/67 18/48
21.S3h-4g 9/76 0/48
22.S7b-6c 0/76 0/48
23.G4i-5h 3/79 0/48
24.K5a-4b 0/79 14/62
25.K5i-6h 11/90 0/62
26.S6c-5d 0/90 10/72
27.K6h-7i 15/105 0/72
28.G6a-5b 0/105 7/79
29.S4g-5f 15/120 0/79
30.P1c-1d 0/120 87/166
31.P1g-1f 11/131 0/166
32.P7c-7d 0/131 0/166
33.P3g-3f 29/160 0/166
34.P6d-6e 0/160 15/181
35.P9f-9e?! 22/182 0/181
Asks the theoretically interesting question: is black's extension on the edge
more important than the extra time white gets for piece development. Sato
wants to make these two moves on the edge a waste of time. If this game is
a good indication, white might indeed have the advantage after the double
pawn push.
36.N8a-7c 0/182 75/256
37.N2i-3g 8/190 0/256
38.G5b-6c 0/190 4/260
39.G5h-4g 38/228 0/260
40.K4b-3a 0/228 46/306
41.R2h-4h 73/301 0/306
42.P4c-4d 0/301 22/328
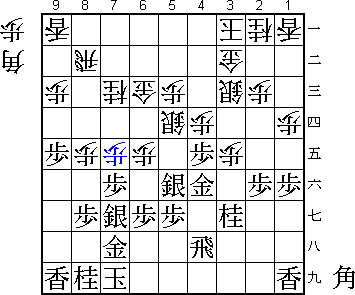
43.P4f-4e?! 20/321 0/328
It is probably better to wait. Black seems to be overextending his position
with this early attack.

44.B*6d        0/321      28/356
45.P3f-3e      43/364     0/356
46.P3dx3e      0/364      14/370
47.B*4f        0/364      0/370
48.B6dx4f      0/364      32/402
49.G4gx4f      0/364      0/402

Moving up this gold seems to help black's attack, but there are too many holes
in black's position. Moves like B*5i and B*3i make this a dangerous position
for black. "I want to have white", was one of the comments heard in the press
room.

50.P7d-7e      0/364      5/407
51.P7fx7e      11/375     0/407
52.P8e-8f      0/375      2/409
53.S7gx8f      25/400     0/409
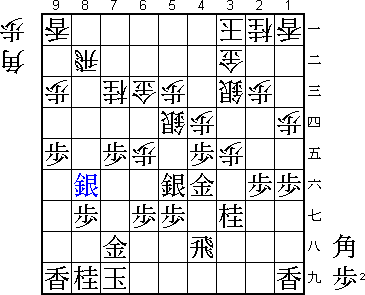
54.B*5i?       0/400      40/449

A bad move that turns the position around. After 54.P*7g instead, white has
very good chances. For example, 55.Sx7g N8e S8f Px4e Nx4e B*3g R4g B5i+.
The difference between a promoted and an unpromoted bishop on 5i is huge.
Also, the black rook no longer helps sideways in defence.

55.R4h-3h      17/417     0/449
56.P4dx4e      0/417      0/449
57.N3gx4e      1/418      0/449
58.P*7g        0/418      42/491

A change of plan and that is almost never a good sign. Sato had planned to
play 58.P*8h, but realised that after Kx8h Sx4e Gx4e N*7f K9h P*8h
Gx8h Nx8h+ Kx8h G*7f S*7g he can not continue his attack and the black
counter attack will be devastating.

59.G7hx7g      26/444     0/491
60.S3c-4d      0/444      1/492
61.P*3c        2/446      0/492
62.N2ax3c      0/446      6/498
63.N4ex3c+     1/447      0/498
64.S4dx3c      0/447      4/502
65.N*2e        0/447      0/502
66.N*6d!       0/447      5/507
Good try. Black hopes to get the knight on 2e in hand so that he can drop it
on 7f.

67.G7g-7h!     34/481     0/507

Tanigawa realises the danger and turns to defence. Like in game 3, the man
famous for his attacking skills shows Oyama like defence.

68.B5ix2f+?    0/481      21/528

Moves the bishop away from the king and that ends all white's hopes of attack.
Best would have been to play a waiting move in reply to black's waiting move.
After 68.K4b, black still has to find a way to win.

69.N2ex3c+     2/483      0/528
70.G3bx3c      0/483      0/528
71.P7e-7d      0/483      0/528
72.N6dx5f      0/483      2/530
73.P7dx7c+     3/486      0/530
74.R8b-4b      0/486      7/537
75.P*4e        25/511     0/537
76.N*7f        0/511      0/537
77.P5gx5f      0/511      0/537
78.+B2f-5i     0/511      1/538
79.S*7g        4/515      0/538
Perfect until the end. White's last hope was 79.S7g?, after which 80.P*8h
Sx7f Px8i+ Kx8i P*7g gives white good chances win.

80.S5dx4e      0/515      1/539
81.S7gx7f      1/516      0/539
82.S4ex4f      0/516      0/539
83.N*2e        1/517      0/539
84.G3c-3d      0/517      0/539
85.+P7cx6c     0/517      0/539
86.S4f-5g=     0/517      0/539
87.P*3c        0/517      0/539
88.G3dx2e      0/517      0/539
89.N*3d        2/519      0/539
Resigns        0/519      0/539
Time:          08:39:00   08:59:00
There is no good defence against the mating threat Nx4b+ Kx4b R*3b K4c B*5b
K4d G*5e.

A strange match with Tanigawa winning three straight games after being
humiliated in game 1 and game 2. Can Sato show the same mental strength
and keep his Meijin title by winning the final two games?