57th Meijin Match Game 4
Black: Sato Yasumitsu, Meijin
White: Tanigawa Koji, Challenger
57th Meijin-sen, Game 4, May 19th and 20th 1999
1.P2g-2f           1/1          0/0
2.P3c-3d           0/1          11/11
3.P7g-7f           1/2          0/11
4.P4c-4d           0/2          1/12
5.P2f-2e           5/7          0/12
6.B2b-3c           0/7          0/12
7.S3i-4h           0/7          0/12
8.R8b-4b           0/7          9/21

This was as expected. After the disaster in game 2, Tanigawa would probably
not try the Yokofudori again in this vital game. He needs to win or this match
is virtually over.

9.P5g-5f           4/11         0/21
10.S7a-7b          0/11         7/28
11.K5i-6h          7/18         0/28
12.P9c-9d          0/18         2/30
13.P9g-9f          5/23         0/30
14.S3a-3b          0/23         11/41
15.K6h-7h          0/23         0/41
16.G4a-5b          0/23         29/70
17.G4i-5h          3/26         0/70
18.P6c-6d          0/26         6/76
19.P3g-3f          22/48        0/76
20.K5a-6b          0/48         10/86
21.S7i-6h          4/52         0/86
22.K6b-7a          0/52         7/93
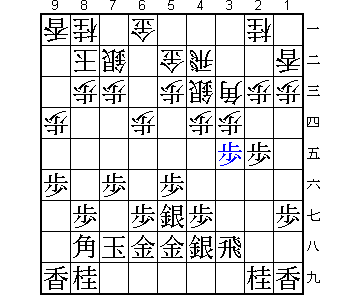
23.S6h-5g          3/55         0/93

A big surprise. Sato is known as an Anaguma specialist, but instead chooses
a Quick Fight here. At professional level this is not considered very
dangerous for the Furibisha side, but Sato shows that there are still all
kinds of variations that might deserve further study.

24.K7a-8b          0/55         10/103
25.G6i-6h          56/111       0/103
26.L1a-1b          0/111        57/160
27.R2h-3h          11/122       0/160
28.S3b-4c          0/122        22/182
29.P3f-3e          84/206       0/182

This is a very straightforward way to start the middle game fight. It is
one of the main variations of the Saginomiya Joseki, which has been studied
deeply by Aono. With the pawns on the first file pushed, there are two
examples of professional games with this position. Both were won by the
Furibisha side. Without the pawns pushed, there have been no previous
game examples.

30.P3dx3e          0/206        40/222
31.S5g-4f          4/210        0/222
32.P4d-4e          0/210        19/241
33.B8hx3c+         2/212        0/241
34.N2ax3c          0/212        0/241
35.S4fx3e          0/212        0/241
36.N3cx2e          0/212        6/247
37.P*3d            81/293       0/247
38.R4b-3b          0/293        13/260
39.R3h-3f          0/293        0/260

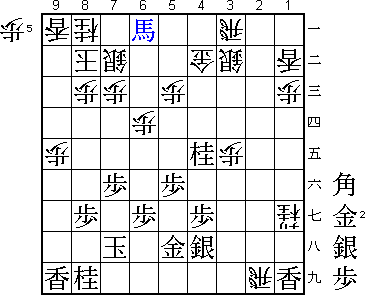
39.R2h also looks good, but after 40.Sx3d Sx3d Rx3d Rx2e P2d Rx4e P*4d P*3e
Px4e Px3d R*2g black is without pawns, which seems to be an important problem
in this position.

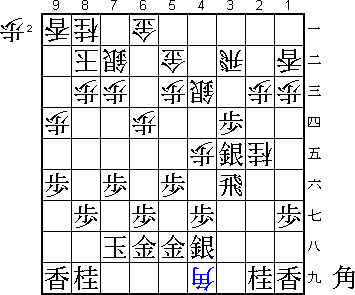
40.B*4i?!          0/293        124/384

Sato was surprised by this move. He expected 40.B*2h, which seems to be better.

41.B*1h!           42/335       0/384

With the pawns pushed on the first file, this would not be so good because
of the possible counter attack P1e. Here, this is no problem and white has
to give up the bishop. Black seems to be better here, but the situation is
not that simple.

42.B4ix5h+         0/335        41/425
43.G6hx5h          0/335        0/425
44.G5b-4b          0/335        0/425
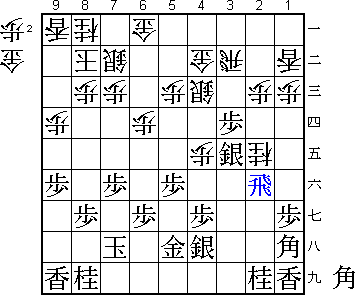
45.R3f-2f?         36/371       0/425

This gives away the advantage. It looks good, since it defends against G*2h,
while attacking the knight on 2e at the same time. However, Sato overlooked
Tanigawa's nasty defence. The right move was 45.B*5e to defend against G*2h.
Then, after 46.P*3c Px3c+ Gx3c P*3d black is better.

46.G*2d!           0/371        9/434

This move looks terrible, but in fact stops all black attacking possibilities.
White now gets the upper hand.

47.S3ex2d          64/435       0/434
48.P2cx2d          0/435        0/434
49.P9f-9e          0/435        0/434
50.P9dx9e          0/435        1/435
51.N2i-3g          0/435        0/435
52.S4cx3d          0/435        30/465
53.N3gx4e          3/438        0/465
54.N2ex1g+         0/438        1/466
55.R2fx2d          16/454       0/466
56.S*2c!           0/454        5/471

Another bad looking move that is actually very good. This silver drop keeps
the pressure on the black position.

57.R2dx2c+         9/463        0/471
58.S3dx2c          0/463        0/471
59.P*3c            0/463        0/471
60.R3b-3a          0/463        1/472
61.B1h-3f          2/465        0/472
62.P*3e            0/465        4/476
63.B3f-2e          6/471        0/476
64.R*2i            0/471        2/478
65.P3c-3b+         13/484       0/478
66.S2cx3b          0/484        3/481
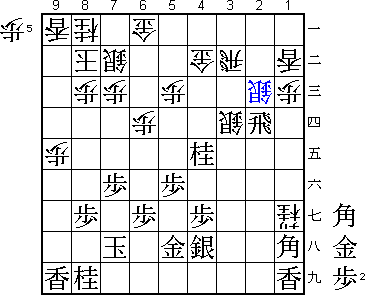
67.B2ex6a+?        1/485        0/481

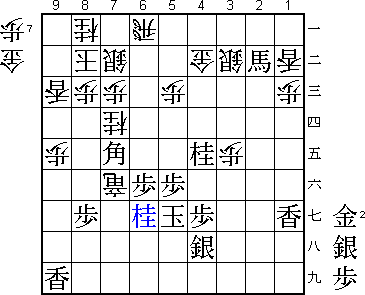
There goes the last fighting chance. Sato did not like it, but 67.Nx5c+ Gx5c
B*4b Rx2e+ (R5a Bx6a+ Rx6a Bx5c+ wins for black) Bx3a+ G5c-5b Lx1g was the
only way to stay in the game.

68.R3ax6a          0/485        0/481
69.L1ix1g          1/486        0/481
70.B*6i            0/486        3/484
71.K7h-6h          0/486        0/484
72.B6ix5h+         0/486        1/485
73.K6hx5h          0/486        0/485
74.R2ix8i+         0/486        0/485
75.B*6f            3/489        0/485

Also, 75.P*9c +R7h (Lx9c? B*6f followed by Bx9c+ gives black good chances) G*6h
N6f K5g G*5h K4f +Rx6h N*9d K7a is not enough for black.

76.N*7d            0/489        4/489
77.B6f-2b+         19/508       0/489
78.P6d-6e          0/508        2/491
79.P*9c            0/508        0/491
80.L9ax9c          0/508        2/493
81.B*7e            15/523       0/493
82.P6e-6f          0/523        8/501
83.P6gx6f          0/523        0/501
84.+R8i-7h         0/523        1/502
85.K5h-5g          0/523        0/502
86.+R7hx7f         0/523        0/502
87.N*6g            10/533       0/502

88.R6ax6f!         0/533        15/517

A great ending. The simple 88.G*7g? would have lead to disaster after 89.K4f
Gx6g Bx5c+. After some good defence earlier in the game, Tanigawa now again
shows us his great attacking skills.

89.B7ex6f          1/534        0/517
90.N7dx6f          0/534        0/517
91.+B2bx6f         0/534        0/517
92.B*7i            0/534        1/518
93.P*6h            0/534        0/518
94.+R7fx6f         0/534        0/518
95.K5gx6f          0/534        0/518
96.B7ix6h+         0/534        0/518
97.R*6d            5/539        0/518
98.B*8h            0/539        3/521
99.K6f-6e          0/539        0/521
100.P*6c           0/539        0/521
Resigns            0/539        0/521
Time:              08:59:00     08:41:00

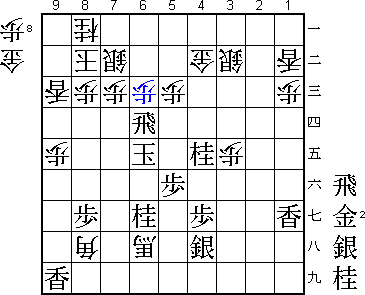
Black has a lot of material, but no chance of a mate. On the other hand,
white's king is being attacked from the top and the bottom and has no
place to go.

Sato might have won the opening battle in this game, but after that he
was outplayed by Tanigawa. Tanigawa is now in the driving seat, showing
his great mental strength after being crushed in game one and two.
