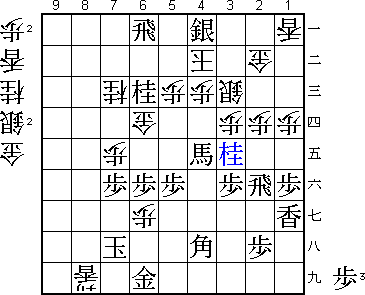
57th Meijin Match Game 3
Black: Tanigawa Koji, Challenger
White: Sato Yasumitsu, Meijin
57th Meijin-sen, Game 3, May 6th and 7th 1999
1.P7g-7f           0/0          0/0
2.P8c-8d           0/0          9/9
3.P2g-2f           5/5          0/9
4.G4a-3b           0/5          20/29

Sato takes up the challenge. In game 1 he chose 4.P3d, resulting in a
Yokofudori opening. Despite being very successful with a win in only 66
moves, he decides to try his luck against the Kakugawari this time. Last
year, he lost all three games played with this opening in the Meijin match
against Tanigawa. What did he prepare at home?

5.G6i-7h           3/8          0/29
6.P8d-8e           0/8          1/30
7.B8h-7g           2/10         0/30
8.P3c-3d           0/10         0/30
9.S7i-8h           0/10         0/30
10.B2bx7g+         0/10         0/30
11.S8hx7g          0/10         0/30
12.S3a-4b          0/10         0/30
13.S3i-3h          5/15         0/30
14.S7a-7b          0/15         0/30
15.P9g-9f          6/21         0/30
16.P9c-9d          0/21         12/42
17.P3g-3f          8/29         0/42
18.S4b-3c          0/29         12/54
19.P4g-4f          26/55        0/54
20.K5a-4b          0/55         12/66
21.S3h-4g          24/79        0/66
22.P6c-6d          0/79         14/80

Sato opts for the defensive Koshikakegin (Reclining Silver) instead of the
aggressive Bogin (after 22.S8c). His comments after the game seem to indicate
that he is convinced that defence is the best way to proceed here.

23.G4i-5h          6/85         0/80
24.S7b-6c          0/85         2/82
25.K5i-6h          3/88         0/82
26.S6c-5d          0/88         6/88
27.P1g-1f          7/95         0/88
28.P1c-1d          0/95         2/90
29.N2i-3g          17/112       0/90
30.P6d-6e          0/112        29/119
31.K6h-7i          16/128       0/119
32.G6a-5b          0/128        5/124
33.S4g-5f          14/142       0/124
34.K4b-3a          0/142        16/140
35.G5h-4g          14/156       0/140

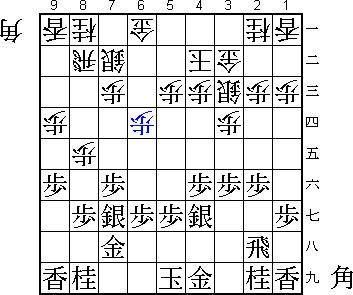
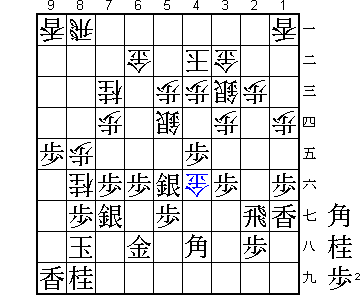
It is actually Tanigawa's opening preparation that shows in this game. He
plays a piece formation that was first played by Maruyama, 8-dan. Almost
the exact moves were also played in the third game of this year's Kio match
between Habu and Sato. There is one vital difference: the king in that game
was on 8h and not on 7i. Tanigawa has studied the position and concluded
that black does not need this extra move and plans to use this move for attack.

36.P7c-7d          0/156        134/274

Sato takes a long time to decide what to do against Tanigawa's new idea. In
the end he judges that it is sound and abandons his defensive plans in favour
of a more positive approach.

37.L1i-1g          78/234       0/274

Threatens to play R1h and an edge attack.

38.S3c-4d!?        0/234        21/295

It is hard to judge this move. It might be good, but from here on Sato seems
to be struggling a little. Tanigawa has won the opening battle.

39.N3g-4e          54/288       0/295

Aims at B*7a.

40.G5b-6c          0/288        52/347

Frees 5b for the rook after B*7a.

41.P2f-2e          26/314       0/347
42.N2a-3c          0/314        4/351
43.P2e-2d          16/330       0/351
44.P2cx2d          0/330        0/351
45.R2hx2d          0/330        0/351
46.B*3i!?          0/330        2/353

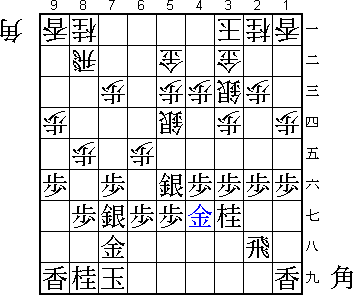
Another move that is hard to judge. Sato himself was not very confident about
it, because it seems that this bishop will be lost soon. Sato felt that he
had no choice, indicating that he is indeed stretching his position.

47.P*2h!?          31/361       0/353

A surprise. 47.P*2c Bx1g+ B*2b is much more Tanigawa's style and does not
seem bad, but instead he chooses defence and goes for the white bishop. The
game now depends on whether the bishop on 3i is bad or the pawn on 2h.

48.P*2c            0/361        5/358
49.R2d-2g          0/361        0/358
50.N8a-7c          0/361        1/359
51.K7i-8h?!        1/362        0/359

Sato feared the surprising 51.B*1i! followed by R3g, winning the bishop.
Tanigawa's quiet play is not bad, though.

52.K3a-4b          0/362        10/369
53.B*3g            12/374       0/369

Tanigawa prefers to drop his bishop here, where it is more active.

54.R8b-8a?         0/374        41/410

This looks like a very nice defence scheme, taking away black's possibilities.
Unfortunately, it turns out that the rook here is too vulnerable. Better would
have been 54.K3a. Returning to 3a is a difficult move to play, since it is
only a waiting move. However, after 55.Nx3c+ Sx3c P4e P2d! (N*6d N*5e G6b
Nx4c= Sx4c Bx6d is not good) which threatens N*2e (for example after N*4f),
and the position is unclear.

55.N4ex3c+         2/376        0/410
56.S4dx3c          0/376        0/410
57.P4f-4e          1/377        0/410
58.G6c-6b          0/377        0/410

This defends against N*4f by clearing a square for the silver on 5d and also
defends against a future silver drop on 7b or 6d. It seems that white can
hold his position together...

59.G4g-4h          13/390       0/410

The other meaning of B*3g. The threat is G4i Bx5g+ Bx7c+ and black wins.

60.N*8f!?          0/390        59/469

A change of plan. Sato wanted to play 60.Bx4h+ Gx4h G*4f. Even though in the
post mortem it did not really became clear why he did not play that variation,
he seemed to be unsatisfied with the variations he saw. Instead he tries
something radical. The knight sacrifice is a standard attack against black's
castle formation, but with no pieces in hand it seems an overplay. "In the
middle game and with no pieces in hand I have never seen it before"
(Katsumata, 5-dan).

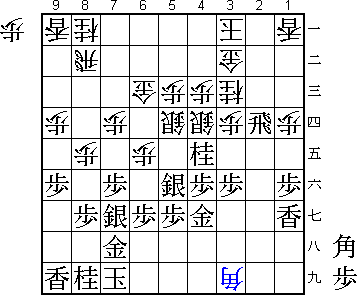
61.G7h-6h!         16/406       0/469

The correct reply. Sato might have been counting on 61.Px8f Bx4h+ Bx4h Px8f
N*7i G*6i! and there is no defence against Gx7i Kx7i P8g+. Of course a Meijin
does not only count on a simple trap like that. Black's king is suddenly much
more in danger than before. The following edge attack looks quite powerful.

62.B3ix4h+         0/406        0/469
63.B3gx4h          0/406        0/469
64.P9d-9e          0/406        0/469
65.P9fx9e          1/407        0/469
66.P6e-6f          0/407        0/469
67.P6gx6f          6/413        0/469
68.G*4f            0/413        1/470

69.R2g-2f!         14/427       0/470

Sato expected 69.S4g Gx4g Rx4g S*3h R3g S4i+ which wins the bishop and gives
white good play. Tanigawa's move is much better, despite moving the rook to
a very bad spot. On 2f it blocks the bishop on 4h and the rook is also very
vulnerable to future lance drop on 2d. It will soon become clear why....

70.G4fx5f          0/427        4/474
71.P5gx5f          0/427        0/474
72.S5dx4e          0/427        2/476
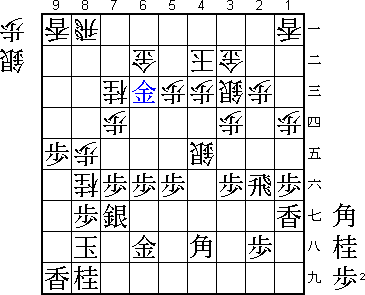
73.G*6c!           34/461       0/476

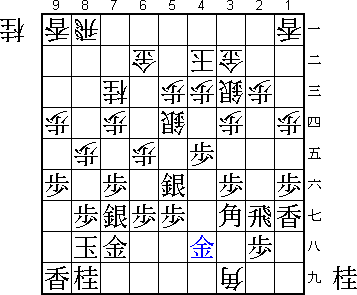
Brilliant move which was overlooked by Sato. It would be interesting to know
if Tanigawa used the time to find the move or to calculate the variations to
the end.

74.P*6g            0/461        40/516
75.G6h-6i          0/461        0/516
76.K4b-5a          0/461        2/518

Desperate defence. 76.R6a fails because of B*8c.

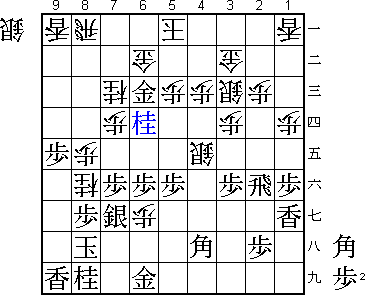
77.N*6d!           15/476       0/518

In attack, Tanigawa knows no equal. This is another good move that decides the
game. "Here I thought I had won" (Tanigawa).

78.G6bx6c          0/476        5/523
79.B*7b            0/476        0/523
80.G6cx6d          0/476        1/524
81.B7bx8a+         0/476        0/524
82.L9ax9e          0/476        2/526
83.P8gx8f          3/479        0/526
84.L9ex9i+         0/479        1/527
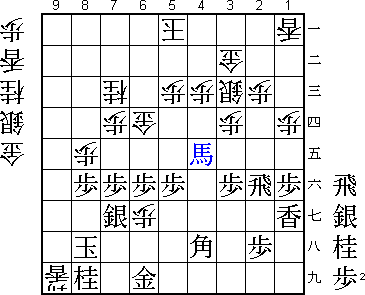
85.+B8ax4e         0/479        0/527

Clears up the right side of the board for the king to run to. Sato has no
good attack.

86.P8ex8f          0/479        1/528
87.S7gx8f          0/479        0/528
88.+L9ix8i         0/479        1/529
89.K8h-7h          5/484        0/529
90.N*7e            0/484        8/537

A last trap.

91.S8fx7e          0/484        0/537

Tanigawa does not fall for it. 91.Px7e S*7f would have been dangerous.

92.P7dx7e          0/484        0/537
93.N*6c            6/490        0/537
94.K5a-4b          0/490        0/537
95.S*4a            0/490        0/537
96.G3b-2b          0/490        2/539
97.R*6a            1/491        0/539
98.P2c-2d          0/491        0/539
99.N*3e            1/492        0/539
Resigns            0/492        0/539
Time:              08:12:00     08:59:00

Hisshi. Without the escape to 2c, there is no defence against S5b+ Kx5b R5a+.
An impressive win by Tanigawa, who recently has been looking very strong in
his wins and rather helpless in his losses. He will need another big game in
game four to keep the match interesting.
