57th Meijin Match Game 2
Black: Sato Yasumitsu, Meijin
White: Tanigawa Koji, Challenger
57th Meijin-sen, Game 2, April 21st and 22nd 1999
1.P7g-7f           1/1          0/0
2.P3c-3d           0/1          3/3
3.P2g-2f           1/2          0/3
4.P8c-8d           0/2          2/5
5.P2f-2e           14/16        0/5
6.P8d-8e           0/16         1/6
7.G6i-7h           0/16         0/6
8.G4a-3b           0/16         0/6
9.P2e-2d           0/16         0/6
10.P2cx2d          0/16         0/6
11.R2hx2d          0/16         0/6
12.P8e-8f          0/16         2/8
13.P8gx8f          0/16         0/8
14.R8bx8f          0/16         0/8
15.R2dx3d          0/16         0/8
16.B2b-3c          0/16         14/22

Again Yokofudori, as in the first game. This is a very popular opening these
days and in this game Tanigawa chooses the latest variation.

17.R3d-3f          49/65        0/22
18.S3a-2b          0/65         8/30
19.P*8g            6/71         0/30
20.R8f-8e          0/71         6/36

This move has been studied deeply by Chuza (4-dan) and is now together with
the Fujii system the most popular opening in professional games. New
developments in this opening are too fast to follow and a conclusion about
this variation is still very far away. In this game the dangers of this
variation become very clear. A small positional mistake might suddenly
end the game.

21.R3f-2f          1/72         0/36
22.K5a-4a          0/72         5/41
23.K5i-5h          33/105       0/41
24.S7a-6b          0/105        11/52
25.G4i-3h          65/170       0/52
26.G6a-5a          0/170        14/66
27.P3g-3f          6/176        0/66
28.P7c-7d          0/176        74/140
29.N2i-3g          18/194       0/140
30.N8a-7c          0/194        76/216
31.S3i-4h          30/224       0/216
32.P*8f            0/224        62/278

33.P8gx8f          153/377      0/278

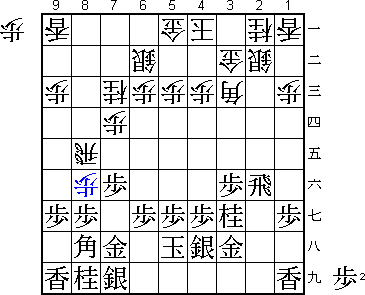
The move is not a surprise, but the time used to play it became a major
talking point in the press room. At first it was thought that Sato looked
deeply at 33.Bx3c+ Nx3c, but after the game Sato said the major part of
the time used was spent looking at deep variations after Px8f. Strange to
spend so much time on a more or less forced move...

34.R8ex8f          0/377        0/278
35.P3f-3e          0/377        0/278
36.P*2e            0/377        14/292
37.R2f-5f          1/378        0/292
38.R8f-8e          0/378        10/302
39.P7f-7e          19/397       0/302
40.R8ex7e          0/397        34/336
41.B8hx3c+         1/398        0/336
42.S2bx3c          0/398        0/336
43.N8i-7g          0/398        0/336
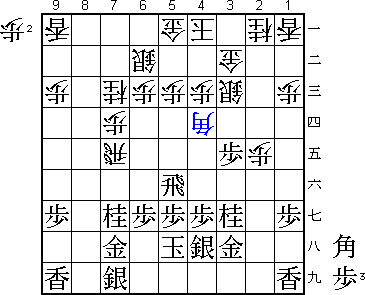
44.B*4d            0/398        45/381

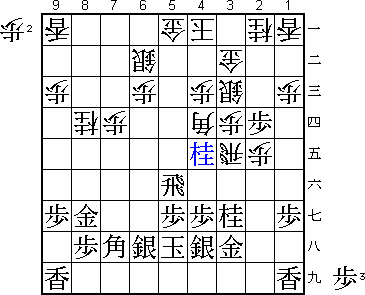
Another possibility is 44.B*5d to aim at 3f instead of 7g. After 45.S6h P*3f
Nx2e S4d P*8c Rx3e P*2f P*2d P8b+ Px2e +P7b Px2f P*2h both players felt
uncomfortable with the position. This could be translated as interesting for
both sides.

45.S7i-6h          12/410       0/381
46.N7c-8e          0/410        2/383
47.P6g-6f          7/417        0/383
48.N8ex7g+         0/417        5/388
49.G7hx7g          1/418        0/388
50.P*8f            0/418        22/410

Interesting is also 50.N*8e. Tanigawa read the variation 51.P*7f Nx7g+ Px7e
+Sx6h Kx6h and decided it was too dangerous to give up the rook. On the other
hand, Sato planned to play the sharp 51.G6g R7h+ N4e. It is unclear who is
right here.

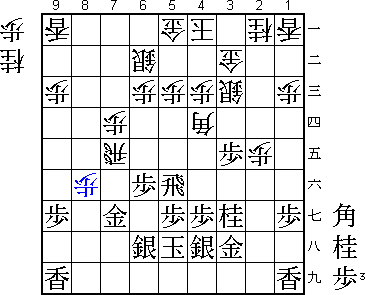
51.B*9f!           23/441       0/410

This type of move shows why Sato is Meijin. No one in the press room even
looked at this move, while Sato said after the game that he had hardly looked
at anything else. This moves defends against P8g+ Gx8g R7h+, but also
defends against the nasty N*6e, since Gx8f then would lose the rook.

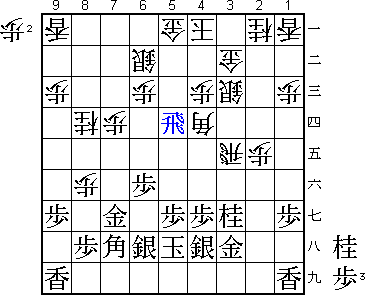
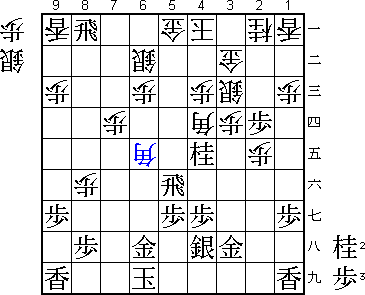
52.N*8d?           0/441        36/446

Better was directly 52.P5d. The plan is to play P5e-P5f next. In contrast to
the game, it is now very hard for black to use the bishop on 9f. Black could
try 53.P*8d, but after P8g+ Bx8g R8e it is hard to defend against N*7e next.

53.B9f-7h          30/471       0/446
54.P5c-5d?         0/471        12/458

One move too late. The plan P5e-P5f is the same, but with the bishop on 7h,
this only helps black. The combination of the aggressive N*8d and the
waiting move P5d is an important strategic mistake. Tanigawa should have
continued aggressively here. After 54.Rx7g+ Sx7g G*8g B8i Gx7g white still
has good chances. For example, after the obvious P*7c, white can choose
between S*6h or S*7h P7b+ Sx8i=.

55.P*8h            9/480        0/458
56.R7ex3e          0/480        32/490
57.R5fx5d          7/487        0/490

Suddenly the black bishop is working very well. The white position suddenly
becomes critical.

58.P8f-8g+         0/487        10/500
59.G7gx8g          8/495        0/500
60.B4dx6f          0/495        2/502
61.P*2d            7/502        0/502

Very painful. In the press room there were discussions if this game might
finish even earlier than the first game. Tanigawa decides to play on for
a little longer.

62.P*3d            0/502        0/502
63.R5d-5f          8/510        0/502
64.B6f-4d          0/510        6/508
65.N*4e            3/513        0/508

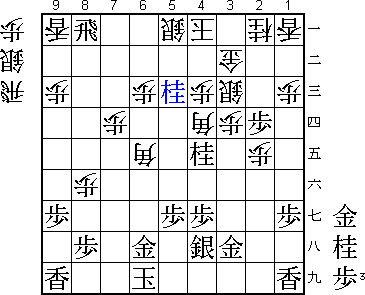
The decider. Now the white rook is lost and there is no compensation. All that
is left for Tanigawa is desperate attack.

66.R3ex4e          0/513        15/523
67.N3gx4e          1/514        0/523
68.N*6f            0/514        0/523
69.K5h-6i          15/529       0/523
70.P*8f            0/529        1/524
71.G8g-7g          1/530        0/524
72.N6fx7h+         0/530        0/524
73.G7gx7h          1/531        0/524
74.N8d-7f          0/531        3/527
75.R*8a            0/531        0/527
76.N7fx6h+         0/531        4/531
77.G7hx6h          0/531        0/531
78.B*6e            0/531        4/535

Quickens the end, but after 78.P*5e Rx8f or 78.P*5b N*5d the white position
would look very bad at the moment of resignation.

79.R5fx5a+         1/532        0/535
80.S6bx5a          0/532        0/535
81.N*5c            0/532        0/535
Resigns            0/532        0/535
Time:              08:52:00     08:55:00

The choice is between mate after 82.K3a Rx5a+ K2b N*1d Px1d G*2c etc., or
82.Bx5c Nx5c+ and a simple win for black. Tanigawa takes the third option:
resignation.

That makes two devastating losses in a row. Furthermore, Tanigawa's opening
preparation must have been severely damaged by two losses with the Yokofudori,
both straight from the opening. What will he choose for game three, a game
he has to win.
