56th Oza Match Game 3
[Black "Habu Yoshiharu, Oza"]
[White "Kimura Kazuki, Challenger"]
[Event "56th Oza-sen, Game 3"]
[Date "September 30th 2008"]
1.P7g-7f     00:00:00  00:00:00
2.P8c-8d     00:00:00  00:00:00
3.S7i-6h     00:01:00  00:00:00
4.P3c-3d     00:01:00  00:00:00
5.P6g-6f     00:03:00  00:00:00
6.S7a-6b     00:03:00  00:00:00
7.P5g-5f     00:04:00  00:00:00
8.P5c-5d     00:04:00  00:00:00
9.S3i-4h     00:05:00  00:00:00
10.S3a-4b    00:05:00  00:00:00
11.G4i-5h    00:09:00  00:00:00
12.G4a-3b    00:09:00  00:00:00
13.G6i-7h    00:10:00  00:00:00
14.K5a-4a    00:10:00  00:00:00
15.K5i-6i    00:11:00  00:00:00
16.G6a-5b    00:11:00  00:01:00
17.S6h-7g    00:13:00  00:01:00
18.S4b-3c    00:13:00  00:01:00
19.B8h-7i    00:14:00  00:01:00
20.B2b-3a    00:14:00  00:01:00
21.P3g-3f    00:16:00  00:01:00
22.P4c-4d    00:16:00  00:01:00
23.G5h-6g    00:20:00  00:01:00
24.P7c-7d    00:20:00  00:01:00
25.S4h-3g    00:21:00  00:01:00
26.B3a-6d    00:21:00  00:02:00
27.B7i-6h    00:21:00  00:02:00
28.G5b-4c    00:21:00  00:03:00
29.K6i-7i    00:21:00  00:03:00
30.K4a-3a    00:21:00  00:03:00
31.K7i-8h    00:22:00  00:03:00
32.K3a-2b    00:22:00  00:04:00

The Yagura opening like in the second game. Of course, this time the colours are
reversed.

33.S3g-4f    00:22:00  00:04:00
34.S6b-5c    00:22:00  00:06:00
35.N2i-3g    00:23:00  00:06:00
36.P9c-9d    00:23:00  00:08:00
37.P2g-2f    00:23:00  00:08:00
38.S3c-2d    00:23:00  00:11:00
39.P1g-1f    00:23:00  00:11:00
40.P1c-1d    00:23:00  00:11:00
41.R2h-3h    00:26:00  00:11:00
42.P8d-8e    00:26:00  00:24:00
43.L1i-1h    00:26:00  00:24:00
44.B6d-7c    00:26:00  00:25:00
45.L9i-9h    00:29:00  00:25:00
46.S5c-4b    00:29:00  00:27:00
47.K8h-9i    00:31:00  00:27:00

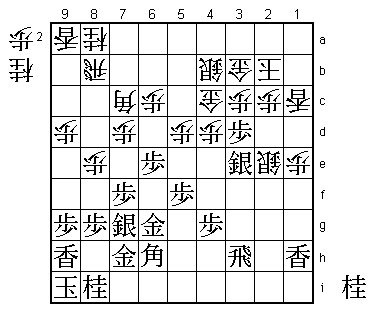
Changing from the Yagura formation to the Anaguma is a very popular way of playing
this position. In response, Kimura plays a four general castle with the bishop on
the diagonal 9a-1i to keep the black attacking pieces on the right side under control.
No one would expect anything different from the top defensive player in the game.

48.B7c-6d    00:31:00  00:29:00
49.P6f-6e    00:37:00  00:29:00
50.B6d-7c    00:37:00  00:32:00
51.N3g-2e    00:39:00  00:32:00
52.N2a-3c    00:39:00  00:35:00
53.P1f-1e    00:39:00  00:35:00
54.P1dx1e    00:39:00  00:35:00
55.P3f-3e    00:39:00  00:35:00
56.N3cx2e    00:39:00  00:44:00
57.P3ex3d    00:39:00  00:44:00
58.P*3c      00:39:00  00:45:00
59.P2fx2e    01:01:00  00:45:00
60.S2dx2e    01:01:00  00:49:00
61.P*1c      01:01:00  00:49:00
62.L1ax1c    01:01:00  01:17:00
63.S4f-3e    01:06:00  01:17:00

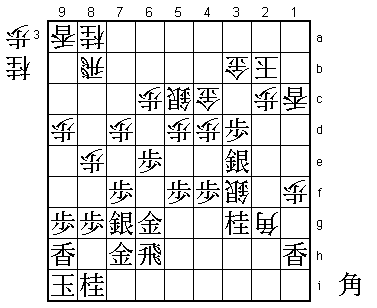
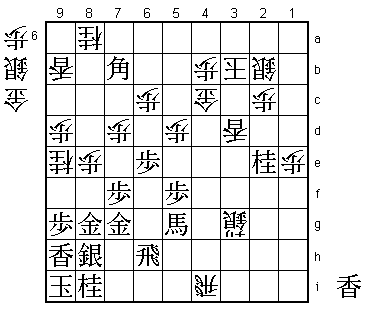
This position has actually been played before. In the preliminary round of the Kio
on July 15th the game between Watanabe and Sato Amahiko continued with 64.N*2a S8h
Px3d N*1g! and black was able to make his attack work after S1f Sx3d Gx3d Rx3d S*3c
R3h P*3d P5e.

64.P1e-1f    01:06:00  01:23:00

This is Kimura's new idea. It is not without risk, as Kimura himself said after the
game: "Without being careful, this might turn out to be a pass move". However, it
puts pressure on the black position, because the threat is P1g+ next. Also, black
no longer has the knight drop on 1g that Watanabe played.

65.B6h-4f    02:06:00  01:23:00
66.B7cx4f    02:06:00  01:55:00
67.P4gx4f    02:06:00  01:55:00
68.B*2g      02:06:00  01:58:00
69.R3h-6h    02:18:00  01:58:00
70.S4b-5c    02:18:00  02:01:00

This seems to be moving the silver back where it came from, weakening the castle
in the process, but 70.S5c is necessary to defend against Sx4d followed by B*7a.
Here Kimura was quite happy with his position.

71.P3dx3c+   02:22:00  02:01:00
72.G3bx3c    02:22:00  02:09:00
73.N*3g      02:24:00  02:09:00
74.S2e-3f    02:24:00  02:33:00
75.P*3d      02:26:00  02:33:00
76.G3c-3b    02:26:00  02:44:00

77.B*7a?     02:38:00  02:44:00

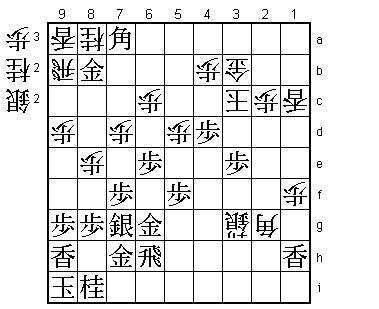
A mistake based on a rare long-term strategic misjudgement by Habu. Correct was to
play 77.P4e directly here. After 78.Sx3g= Sx4d B4e+ B*7a Sx4d Bx8b+ P*4f +Bx8a P4g+
+Bx9a +Bx3d Habu said it might be difficult to find good moves for black, but that
this was clearly better than what happened in the game.

78.R8b-9b    02:38:00  02:56:00
79.P4f-4e    02:47:00  02:56:00
80.S3fx3g+   02:47:00  03:04:00
81.S3ex4d    02:48:00  03:04:00
82.S5cx4d    02:48:00  03:12:00
83.P4ex4d    02:48:00  03:12:00
84.G4cx3d    02:48:00  03:12:00
85.P*3e      02:49:00  03:12:00
86.G3d-3c    02:49:00  03:19:00
87.S*3d      02:50:00  03:19:00
88.P*4b      02:50:00  03:31:00
89.S3dx3c+   02:50:00  03:31:00
90.K2bx3c    02:50:00  03:31:00
91.G*8b      02:51:00  03:31:00

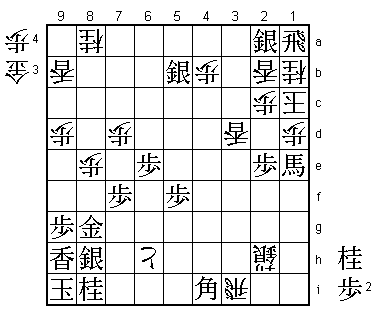
When Habu played 77.B*7a, he had counted on this position. After 92.R9c Gx9a! is
very strong because Rx9a B8b+ is a fork on the rook and the promoted silver.

92.B2g-3f+!  02:51:00  03:39:00

This is the mistake in judgement that Habu regretted. He thought that it would
be good for black to get the rook in hand, but in reality this is not such a big
problem for white. After 92.B3f+, the white king is very strongly defended at the
top and it will be hard to build a good attack. From now on, Kimura's position gets
better and better.

93.G8bx9b    03:15:00  03:39:00
94.L9ax9b    03:15:00  03:39:00
95.L1hx1f    03:28:00  03:39:00
96.L1cx1f    03:28:00  03:39:00
97.R*1b      03:28:00  03:39:00
98.S*2e      03:28:00  03:55:00
99.P3e-3d    03:33:00  03:55:00
100.S2ex3d   03:33:00  03:55:00
101.R1bx1f+  03:33:00  03:55:00
102.P*1e     03:33:00  03:56:00
103.+R1fx3f  03:33:00  03:56:00
104.+S3gx3f  03:33:00  03:56:00
105.P*3g     03:33:00  03:56:00
106.+S3fx3g  03:33:00  03:57:00
107.L*3e     03:33:00  03:57:00
108.S3dx3e   03:33:00  04:00:00
109.P4d-4c+  03:33:00  04:00:00
110.G3bx4c   03:33:00  04:03:00
111.B7ax3e+  03:33:00  04:03:00
112.L*3d     03:33:00  04:04:00
113.+B3e-1c  03:40:00  04:04:00
114.S*2b     03:40:00  04:06:00
115.+B1c-5g  03:40:00  04:06:00
116.R*4i     03:40:00  04:06:00
117.B*7b!    03:45:00  04:06:00

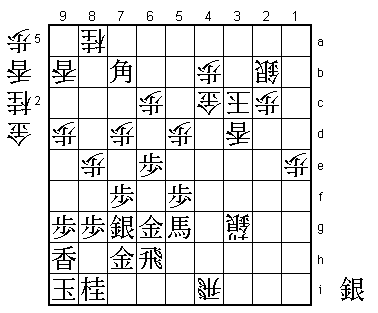
Habu is in serious trouble, but this is a nasty move. It looks very slow and invites
the following attack, but it also forces white into action. As a result, Kimura
rushes his attack a little, so Akutsu (6-dan) specifically picked out this bishop
drop as a turning point in the game.

118.N*9e     03:45:00  04:07:00
119.S*8h     03:56:00  04:07:00
120.N9ex8g=? 03:56:00  04:13:00

Here is Kimura's attacking mistake. Difficult to see, but correct was 120.L*8f!
and after Px8f white has G*7i and the black position seems impossible to defend.
Even after 120.Nx8g= white probably has the better position, but now things get
really complicated.

121.S8hx8g   03:56:00  04:13:00
122.L*8f     03:56:00  04:13:00
123.N*2e     03:58:00  04:13:00
124.K3c-3b   03:58:00  04:16:00
125.S7g-8h   04:03:00  04:16:00
126.L8fx8g+  04:03:00  04:19:00
127.G7hx8g   04:03:00  04:19:00
128.N*9e     04:03:00  04:23:00
129.G6g-7g   04:08:00  04:23:00

130.+S3g-4g? 04:08:00  04:36:00

This move turns the game around, but calling it a blunder would be too harsh,
although Kimura himself called it the worst possible move. The right way of playing
here was 130.G*4g, but it is the kind of move that looks so heavy that very few
professionals would dare to play it. However, after 130.G*4g +B6f S*5g +Bx2b Kx2b
R1h Nx8g= Gx8g G*1d the white position is very strong and it will almost impossible
for black to find a way to win. Also, 130.G*4g +B8d R5i+ R1h +R2i Rx1e P*1d P*3c
Sx3c Rx1d +Rx2e and white seems to be winning.

131.+B5gx4g  04:17:00  04:36:00
132.R4ix4g+  04:17:00  04:36:00
133.B7bx6c+  04:17:00  04:36:00

This bishop is quite effective in attack, combined with the following move.

134.B*2d     04:17:00  04:46:00
135.L*4h     04:23:00  04:46:00

This gives black a rook in hand, which makes the attack suddenly very dangerous.
Actually, 135.P*3c K2a and only then L*4h would have even been better, but 135.L*4h
just seems to do enough damage.

136.B2dx6h+  04:23:00  04:48:00
137.L4hx4g   04:23:00  04:48:00
138.R*4i     04:23:00  04:49:00
139.L4gx4c+  04:41:00  04:49:00
140.K3bx4c   04:41:00  04:49:00
141.S*5b     04:44:00  04:49:00
142.K4c-4d   04:44:00  04:50:00
143.+B6cx5d  04:44:00  04:50:00
144.K4d-3e   04:44:00  04:50:00
145.R*3h     04:44:00  04:50:00
146.K3e-2d   04:44:00  04:50:00
147.R3hx6h   04:44:00  04:50:00
148.P*6g     04:44:00  04:50:00
149.R6h-2h   04:45:00  04:50:00
150.S*3g     04:45:00  04:54:00
151.B*5h     04:47:00  04:54:00
152.S3gx2h+  04:47:00  04:55:00
153.B5hx4i   04:47:00  04:55:00
154.P6g-6h+  04:47:00  04:56:00
155.+B5d-4d  04:49:00  04:56:00
156.R*3i     04:49:00  04:59:00
157.N2e-3c+  04:50:00  04:59:00
158.S2bx3c   04:50:00  04:59:00
159.P*2e     04:50:00  04:59:00
160.K2d-1d   04:50:00  04:59:00
161.G*1c     04:50:00  04:59:00
162.K1dx1c   04:50:00  04:59:00
163.+B4dx3c  04:50:00  04:59:00
164.L*2b     04:50:00  04:59:00
165.R*1a     04:50:00  04:59:00
166.N*1b     04:50:00  04:59:00
167.+B3cx1e  04:50:00  04:59:00
168.P*1d     04:50:00  04:59:00
169.S*2a     04:50:00  04:59:00
170.N9ex8g=  04:50:00  04:59:00
171.G7gx8g   04:50:00  04:59:00
Resigns      04:50:00  04:59:00

The white king is in a hisshi position, because Px1e Rx1b+ is a simple mate. Since
it is very clear that there is no check against the black Anaguma position, the only
thing Kimura can do is resign here. With this victory Habu wins an incredible 17th
consecutive Oza title. He also defends his title in straight games for the 4th time
in a row. In these 17 consecutive title matches he was only in trouble twice, needing
a fifth game to win (in 2003 against Watanabe and in 2000 against Fujii). It is clear
 that Habu owns the Oza title. Kimura will have some regrets because he had his chances
in this game and in the previous ones as well, but he was not able to make Habu pay
for the few mistakes he made.
