56th Oza Match Game 2
[Black "Kimura Kazuki, Challenger"]
[White "Habu Yoshiharu, Oza"]
[Event "56th Oza-sen, Game 2"]
[Date "September 17th 2008"]
1.P7g-7f 00:01:00 00:00:00
2.P8c-8d 00:01:00 00:01:00
3.S7i-6h 00:01:00 00:01:00
4.P3c-3d 00:01:00 00:02:00
5.P6g-6f 00:01:00 00:02:00
6.S7a-6b 00:01:00 00:04:00
7.P5g-5f 00:01:00 00:04:00
8.P5c-5d 00:01:00 00:06:00
9.S3i-4h 00:01:00 00:06:00
10.S3a-4b 00:01:00 00:07:00
11.G4i-5h 00:01:00 00:07:00
12.G4a-3b 00:01:00 00:09:00
13.G6i-7h 00:02:00 00:09:00
14.K5a-4a 00:02:00 00:11:00
15.K5i-6i 00:02:00 00:11:00
16.G6a-5b 00:02:00 00:11:00
17.S6h-7g 00:03:00 00:11:00
18.S4b-3c 00:03:00 00:12:00
19.B8h-7i 00:03:00 00:12:00
20.B2b-3a 00:03:00 00:13:00
21.P3g-3f 00:03:00 00:13:00
22.P4c-4d 00:03:00 00:14:00
23.G5h-6g 00:05:00 00:14:00
24.P7c-7d 00:05:00 00:18:00
25.S4h-3g 00:08:00 00:18:00
26.B3a-6d 00:08:00 00:23:00
27.B7i-6h 00:08:00 00:23:00
28.G5b-4c 00:08:00 00:29:00
29.K6i-7i 00:08:00 00:29:00
30.K4a-3a 00:08:00 00:30:00
31.K7i-8h 00:08:00 00:30:00
32.K3a-2b 00:08:00 00:32:00
33.S3g-4f 00:14:00 00:32:00
34.S6b-5c 00:14:00 00:39:00
35.N2i-3g 00:15:00 00:39:00
36.P8d-8e 00:15:00 00:39:00
37.P1g-1f 00:17:00 00:39:00
38.P1c-1d 00:17:00 00:40:00
39.P2g-2f 00:17:00 00:40:00
40.S3c-2d 00:17:00 00:41:00
41.R2h-3h 00:32:00 00:41:00
42.P9c-9d 00:32:00 00:43:00
43.L1i-1h 00:35:00 00:43:00
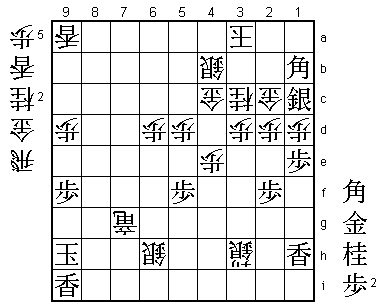
44.S5c-4b!? 00:35:00 00:43:00
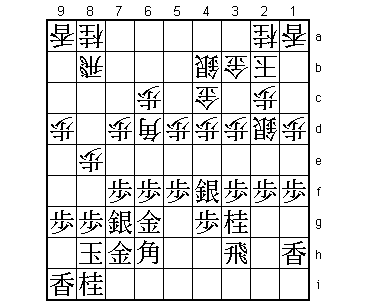
This is a popular Yagura position, but 44.S4b is not often played here. It is a
specialty of Shimamoto (4-dan), but the move has some serious drawbacks because
it weakens the front of the Yagura. This becomes clear if black plays 45.N2e as
in the game. Normally, white would like to answer this with 46.P4e, but in this
position there follows 47.Sx4e B1a+ B4f +Bx4f Px4f and this is bad for white because
black threatens S4d Gx4d B*7a next. This bishop fork is made possible by pulling
back the silver to 4b. Therefore, in general white plays 44.B7c or 44.N3c or 44.P9e
here.
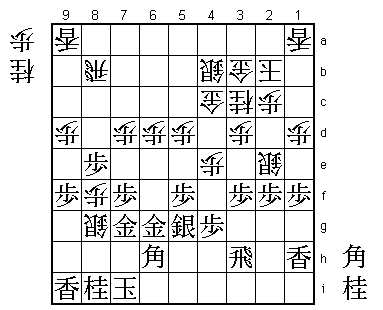
45.N3g-2e 00:58:00 00:43:00
46.N8a-7c 00:58:00 00:49:00
This is Habu's new idea, which he himself describes as "dangerous but positive".
47.P9g-9f 01:19:00 00:49:00
48.N2a-3c 01:19:00 00:52:00
49.P6f-6e 01:27:00 00:52:00
Kimura admitted after the game that this way of inviting the attack is not really
characteristic for black, but then again, it is his style to invite the attack and
then kill it.
50.N7cx6e 01:27:00 01:21:00
51.S7g-6f 01:28:00 01:21:00
52.P8e-8f 01:28:00 01:21:00
53.S6fx6e 01:38:00 01:21:00
54.P8fx8g+ 01:38:00 01:23:00
55.G7hx8g 01:38:00 01:23:00
56.P*8f 01:38:00 01:23:00
57.G8g-7g 01:57:00 01:23:00
58.P4d-4e 01:57:00 01:25:00
59.S6ex6d 02:04:00 01:25:00
60.P6cx6d 02:04:00 01:30:00
61.S4f-5g 02:07:00 01:30:00
62.S*8g 02:07:00 01:50:00
63.K8h-7i 02:07:00 01:50:00
64.S2dx2e 02:07:00 01:50:00
65.P*8e 02:13:00 01:50:00
This looks like a very good defensive tactic. After all, if white doesn't take
this pawn, black will play Gx8f next and the silver cannot be saved. Also, it
seems that 66.Rx8e Gx8f to play P*8e again after the rook moves away is good for
black. Finally, 66.N*6e seems like an obvious move, but after 67.Gx8f Nx5g+ Bx5g
white has only a silver in hand and this is not enough to give the attack enough
power.
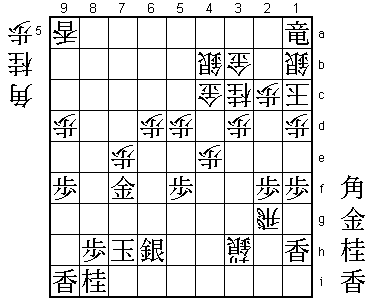
66.R8bx8e 02:13:00 02:50:00
Habu spent 60 minutes on this moves and the general opinion in the press room was
that this was because he was in trouble and he was desperately trying to find a way
to escape. The truth is that Habu saw something interesting in this position.
67.G7gx8f 02:23:00 02:50:00
68.R8ex8f 02:23:00 02:50:00
First, sacrifice the bishop for the gold...
69.B6hx8f 02:23:00 02:50:00
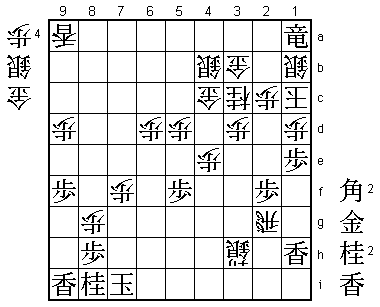
70.S2ex3f! 02:23:00 02:50:00
And then save the silver. Black cannot take this silver because after 71.Rx3f G*7h
is mate! Strangely enough, this position looks very unstable but seems to be evenly
balanced. It is still very much up in the air who will win this game.
71.P*8h 02:48:00 02:50:00
Kimura was not so happy with this move, because the pawn becomes a wall against the
escape of the black king. In the press room 71.B*6i was analysed. Then 72.P*8h Bx8g
Px8i+ Kx8i Sx4g+ R2h +Sx5g Gx5g N*6e is unclear. Habu said in the post-mortem analysis
that he didn't have much confidence in the white position, but Kimura didn't like the
position of the two bishops on 8g and 8f, so he just couldn't bring himself to play
this variation.
72.S8gx7f+ 02:48:00 02:58:00
73.G6gx7f 02:48:00 02:58:00
74.S3fx4g+ 02:48:00 02:58:00
75.R*7a 03:16:00 02:58:00
76.+S4gx3h 03:16:00 03:19:00
77.K7i-7h 03:16:00 03:19:00
78.R*2g 03:16:00 03:25:00
79.S5g-6h 03:28:00 03:25:00
80.G*7e 03:28:00 03:46:00
81.S*1c 04:05:00 03:46:00
82.K2bx1c 04:05:00 03:54:00
83.R7ax1a+ 04:05:00 03:54:00
84.S*1b 04:05:00 03:55:00
85.B8fx7e 04:13:00 03:55:00
86.P7dx7e 04:13:00 03:55:00
87.G7f-7g    04:13:00  03:55:00

For a moment, the professionals in the press room thought that they had found a
forced win for black here in 87.B*2a. Then 88.G2b +Rx2b Kx2b G*3b K1c Bx1b+ Kx2b
S*2b is hisshi. However, Kimura pointed out that after 87.B*2a, white can play
88.K2d Bx1b+ K3e and it is very difficult to mate the white king.

88.N*7f      04:13:00  04:07:00
89.S6h-7i    04:26:00  04:07:00
90.B*4f      04:26:00  04:16:00
91.P1f-1e    04:36:00  04:16:00
92.B4fx7i+   04:36:00  04:33:00

It seems like Habu has found a forced win, but there is a snag...

93.K7hx7i    04:36:00  04:33:00
94.P*8g      04:36:00  04:33:00
95.G7gx7f    04:41:00  04:33:00
96.P7ex7f    04:41:00  04:34:00
97.B*6h?     04:42:00  04:34:00

Although this move is throwing away the game, it is hard to call it a huge blunder
because the correct move was so hidden neither player had seen it and it would be
very fitting for a next-move problem in a magazine: 97.B*3a!!. It was discovered
in the press room during the game that 98.Sx3a +Rx1b Kx1b S*1c or 98.Gx3a +Rx1b
Kx1b N*2d!! Px2d G*1c Kx1c Px1d K2b P1c+ K3b B*2c both lead to mate, so white cannot
take the bishop on 3a. The only move is 98.G*2b, but then there is no longer a mating
threat against the black king. Actually, it could not even be concluded that 97.B*3a
G*2b is winning for black, but Habu admitted after the game that the shock of this
move would probably have been enough for him to give up on this game. This was all
analysed before this position appeared and when Kimura moved his hand to the piece
stand and picked up the bishop, everyone in the press room was holding his breath.
But then Kimura dropped the bishop on 6h and everybody exhaled: game over.

98.S*5g      04:42:00  04:36:00
99.B6h-8f    04:44:00  04:36:00
100.G*6h     04:44:00  04:42:00
101.B8fx6h   04:44:00  04:42:00
102.P8gx8h+  04:44:00  04:42:00
103.K7ix8h   04:44:00  04:42:00
104.S5gx6h=  04:44:00  04:42:00
105.G*7h     04:49:00  04:42:00
106.B*6f     04:49:00  04:45:00
107.K8h-9h   04:52:00  04:45:00
108.P7f-7g+  04:52:00  04:45:00
109.N8ix7g   04:55:00  04:45:00
110.B6fx7g+  04:55:00  04:46:00
111.G7hx7g   04:57:00  04:46:00
112.R2gx7g+  04:57:00  04:46:00
113.+R1ax1b  04:59:00  04:46:00
114.K1cx1b   04:59:00  04:46:00
115.N*2d     04:59:00  04:46:00
116.P2cx2d   04:59:00  04:46:00
117.S*1c     04:59:00  04:46:00
118.K1b-2a   04:59:00  04:50:00
119.L*2c     04:59:00  04:50:00
120.G3bx2c   04:59:00  04:50:00
121.B*1b     04:59:00  04:50:00
122.K2a-3a   04:59:00  04:50:00
Resigns      04:59:00  04:50:00
Black doesn't have mate after 123.G*3b Kx3b Bx2c+ Kx2c and the black king cannot be
defended, so Kimura resigned here. Another painful loss for Kimura, who played two
good games but is 2-0 down and he will play with the white pieces in the third game.
Everything seems to be pointing to a 17th consecutive Oza title for Habu.