56th Oza Match Game 1
[Black "Habu Yoshiharu, Oza"]
[White "Kimura Kazuki, Challenger"]
[Event "56th Oza-sen, Game 1"]
[Date "September 5th 2008"]
1.P7g-7f 00:00:00 00:00:00
Habu has an unbelievable record in the Oza tournament: 16 consecutive titles. He
also has won the last three Oza match without losing a game (beating Sato twice and
Kubo once with 3-0). However, he has never played Kimura in a title match before, so
maybe this was a chance to surprise him. Kimura is considered the best defender in
the game at the moment and it will be interesting to see how this holds up in a
title match against someone with magical endgame skills.
2.P3c-3d 00:00:00 00:02:00
3.P2g-2f 00:01:00 00:02:00
4.G4a-3b 00:01:00 00:03:00
5.G6i-7h 00:02:00 00:03:00
6.S3a-4b 00:02:00 00:05:00
7.B8hx2b+ 00:04:00 00:05:00
8.G3bx2b 00:04:00 00:05:00
9.S7i-6h 00:05:00 00:05:00
10.S7a-6b 00:05:00 00:05:00
11.S3i-3h 00:06:00 00:05:00
12.P6c-6d 00:06:00 00:05:00
13.P4g-4f 00:07:00 00:05:00
14.S6b-6c 00:07:00 00:05:00
15.S3h-4g 00:08:00 00:05:00
16.G2b-3b 00:08:00 00:08:00
17.P1g-1f 00:09:00 00:08:00
18.P1c-1d 00:09:00 00:08:00
19.K5i-6i 00:13:00 00:08:00
20.P9c-9d 00:13:00 00:10:00
21.P9g-9f 00:14:00 00:10:00
22.G6a-5b 00:14:00 00:13:00
23.K6i-7i 00:15:00 00:13:00
24.K5a-4a 00:15:00 00:14:00
25.P3g-3f 00:24:00 00:14:00
26.K4a-3a 00:24:00 00:23:00
27.N2i-3g 00:31:00 00:23:00
28.S6c-5d 00:31:00 00:25:00
29.S6h-7g 00:38:00 00:25:00
30.P7c-7d 00:38:00 00:34:00
31.S4g-5f 00:42:00 00:34:00
32.P8c-8d 00:42:00 01:06:00
33.G4i-4h 01:05:00 01:06:00
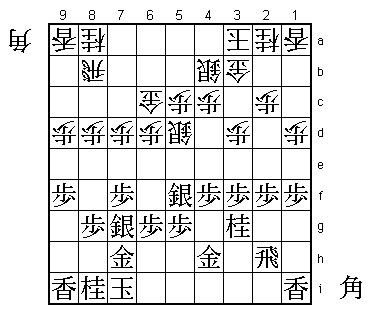
The opening was no surprise, because Kimura likes to defend with the classic
Kakugawari strategy with two reclining silvers. Habu plays the same way as in the
first game of the Oi match against Fukaura in July.
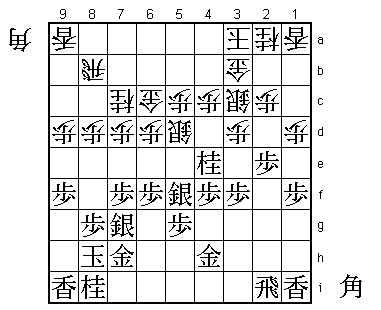
34.G5b-6c 01:05:00 01:17:00
In the Oi match Fukaura played a more aggressive opening, leaving the gold on 5b
and countering the black attack with an attack of his own with P9e and P7e. Even
though Habu won this game, this was not necessarily bad for white. However, as
already mentioned, Kimura has a style that is much more defensively oriented than
Fukaura, so it is no surprise that he goes for 34.G6c, which aims at discouraging
all ways of opening the game for black.
35.P2f-2e 01:35:00 01:17:00
36.S4b-3c 01:35:00 01:18:00
37.R2h-2i 01:35:00 01:18:00
38.N8a-7c 01:35:00 01:25:00
39.P6g-6f 01:35:00 01:25:00
40.K3a-4b 01:35:00 02:20:00
41.K7i-8h 01:39:00 02:20:00
42.K4b-3a 01:39:00 02:27:00
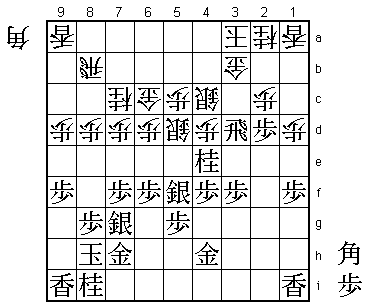
While black is still improving his position, white just moves the king back and
forth. This looks like wasting time, but the point of this position is that even
though black can still improve his position, white is ready to face anything that
black can throw at him. Furthermore, if black decides not to open the game and play
a waiting game himself, the game will end in sennichite. This is good for white
because the game will be replayed with reversed colours.
43.N3g-4e!? 02:15:00 02:27:00
This simple knight jump was a big surprise. This knight will almost certainly be
lost to P4d later and there doesn't seem to be enough support for this attack to get
compensation for the lost material. In the post-mortem analysis Kimura said that he
thought that 43.N4e was a pleasant surprise. Taking the material and then snuff out
the opponent attack is his specialty and this game seems to be headed in this
direction now.
44.S3c-4b 02:15:00 02:39:00
45.P2e-2d 02:15:00 02:39:00
46.P2cx2d 02:15:00 02:39:00
47.R2ix2d 02:15:00 02:39:00
48.P*2c 02:15:00 02:42:00
49.R2dx3d 02:15:00 02:42:00
50.P4c-4d 02:15:00 02:50:00
51.P*2d 02:41:00 02:50:00
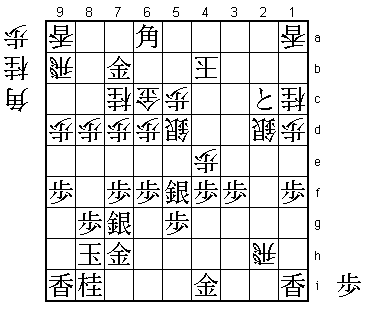
52.S4b-4c?! 02:41:00 02:54:00
This move is very tempting, because now not only the knight on 4e is in trouble,
but black also loses the rook on 3d. Therefore, the opinion of Kimura and all of
the followers in the press room including Kio Sato Yasumitsu was that white has
a big advantage here. However, Habu shows that this position is not so easy.
Actually, after 52.S4c there was no way found for white to win and in the end
the post-mortem analysis returned to this position as a possible culprit. Maybe
Kimura should have simply played 52.Px2d Rx2d P*2c R4i Px4e here to just take the
knight and forget about the rook. This seems to be good for white as well, but
perhaps nothing is like it seems in this game...

53.B*6a      02:46:00  02:54:00
54.K3a-4b    02:46:00  03:29:00

After 54.Sx3d Bx3d+ the black attack cannot be stopped.

55.R3dx3b+   03:02:00  03:29:00
56.S4cx3b    03:02:00  03:29:00
57.G*7b!     03:06:00  03:29:00

Strong move, shutting out the rook from the defence.

58.R8b-9b    03:06:00  03:43:00
59.P2dx2c+   03:06:00  03:43:00
60.S3bx2c    03:06:00  03:43:00
61.P*2b      03:06:00  03:43:00

This tokin attack looks slow, but as the proverb says: "A tokin is faster than
you think".

62.N2a-1c    03:06:00  04:05:00
63.P2b-2a+   03:07:00  04:05:00
64.R*2h      03:07:00  04:10:00

This looks like a strong counter attack, defending on the second file at the same
time. Kimura still felt that white was winning here.

65.+P2a-2b   03:16:00  04:10:00
66.S2c-2d    03:16:00  04:11:00
67.G4h-4i    03:16:00  04:11:00
68.P4dx4e    03:16:00  04:12:00
69.+P2b-2c   03:18:00  04:12:00
70.B*6i      03:18:00  04:17:00

In the post-mortem analysis Kimura admitted that he thought this bishop drop was
winning. He was so convinced of this that during the analysis he just couldn't
let it go and even asked with tears in his eyes if anyone in the press room had
found a winning attack after 70.B*6i. Even after the answer was negative, he still
couldn't believe it. The alternative to 70.B*6i seems to be 70.S2e, but after 71.P*2i
Rx2i+ S4e! the black attack is again too strong. For example, +Rx4i Sx5d Px4d S*4d
is a mating threat against which there is no proper defence.

71.S7g-6h!   03:29:00  04:17:00

After this move, it becomes clear that everybody but Habu fell for the illusion of
this position looking good for white.

72.B6ix7h+   03:29:00  04:33:00
73.K8hx7h    03:29:00  04:33:00
74.G*8h      03:29:00  04:33:00
75.K7h-6g    03:31:00  04:33:00
76.P6d-6e    03:31:00  04:34:00
77.B*4d!     03:59:00  04:34:00

This bishop drop works in attack and defence, but it doesn't seem to be very strong
as it can be pulled away from the attack with Px6f at any time. The first feeling
by professional players is that there now is a chance to win the game. Only Habu
has judged correctly that this bishop is winning. Having it pulled back to 6f is
not a problem, because it attacks the gold on 8h from there. Of course this is
clear for everyone, but Habu was the only one who saw that there is no other way
to make use of this bishop drop.

78.G6c-6b    03:59:00  04:40:00

Kimura had counted on this move, but...

79.B6a-3d+!  04:07:00  04:40:00

Again a strong move by Habu. The black attack can no longer be stopped.

80.G6bx7b    04:07:00  04:48:00

Also, 80.Rx7b is answered by +Px2d. After 80.S2e, the black attack is too strong
after 81.Gx6b Rx6b +P3c.

81.+P2cx2d   04:09:00  04:48:00
82.K4b-5a    04:09:00  04:50:00
83.G4i-3i    04:14:00  04:50:00
84.P6ex6f    04:14:00  04:52:00
85.B4dx6f    04:14:00  04:52:00
86.R2h-2g+   04:14:00  04:53:00
87.B6fx8h    04:15:00  04:53:00
88.G7b-7a    04:15:00  04:54:00
89.S*6d      04:17:00  04:54:00
Resigns      04:17:00  04:58:00
Kimura took four minutes to resign here. Black threatens both Sx7c+ and Sx5c+ and
the only defence against this seems G*6b, but then B3c+ leads to mate. White has
no effective defence here while the black king cannot be attacked, so there is nothing
here but to resign. A very painful loss for Kimura, not because of dropping this
opening game (after all, he was playing with white), but because he had his general
judgement of shogi positions shaken by Habu here. This may be a psychological blow
that carries over to the rest of the match. Game 2 already becomes very important
for Kimura, not only to avoid a 2-0 hole, but more to restore his confidence.