56th Osho Match Game 6 (Replay)
[Black "Sato Yasumitsu, Challenger"]
[White "Habu Yoshiharu, Osho"]
[Event "56th Osho-sen, Replay game 6"]
[Date "March 7th 2007"]
1.P7g-7f     05:31:00  00:00:00
2.P3c-3d     05:31:00  05:28:00

Both players have about two and half hours for the replay of this
6th game. The first game also ended in sennichite. Having sennichite
twice in an Osho match hasn't happened in 50 years. The last time
was when Masuda played Oyama. Interestingly, in that match the
sennichite games were also the first game and the sixth game.

3.P2g-2f     05:31:00  05:28:00
4.P4c-4d     05:31:00  05:29:00
5.P2f-2e     05:31:00  05:29:00

This invites Habu to play Furibisha again. Habu takes Sato up on
his offer, but this time he plays a Mukaibisha opening.

6.B2b-3c     05:31:00  05:29:00
7.S3i-4h     05:31:00  05:29:00
8.P9c-9d     05:31:00  05:29:00
9.G4i-5h     05:32:00  05:29:00
10.S3a-3b    05:32:00  05:33:00
11.P5g-5f    05:37:00  05:33:00
12.S3b-4c    05:37:00  05:35:00
13.K5i-6h    05:37:00  05:35:00
14.R8b-2b    05:37:00  05:35:00
15.K6h-7h    05:37:00  05:35:00
16.S7a-7b    05:37:00  05:36:00
17.B8h-7g    05:38:00  05:36:00
18.P7c-7d    05:38:00  05:43:00
19.S4h-5g    05:44:00  05:43:00
20.N8a-7c    05:44:00  05:57:00
21.B7g-5i    05:53:00  05:57:00
22.K5a-6b    05:53:00  06:01:00
23.P6g-6f    06:00:00  06:01:00
24.G4a-5b    06:00:00  06:02:00
25.K7h-8h    06:04:00  06:02:00
26.P6c-6d    06:04:00  06:03:00
27.L9i-9h    06:07:00  06:03:00

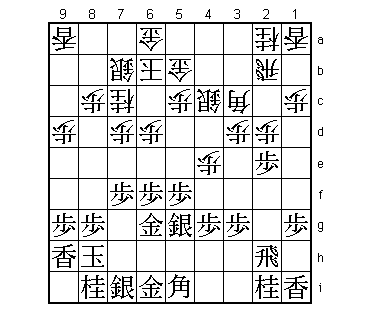
The Anaguma is always a good option in games with a short time limit.

28.P4d-4e    06:07:00  06:21:00
29.G5h-6g    06:08:00  06:21:00
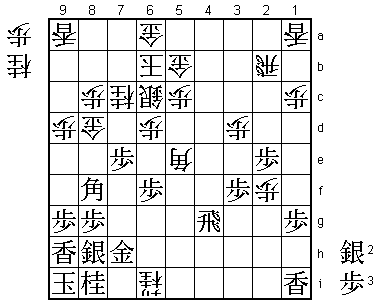
30.P2c-2d!?  06:08:00  06:43:00

A surprising start of the attack. Of course white wants to attack
before the Anaguma is completed, but the most natural attack seems
to be 30.P6e K9i Px6f Sx6f P*6f S7g N8e S7g-8h P9e. In this case
white also doesn't need to worry about the head of the knight on 7c,
as Miyata (7-dan) pointed out. Still, Habu's P2d can be called a success,
so is probably better than 30.P6e, which looks natural but is not
really clear.

31.P2ex2d    06:08:00  06:43:00
32.R2bx2d    06:08:00  06:43:00
33.P*2e      06:27:00  06:43:00
34.R2d-2b    06:27:00  06:43:00
35.K8h-9i    06:27:00  06:43:00
36.B3c-4d    06:27:00  06:44:00
37.P3g-3f    06:28:00  06:44:00
38.N2a-3c    06:28:00  06:47:00
39.N2i-3g    06:35:00  06:47:00
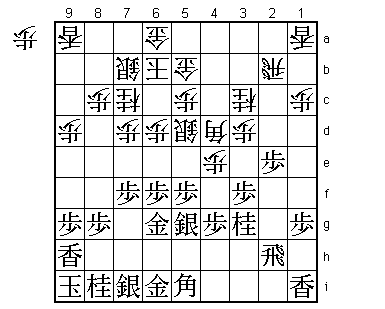
40.S4c-5d?   06:35:00  06:51:00

After the game, Habu said that he regretted this move very much. He should
have played 40.P*2f immediately here. If then 41.P4f N6e Px4e Nx5g= Gx5g
Nx4e Nx4e Rx2e, white has not only won material, but also activated the
rook. Furthermore, if black tries the same plan as in the game, then after
41.P7e Px7e S8h Nx2e Nx4e N3g+ R7h P2g+ P*7d +P3h B8f R2i+ white is much
better, as both players agreed in the post-mortem.

41.S7i-8h    06:36:00  06:51:00

This is a very important difference. Because of 40.S5d, black can close
the hatch on the Anaguma, which makes both of the variations above impossible.

42.P*2f      06:36:00  06:53:00
43.P7f-7e!   06:55:00  06:53:00

Sato was not sure if this pawn push was too soon, but the attack at the
vulnerable head of the knight is the right way to play.

44.P7dx7e    06:55:00  07:00:00
45.P4g-4f    06:55:00  07:00:00
46.P4ex4f    06:55:00  07:01:00
47.S5gx4f    06:55:00  07:01:00
48.P*4e      06:55:00  07:01:00
49.S4f-5e    06:55:00  07:01:00
50.S5dx5e    06:55:00  07:02:00
51.P5fx5e    06:55:00  07:02:00
52.S7b-6c    06:55:00  07:02:00
53.R2h-4h!   07:13:00  07:02:00

Black wants to move this rook to the 7th file to attack the weak point on
7d, but before that, Sato makes sure that white drops his material to avoid
a breakthrough on the 4th file.

54.S*4f      07:13:00  07:21:00
55.N3gx4e    07:13:00  07:21:00
56.P*4g      07:13:00  07:21:00
57.R4h-7h    07:13:00  07:21:00

Black has sacrificed a rook, but without a pawn in hand, white can't properly
defend against this rook.

58.N3cx4e    07:13:00  07:21:00
59.R7hx7e    07:13:00  07:21:00
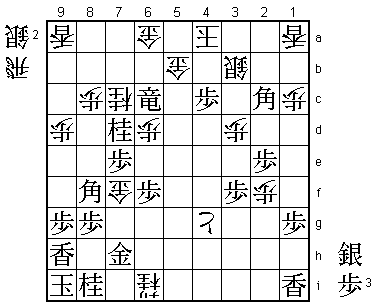
60.S4f-5g+!  07:13:00  07:23:00

A typical "unnatural" Habu move. The normal move is of course 60.N5g+, but
after 61.Gx5g Sx5g+ P*7d Sx7d Rx7d G*6c R7g black is better.

61.G6gx5g    07:28:00  07:23:00

No choice. If 61.P*7d Sx7d Rx7d G6c R7g N8e white has a strong attack.

62.N4ex5g=   07:28:00  07:23:00

The point. Because of this non-promotion, the knight ends up on 6i, where it
is quite close to the Anaguma.

63.G6i-7h    07:28:00  07:23:00
64.G*7d      07:28:00  07:31:00
65.R7e-7g    07:28:00  07:31:00
66.N5g-6i+   07:28:00  07:31:00
67.P*7e      07:29:00  07:31:00
68.G7d-8d    07:29:00  07:35:00
69.R7gx4g    07:31:00  07:35:00
70.B4dx5e    07:31:00  07:36:00
71.B5i-8f    07:34:00  07:36:00

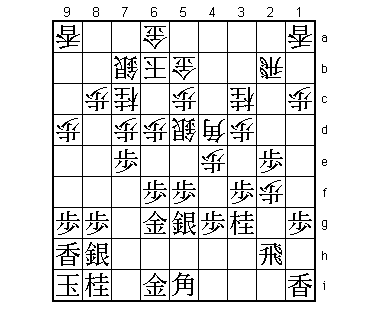
72.N*7f?!    07:34:00  07:42:00

Probably better was 72.Bx1i+, threatening L*7f next. The best way to play for
black seems 73.P7d Gx7d R4a+ R4b +Rx4b Gx4b R*4i G6a-5b Rx1i R*2h P*7i, but
Sato admitted that "giving up the stronghold on 7d would have been very
difficult to play", so it would have been very unlikely that he would have
played the strongest variation.

73.S8h-7g!   07:41:00  07:42:00

Strong defense, but Sato also needs a little bit of luck.

74.G8d-8e    07:41:00  07:45:00
75.S7gx7f!   07:54:00  07:45:00

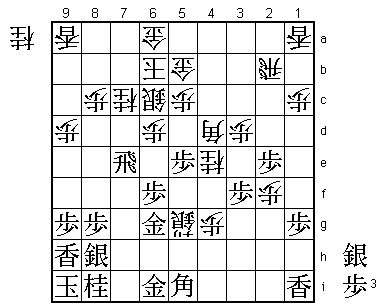
Sato was also thinking long and hard about 75.S*6g, but he couldn't really
decide which was better. After the game, Habu pointed out that 75.S*6g would
have been a blunder, because of 76.Gx8f Px8f N6h+ Sx6h +Nx6h Gx6h S*8g G*7h
B*6e! and white suddenly wins. Sato had overlooked this trap and was lucky
to select the right move here.

76.G8ex7f    07:54:00  07:47:00
77.N*7d      07:54:00  07:47:00
78.K6b-5a    07:54:00  07:54:00

If 78.Sx7d then 79.Px7d P*4f Px7c+ Kx7c P5f Bx6f S*7g and with the bishop
in hand the white king will be mated.

79.S*3a      07:54:00  07:54:00
80.R2b-3b    07:54:00  07:55:00
81.S*4b      07:54:00  07:55:00
82.R3bx4b    07:54:00  07:57:00

Again, 82.Gx4b is impossible because of 83.Sx4b+ Rx4b P*4c P*4f Px4b+ Kx4b
P*4c Kx4c R*4a S*4b P*4d and black wins.

83.S3ax4b+   07:54:00  07:57:00
84.G5bx4b    07:54:00  07:57:00
85.P*4c      07:54:00  07:57:00
86.G4b-5b    07:54:00  07:58:00
87.R*4e      07:54:00  07:58:00
88.P*4f      07:54:00  07:59:00
89.R4ex5e    07:55:00  07:59:00
90.P4fx4g+   07:55:00  07:59:00
91.R5ex5c+   07:55:00  07:59:00
92.K5a-4a    07:55:00  07:59:00
93.B*2c      07:57:00  07:59:00
94.S*3b      07:57:00  07:59:00
95.+R5cx6c   07:59:00  07:59:00

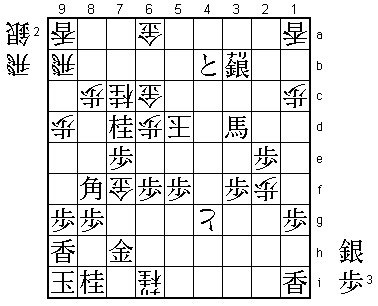
How strong these two players really are became clear once more after the game
when they were asked if 95.Bx3b+ Kx3b P4b+ Gx4b S*2c K4a +R6c wouldn't have
been faster. This variation had been analyzed in the press room and was considered
an easy win as it seems white has nothing else than S*5b, which is answered by
S*3b K5a P*4c. Both players immediately pointed out that instead of S*5b, white
has the surprising S*7b!, after the white position remarkably seems to hang
together. Habu had weaved a little magic in the position, but Sato didn't fall
for it. Quite a deep trap at the end of a grueling two days with a replay and
the match on the line, but both players read the endgame to perfection.

96.G5bx6c    07:59:00  07:59:00
97.S*3c      07:59:00  07:59:00
98.R*9b      07:59:00  07:59:00
99.S3cx3b+   07:59:00  07:59:00
100.K4a-5b   07:59:00  07:59:00
101.P4c-4b+  07:59:00  07:59:00
102.K5b-5c   07:59:00  07:59:00
103.B2cx3d+  07:59:00  07:59:00
104.K5c-5d   07:59:00  07:59:00
105.P*5f     07:59:00  07:59:00
Resigns      07:59:00  07:59:00

Black is simply threatening S*5e K5c +B4c, but there is no good defense. For
example, 106.Gx7d Px7d is again a mating threat and 106.G5c S*5e K6c +Bx6a
also leaves white without defense. For the second year in a row, the Osho
match between Habu and Sato takes the full seven games.
