56th Osho Match Game 5
[Black "Sato Yasumitsu, Challenger"]
[White "Habu Yoshiharu, Osho"]
[Event "56th Osho-sen, Game 5"]
[Date "February 15th and 16th 2007"]
1.P7g-7f     00:00:00  00:00:00
2.P8c-8d     00:00:00  00:02:00
3.S7i-6h     00:00:00  00:02:00
4.P3c-3d     00:00:00  00:04:00
5.P6g-6f     00:00:00  00:04:00
6.S7a-6b     00:00:00  00:07:00
7.P5g-5f     00:00:00  00:07:00
8.P5c-5d     00:00:00  00:20:00
9.S3i-4h     00:00:00  00:20:00
10.S3a-4b    00:00:00  00:26:00
11.G4i-5h    00:00:00  00:26:00
12.G4a-3b    00:00:00  00:29:00
13.G6i-7h    00:00:00  00:29:00
14.K5a-4a    00:00:00  00:33:00
15.K5i-6i    00:00:00  00:33:00
16.G6a-5b    00:00:00  00:42:00
17.S6h-7g    00:01:00  00:42:00
18.S4b-3c    00:01:00  00:46:00
19.B8h-7i    00:01:00  00:46:00
20.B2b-3a    00:01:00  00:47:00
21.P3g-3f    00:05:00  00:47:00
22.P4c-4d    00:05:00  00:48:00
23.G5h-6g    00:07:00  00:48:00
24.P7c-7d    00:07:00  00:48:00
25.B7i-6h    00:18:00  00:48:00
26.G5b-4c    00:18:00  01:27:00
27.K6i-7i    00:18:00  01:27:00
28.P9c-9d    00:18:00  01:27:00
29.K7i-8h    00:49:00  01:27:00

A classic Yagura opening. With all the opening fireworks by Sato, this is
almost a surprise. Of course, Sato has prepared a new idea here as well.

30.P9d-9e    00:49:00  01:30:00
31.P2g-2f    01:03:00  01:30:00
32.S6b-7c    01:03:00  01:34:00
33.P2f-2e    01:41:00  01:34:00
34.P7d-7e    01:41:00  01:51:00
35.P7fx7e    01:48:00  01:51:00
36.B3ax7e    01:48:00  01:52:00
37.P6f-6e    01:48:00  01:52:00
38.B7e-4b    01:48:00  01:57:00
39.B6h-4f    01:48:00  01:57:00
40.R8b-9b    01:48:00  01:58:00
41.S4h-5g    01:48:00  01:58:00
42.K4a-3a    01:48:00  01:59:00
43.S5g-6f    01:48:00  01:59:00
44.K3a-2b    01:48:00  02:00:00
45.P1g-1f    01:51:00  02:00:00
46.P1c-1d    01:51:00  02:41:00
47.R2h-1h?!  03:00:00  02:41:00

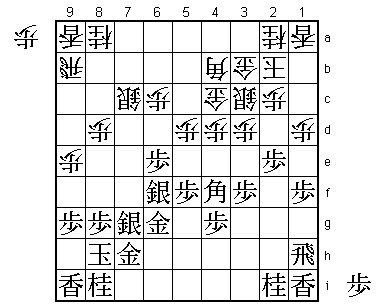
This is Sato's new idea. It prepares for an edge attack, moving the rook
out of the potential line of fire of the white bishop at the same time.
However, the edge attack never materializes and the white bishop is going
in a completely different direction. The consensus in the press room was
that this was not an idea that should be repeated. Interestingly, not a
word was spent on this move in the post-mortem analysis. This may be
because of everything that happened later in the game, or maybe both players
wanted to study the idea some more at home to try it again later.

48.S7c-7d    03:00:00  03:05:00
49.P*7e      03:53:00  03:05:00
50.S7dx7e    03:53:00  03:39:00
51.S6fx7e    03:53:00  03:39:00
52.B4bx7e    03:53:00  03:40:00
53.S7g-6f    03:53:00  03:40:00
54.P4d-4e    03:53:00  03:40:00
55.B4f-3g    03:53:00  03:40:00
56.B7e-5c    03:53:00  03:40:00
57.S*8c      03:54:00  03:40:00
58.R9b-9c    03:54:00  03:40:00
59.B3g-8b+   03:54:00  03:40:00
60.B5c-4d    03:54:00  03:41:00
61.S8c-7b+   05:06:00  03:41:00
62.P6c-6d    05:06:00  04:56:00
63.+B8bx6d   05:09:00  04:56:00
64.S*6c      05:09:00  04:56:00
65.+B6d-8b   05:11:00  04:56:00
66.S6cx7b    05:11:00  04:58:00
67.+B8bx7b   05:11:00  04:58:00
68.N8a-7c    05:11:00  04:58:00
69.S*8b      05:34:00  04:58:00
70.P*6d      05:34:00  04:58:00
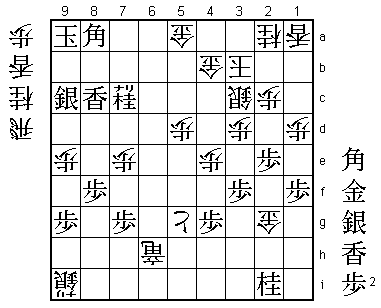
71.P*7g      06:24:00  04:58:00

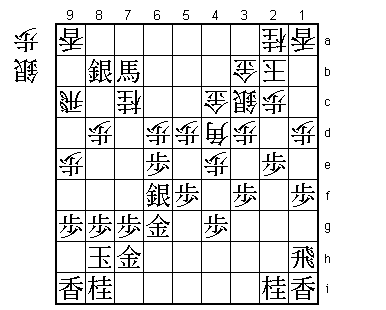
Not a move black wants to play, but the pressure of the bishop on 4d is
too much. Sato of course realized here that his position was bad and is
already preparing to fight back with everything he has. However, after the
game Habu surprised everyone by saying that there wasn't any point during
the game when he thought he was better...

72.P6dx6e?   06:24:00  05:09:00

Too eager. Habu should have taken one more move to prepare his attack by
either 72.R9b, which creates the option of taking either the silver of
bishop (if 73.Sx7c+) at any time, or 72.N8e. Habu is overlooking a simple
but nasty trick until it is too late to do anything about it.

73.S6f-5g    06:24:00  05:09:00
74.S*6f      06:24:00  05:17:00
75.S8bx9c=   06:24:00  05:17:00
76.L9ax9c    06:24:00  05:26:00
77.+B7bx7c   06:25:00  05:26:00
78.S6fx6g+   06:25:00  05:31:00
79.G7hx6g    06:25:00  05:31:00
80.S*6f      06:25:00  05:31:00
81.S5gx6f    06:44:00  05:31:00
82.P6ex6f    06:44:00  05:40:00
83.G6gx6f    06:44:00  05:40:00
84.B4dx6f    06:44:00  06:09:00
85.S*3a      06:44:00  06:09:00

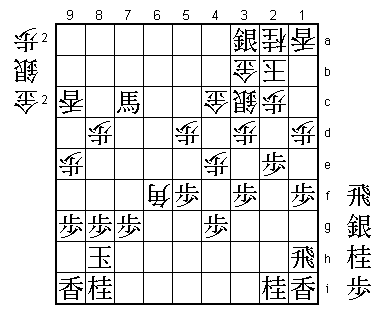
Habu will have been kicking himself for overlooking this.

86.G3bx3a    06:44:00  06:09:00

Or 86.K1b R*6b with more or less the same problem.

87.R*6b      06:44:00  06:09:00
88.G4c-4b    06:44:00  06:09:00
89.R6bx6f+   06:44:00  06:09:00

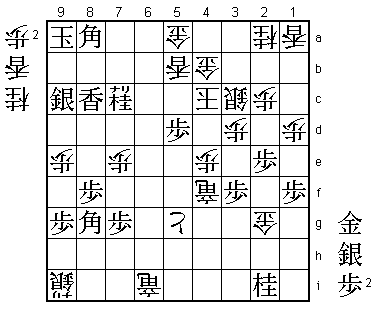
Sato has turned the tables. The white attack is stopped and black now has
the four major pieces, so all that remains to be done is making an entering
king and black wins because of the overwhelming point difference. Still,
making an entering king requires a different outlook than used for normal
shogi and even professionals don't get enough practice to master this type
of play well. In the next phase of this long game, Habu is making it very
difficult for Sato to enter and even though he can't completely prevent it,
Sato is running out of time and starts seeing some ghosts.

90.P*6e      06:44:00  06:11:00
91.+R6fx6e   06:46:00  06:11:00
92.S*5g      06:46:00  06:11:00
93.+B7cx8d   06:51:00  06:11:00
94.P*6f      06:51:00  06:13:00
95.P8g-8f    07:10:00  06:13:00
96.G*2g      07:10:00  06:18:00
97.R1h-7h    07:13:00  06:18:00
98.S*6g      07:13:00  06:18:00
99.K8h-8g    07:14:00  06:18:00
100.S6gx7h=  07:14:00  06:18:00
101.K8g-7f   07:14:00  06:18:00
102.S7hx8i+  07:14:00  06:19:00
103.K7f-7e   07:34:00  06:19:00
104.+S8ix9i  07:34:00  06:22:00
105.+B8dx9c  07:36:00  06:22:00
106.R*7c     07:36:00  06:31:00
107.K7e-8d   07:36:00  06:31:00
108.N*8a     07:36:00  07:03:00
109.L*8c     07:40:00  07:03:00
110.L*9a     07:40:00  07:05:00
111.S*7d     07:43:00  07:05:00
112.G*7b     07:43:00  07:07:00
113.N*8e     07:43:00  07:07:00
114.R7cx7d   07:43:00  07:09:00
115.+R6ex7d  07:43:00  07:09:00
116.S*6c     07:43:00  07:09:00
117.+R7d-7f  07:47:00  07:09:00
118.N8ax9c   07:47:00  07:09:00
119.N8e-7c+  07:48:00  07:09:00
120.B*5a     07:48:00  07:09:00
121.P*6b     07:53:00  07:09:00
122.G7bx6b   07:53:00  07:09:00
123.+N7c-8b  07:57:00  07:09:00
124.G6b-7b   07:57:00  07:13:00
125.K8d-9d   07:57:00  07:13:00
126.B5a-7c   07:57:00  07:13:00
127.R*8a     07:57:00  07:13:00
128.B7cx1i+  07:57:00  07:17:00
129.R8ax9a+  07:57:00  07:17:00
130.L*7a     07:57:00  07:17:00
131.L*7e     07:59:00  07:17:00
132.P*7d     07:59:00  07:17:00
133.K9dx9c   07:59:00  07:17:00
134.P7dx7e   07:59:00  07:17:00

135.+R7f-6e? 07:59:00  07:17:00

It is hard to criticize Sato for missing the way to win in byoyomi after
such a long struggle. Still, after 135.+R8e black wins rather easily. For
example, 136.S7d +Rx7d Gx8b looks pretty bad for black, but after Lx8b+ Lx7d
S*8c white has no way to get to the black king. Sato feared that giving up
the rook would be important if white would also make an entering king. However,
Habu said after the game that he didn't think there was any chance that white
could enter in this position.

136.+B1i-7c  07:59:00  07:18:00
137.+R6ex6c  07:59:00  07:18:00
138.G7bx6c   07:59:00  07:19:00
139.+R9ax7a  07:59:00  07:19:00
140.R*4a     07:59:00  07:21:00
141.+R7ax4a  07:59:00  07:21:00
142.G3ax4a   07:59:00  07:21:00
143.K9c-9b   07:59:00  07:21:00
144.P6f-6g+  07:59:00  07:21:00

Habu suddenly felt that making an entering king was a possibility, probably
having enough points to force a replay. Sato realized that the game was starting
to slip away here. After the game he admitted that he was losing his cool a little
here, not knowing exactly what he was doing. Fortunately, Habu is lending him a
helping hand.

145.R*8a     07:59:00  07:21:00
146.K2b-3b   07:59:00  07:23:00
147.N*8e     07:59:00  07:23:00
148.+B7c-6d  07:59:00  07:25:00
149.R8a-6a+  07:59:00  07:25:00
150.+P6g-6f  07:59:00  07:28:00
151.+N8b-7b  07:59:00  07:28:00
152.R*5a     07:59:00  07:28:00
153.+R6ax5a  07:59:00  07:28:00
154.G4ax5a   07:59:00  07:28:00
155.R*8a     07:59:00  07:28:00
156.R*9d     07:59:00  07:32:00
157.S*9c     07:59:00  07:32:00
158.L*9a     07:59:00  07:32:00
159.R8ax9a+  07:59:00  07:32:00
160.+B6dx9a  07:59:00  07:32:00
161.K9bx9a   07:59:00  07:32:00
162.R9d-6d   07:59:00  07:32:00
163.N8e-7c+  07:59:00  07:32:00
164.G6cx7c   07:59:00  07:32:00
165.+N7bx7c  07:59:00  07:32:00
166.+P6fx5f  07:59:00  07:32:00
167.L*5i     07:59:00  07:32:00
168.R6d-6h+  07:59:00  07:32:00
169.L5ix5g   07:59:00  07:32:00
170.+P5fx5g  07:59:00  07:32:00
171.B*8a     07:59:00  07:32:00

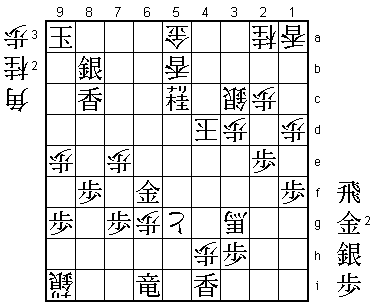
172.L*5b?    07:59:00  07:37:00

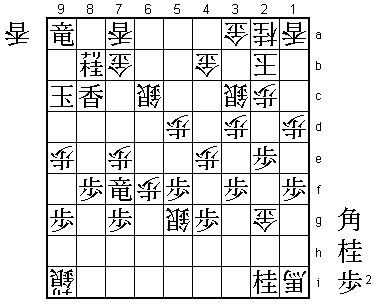
A natural looking defense against Bx5d+, but this was probably Habu's only
chance to go for an entering king with 172.K4c. With time on the clock, it
seems strange that he again is overlooking a rather simple combination.

173.P4g-4f   07:59:00  07:37:00
174.R*4i     07:59:00  07:38:00
175.P*5e     07:59:00  07:38:00
176.R4ix4f+  07:59:00  07:39:00
177.P5ex5d   07:59:00  07:39:00
178.K3b-4c   07:59:00  07:39:00

With P4f, P*5e and Px5d, black has put pressure on the white king, forcing
him out to 4c.

179.L*6i!    07:59:00  07:39:00

Again a combination where Habu can't get out of.

180.+R6hx6i  07:59:00  07:41:00
181.B*8g     07:59:00  07:41:00

And now white has to give up the rook, because P5c+ is devastating. With the
rook in hand, black can stop the white king from entering.

182.L*6e     07:59:00  07:41:00
183.B8gx6i   07:59:00  07:41:00
184.L6ex6i+  07:59:00  07:41:00
185.R*6c     07:59:00  07:41:00
186.K4c-4d   07:59:00  07:41:00
187.R6cx6i+  07:59:00  07:41:00
188.P*6g     07:59:00  07:41:00
189.L*4i     07:59:00  07:41:00
190.+R4f-5f  07:59:00  07:43:00
191.P5d-5c+  07:59:00  07:43:00
192.G4bx5c   07:59:00  07:43:00
193.G*6f     07:59:00  07:43:00
194.+R5fx3f  07:59:00  07:47:00
195.P*3g     07:59:00  07:47:00
196.G2gx3g   07:59:00  07:47:00
197.B8ax4e+  07:59:00  07:47:00
198.+R3fx4e  07:59:00  07:47:00
199.N2ix3g   07:59:00  07:47:00
200.P*4h     07:59:00  07:49:00
201.N3gx4e   07:59:00  07:49:00
202.B*3g     07:59:00  07:49:00
203.N4ex5c+  07:59:00  07:49:00
204.B3gx7c+  07:59:00  07:51:00
205.S9c-8b=  07:59:00  07:51:00
206.+B7c-3g  07:59:00  07:52:00
207.P*3h     07:59:00  07:52:00
Resigns      07:59:00  07:55:00

After 208.+Bx3h white is mated: 209.R*4f Kx5c (B*4e Rx4e is also mate) P*5d
Kx5d S*5e etc. If white leaves the pawn on 3h, this becomes a deciding foothold
to stop the white king from entering. Habu thought for 3 minutes, but then decided
that there was no way for his king to enter and resigned. Great game that turned
out to be the longest that Habu and Sato ever played against each other. With
his back against the wall, Sato managed to pull out the win, but he is still
3-2 behind in the match and playing with the white pieces in the next game.
