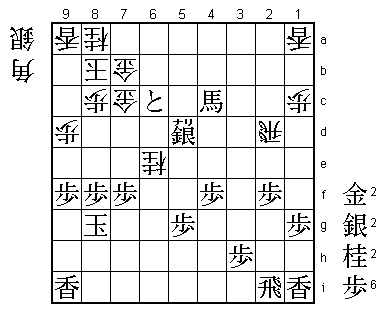
56th Osho Match Game 4
[Black "Habu Yoshiharu, Osho"]
[White "Sato Yasumitsu, Challenger"]
[Event "56th Osho-sen, Game 4"]
[Date "February 7th and 8th 2007"]
1.P7g-7f     00:00:00  00:00:00
2.P3c-3d     00:00:00  00:00:00
3.P2g-2f     00:04:00  00:00:00
4.P5c-5d     00:04:00  00:02:00
5.P2f-2e     00:10:00  00:02:00
6.R8b-5b     00:10:00  00:02:00

Among professionals, Sato is feared for his opening play, because "you never know what
he will come up with". However, it is clear that his recent opening of preference is the
Gokigen Nakabisha. Unlike other Furibisha openings, it is easier to avoid the well known
opening patterns, quickly leading to the man-to-man battle Sato likes. In this game he
tries something new as well, but this time not with much success.

7.B8hx2b+    00:10:00  00:02:00
8.S3ax2b     00:10:00  00:02:00
9.P9g-9f     00:10:00  00:02:00
10.P9c-9d    00:10:00  00:06:00
11.S7i-7h    00:14:00  00:06:00
12.G6a-7b    00:14:00  00:11:00
13.P6g-6f    00:23:00  00:11:00
14.S2b-3c    00:23:00  00:13:00
15.K5i-6h    00:36:00  00:13:00
16.S7a-6b    00:36:00  00:19:00
17.S3i-4h    00:41:00  00:19:00
18.R5b-2b    00:41:00  00:27:00
19.P4g-4f    00:57:00  00:27:00
20.K5a-6a    00:57:00  00:28:00
21.S4h-4g    00:58:00  00:28:00
22.K6a-7a    00:58:00  00:28:00
23.K6h-7i    01:01:00  00:28:00
24.P2c-2d    01:01:00  00:58:00
25.P2ex2d    01:07:00  00:58:00
26.S3cx2d    01:07:00  00:58:00
27.S4g-3f    01:07:00  00:58:00
28.P*2e      01:07:00  01:32:00
29.G4i-5h    01:08:00  01:32:00
30.K7a-8b    01:08:00  01:33:00
31.K7i-8h    01:42:00  01:33:00

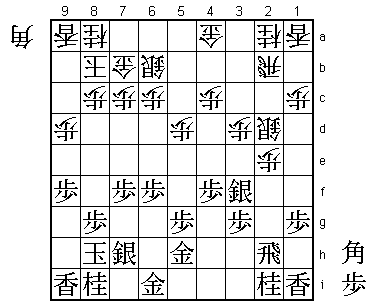
32.P6c-6d?!  01:42:00  02:12:00

White likes to play 32.P3e, but after 33.P*2c Rx2c B*6g R2b Sx2e Sx2e P*2c R4b
Rx2e N3c R2d P*2a Sato didn't like the white position, which looks a bit passive.
However, after the game Sato had to admit that this was probably his best option,
giving better chances than what he played.

33.S7h-7g    02:09:00  02:12:00
34.S6b-5c!?  02:09:00  02:41:00

Very interesting move that shows that Sato is not afraid to play against general
shogi wisdom. The "right" move is obviously 34.S6c, keeping gold and silver
together. However, Sato wants to have the option of moving the rook sideways
to 6b instead of 4b, directly attacking the black king. An interesting idea, but
unfortunately for Sato, there is a strong counter.

35.B*7h!     02:19:00  02:41:00

Habu just picks up a pawn (P3e is not possible because of Sx2e followed by P*2c),
but this needed some good judgment, because the bishop can become a target for
attack as well.

36.N2a-3c    02:19:00  03:06:00
37.B7hx3d    02:20:00  03:06:00
38.G4a-5b    02:20:00  03:07:00
39.G6i-7h    02:23:00  03:07:00
40.P7c-7d    02:23:00  03:31:00
41.S3f-4g    02:38:00  03:31:00
42.P5d-5e    02:38:00  03:54:00
43.P3g-3f    03:04:00  03:54:00
44.S5c-5d    03:04:00  03:55:00
45.B3d-6g    03:39:00  03:55:00
46.P6d-6e    03:39:00  03:58:00
47.P3f-3e    03:44:00  03:58:00
48.P6ex6f    03:44:00  04:00:00
49.S7gx6f    03:44:00  04:00:00
50.P2e-2f    03:44:00  04:00:00
51.R2hx2f    03:57:00  04:00:00
52.N3c-2e    03:57:00  04:08:00
53.R2f-2h    04:04:00  04:08:00
54.G5b-6c    04:04:00  04:21:00
55.P*2f      04:27:00  04:21:00
56.B*3g      04:27:00  05:34:00
57.N2ix3g    04:38:00  05:34:00
58.N2ex3g+   04:38:00  05:34:00
59.P*6d      04:38:00  05:34:00
60.G6c-6b    04:38:00  05:34:00
61.R2h-2i    04:43:00  05:34:00
62.P*6e      04:43:00  05:34:00
63.S6f-7g    04:43:00  05:34:00
64.S2dx3e    04:43:00  05:34:00
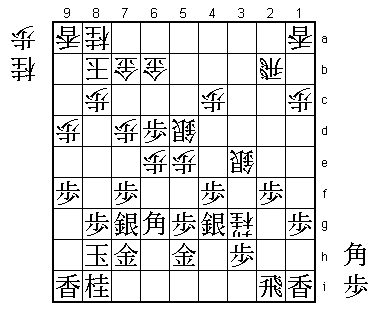
65.P*3h!     05:52:00  05:34:00

For a professional, this is a very strange move to play. White is going to play
+Nx4g at some point anyway, so why waste a move to force his hand? Of course,
dropping the pawn on 3h defends against the fork +Nx4g Gx4g S*3h, but the obvious
square for this pawn is 3d. However, in the post-mortem analysis there were no
good variations found for black after 65.P*3d. Habu admitted that he didn't know
if there was any merit to P*3h, but in this position the threat of N*8f is very
annoying for white, so forcing the exchange of the knight is probably good,
especially since it is followed by another special move by Habu.

66.+N3gx4g   05:52:00  06:04:00
67.G5hx4g    05:52:00  06:04:00
68.S3e-4d    05:52:00  06:04:00
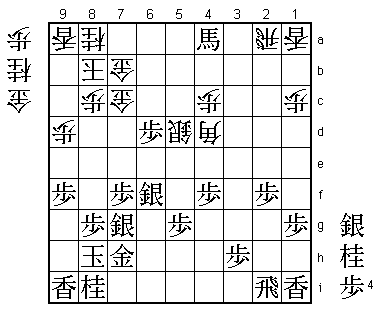
69.B*4a!     05:53:00  06:04:00

This type of move can be considered one of Habu's specials. This bishop doesn't
seem to be threatening anything special (black wants to put a knight on 7d, not
a promoted bishop), but after thinking about it a little more, this bishop drop
has several important meanings. First, the obvious pressure on the head of the
king after +Bx7d. Second, defending against the white counter-attack R3b. Third,
under certain circumstances preparing for the promotion B6g-2c+. Because of this,
white has no good way to continue and even though Sato is doing everything he can,
he doesn't get a real chance of winning this game from here.

70.P5e-5f    05:53:00  06:14:00
71.B6gx5f    05:58:00  06:14:00
72.S4d-5e    05:58:00  06:19:00
73.N*8f      06:13:00  06:19:00
74.S*8e      06:13:00  06:28:00
75.N8fx7d    06:42:00  06:28:00
76.S8ex7d    06:42:00  06:28:00
77.B4ax7d+   06:42:00  06:28:00
78.G6b-7c    06:42:00  06:35:00
79.+B7d-4a   06:49:00  06:35:00
80.S5ex5f    06:49:00  06:35:00
81.G4gx5f    06:53:00  06:35:00
82.N*6f      06:53:00  06:45:00
83.G5fx6f    06:59:00  06:45:00
84.P6ex6f    06:59:00  06:45:00
85.S7gx6f    06:59:00  06:45:00
86.B*4d      06:59:00  07:19:00
87.S*7g      07:05:00  07:19:00
88.R2b-2a    07:05:00  07:30:00
89.+B4a-4b   07:18:00  07:30:00
90.R2a-2b    07:18:00  07:30:00
91.+B4b-4a   07:21:00  07:30:00
92.R2b-2a    07:21:00  07:30:00

93.+B4a-3b!  07:23:00  07:30:00

It is unclear why Habu repeated the moves here. He was not in time trouble and his
position is obviously better, although rather difficult to win. Finally, by moving
the promoted bishop away from the king, he found the road to victory.

94.R2a-2d    07:23:00  07:31:00
95.S*6c!     07:24:00  07:31:00

Tough to defend against this attack. For example, after 96.Sx6c Px6c+ G7cx6c the
move P*6d is very strong. White can not take this pawn with Gx6d because of the
fork +B4b.

96.P*6e      07:24:00  07:41:00

Sato tries a desperate counter attack, but it is all in vain. It seems he could
have tried 96.R3d, but after 97.+B2c Rx3h+ +B5f black wins because white cannot
afford to exchange rooks in this position.

97.S6cx5d+   07:30:00  07:41:00
98.P6ex6f    07:30:00  07:43:00
99.+B3bx4c   07:37:00  07:43:00

Sato was surprised to find that he had no way to continue his attack from here.

100.S*6g     07:37:00  07:44:00
101.S*7i     07:38:00  07:44:00
102.S6gx7h+  07:38:00  07:57:00
103.S7ix7h   07:38:00  07:57:00
104.P6f-6g+  07:38:00  07:57:00
105.S7hx6g   07:40:00  07:57:00
106.B4dx7g+  07:40:00  07:57:00
107.N8ix7g   07:45:00  07:57:00
108.G*6h     07:45:00  07:57:00
109.P6d-6c+! 07:55:00  07:57:00

Habu had originally planned 109.S*7h here, but realized in time that 110.Rx2f!
is a strong counter. Then 111.Rx2f S*7i K9g Gx7h Sx7h N*7d is very dangerous for
black, also because white has the strong edge attack P9e. Fortunately for Habu,
there is another way to play here.

110.G6hx6g   07:55:00  07:57:00
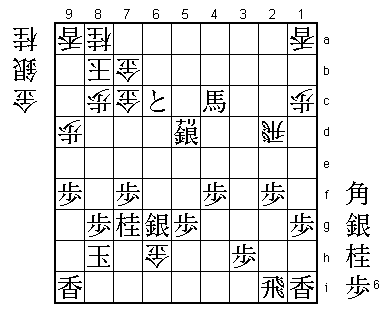
111.B*5e!    07:56:00  07:57:00

White was threatening mate (G*7h K9h N*8f Px8f S*8g etc.), but this bishop defends
against this mating threat while threatening mate with +Px7b etc. White's biggest
problem is that the early escape 112.K9b doesn't work: 113.+Px7b Gx7b G*8b and
mate. Sato gives some checks, but there is no way to win this position.

112.G*7h     07:56:00  07:59:00
113.K8h-9h   07:56:00  07:59:00
114.N*8f     07:56:00  07:59:00
115.P8gx8f   07:56:00  07:59:00
116.S*8g     07:56:00  07:59:00
117.K9hx8g   07:56:00  07:59:00
118.G6gx7g   07:56:00  07:59:00
119.B5ex7g   07:56:00  07:59:00
120.G7hx7g   07:56:00  07:59:00
121.K8gx7g   07:56:00  07:59:00
122.N*6e     07:56:00  07:59:00
123.K7g-8g   07:57:00  07:59:00
Resigns      07:57:00  07:59:00

Sato has run out of decent checks and even out of decent attacking moves. For example,
the obvious move 124.B*6f is not even a mating threat, so black can just play +Px7b
or N*8e with an easy win. White has no attack and no defense, so Sato resigned here.
Habu wins three consecutive games after dropping the first game in this match, putting
him one game away from his 12th Osho title, which also automatically gives him the
honorary "Lifetime Osho" title.
