56th Osho Match Game 3
[Black "Sato Yasumitsu, Challenger"]
[White "Habu Yoshiharu, Osho"]
[Event "56th Osho-sen, Game 3"]
[Date "January 24th and 25th 2007"]
1.P7g-7f     00:00:00  00:00:00
2.P8c-8d     00:00:00  00:02:00
3.B8h-7g     00:02:00  00:02:00
4.P3c-3d     00:02:00  00:03:00
5.R2h-8h     00:02:00  00:03:00

This could be called a "Sato Special". There have been only five
professional games with this position and Sato played two of them.
He also won both of the games he played with this opening. White
won only one of the five games, so it is kind of surprising that
this has not been played more often.

6.K5a-4b     00:02:00  00:06:00
7.S7i-6h     00:03:00  00:06:00
8.K4b-3b     00:03:00  00:08:00
9.K5i-4h     00:03:00  00:08:00
10.S7a-6b    00:03:00  00:19:00
11.K4h-3h    00:03:00  00:19:00
12.G6a-5b    00:03:00  00:20:00
13.K3h-2h    00:04:00  00:20:00
14.P6c-6d    00:04:00  00:49:00
15.G6i-5h    00:38:00  00:49:00
16.P8d-8e    00:38:00  00:57:00
17.L1i-1h    00:49:00  00:57:00
18.S6b-6c    00:49:00  01:21:00
19.K2h-1i    00:50:00  01:21:00
20.B2bx7g+   00:50:00  01:34:00
21.S6hx7g    00:50:00  01:34:00
22.S3a-2b    00:50:00  01:34:00
23.S3i-2h    00:50:00  01:34:00

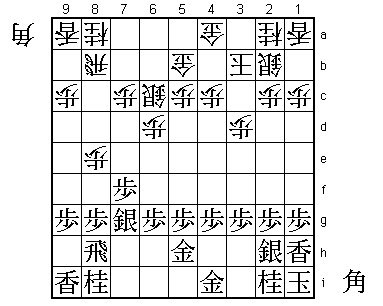
Habu is playing the opening completely different from the games that
have been played so far. Still, his strategy is a little suspect
because white has lost a tempo by exchanging the bishop. Black already
has gotten very far into the Anaguma formation and is ready for attack.

24.S2b-3c    00:50:00  01:36:00
25.G4i-3i    01:03:00  01:36:00
26.K3b-2b    01:03:00  01:36:00
27.P9g-9f    01:11:00  01:36:00
28.G4a-3b    01:11:00  01:38:00
29.P9f-9e    01:11:00  01:38:00
30.P1c-1d    01:11:00  01:38:00
31.G5h-4h    01:19:00  01:38:00
32.P1d-1e    01:19:00  01:53:00
33.P7f-7e    01:33:00  01:53:00
34.G5b-4b    01:33:00  01:55:00
35.G4h-3h    01:56:00  01:55:00
36.S6c-5d    01:56:00  01:57:00
37.L9i-9g    02:24:00  01:57:00
38.P4c-4d    02:24:00  02:30:00
39.R8h-9h    02:38:00  02:30:00
40.P4d-4e    02:38:00  03:08:00

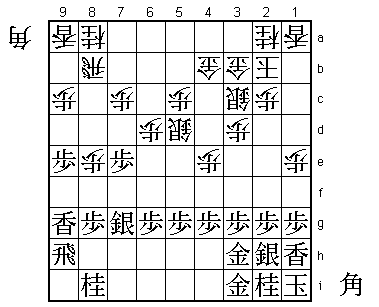
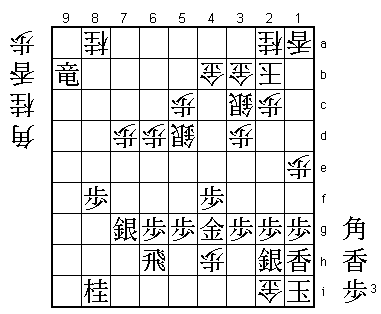
Uncharacteristically, Sato has passed up on the early attack, which
he regretted after the game. Black has a complete Anaguma, which looks
very strong, but white also has a strong castle and the loss of tempo
seems to have had no effect. Sato should have started the attack with
P8f Px8f Sx8f when this was still possible, maybe even at the 25th move.

41.P9e-9d    03:08:00  03:08:00

It seems like Sato thought that this edge attack was very strong. Even
though we are close to the end of the first day, he decided to play it
instead of sealing this move.

42.P9cx9d    03:08:00  03:15:00
43.L9gx9d    03:08:00  03:15:00
44.P*9b      03:08:00  03:15:00
45.P7e-7d    04:19:00  03:15:00

The sealed move. Tempting is 45.P*9c Px9c Lx9c+ Lx9c P*9d, but after P*9b
white can't break through. Instead, Sato uses a little pawn technique to
promote the bishop.

46.P7cx7d    04:19:00  03:29:00
47.P*7b      04:26:00  03:29:00
48.R8bx7b    04:26:00  04:49:00
49.B*8c      04:32:00  04:49:00
50.R7b-7c    04:32:00  04:49:00
51.B8c-6a+   04:32:00  04:49:00
52.P9b-9c    04:32:00  04:49:00
53.+B6a-6b   04:49:00  04:49:00

The alternative is 53.R9e, but after 54.B*8c +B6b Px9d Rx8e P*8b there is
again no way through for black.

54.R7c-8c    04:49:00  05:15:00

Now it is Habu's turn to be patient. He said he really would have liked to
play 54.Px9d here, but after 55.+Bx7c Nx7c R*7a N6e Rx9a+ Nx5g+ L*5i white
has no good continuation.

55.+B6b-7b   04:57:00  05:15:00
56.R8c-8d    04:57:00  05:16:00
57.L9dx9c=   04:57:00  05:16:00
58.L9ax9c    04:57:00  05:23:00
59.P*9d      04:57:00  05:23:00
60.P8e-8f!   04:57:00  05:23:00

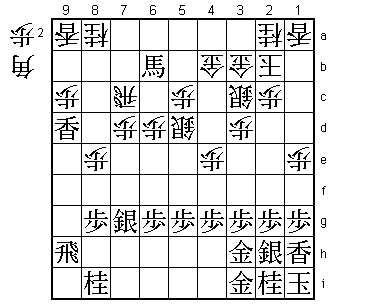
Finally Habu gets the chance to expose the problem of the black position.
In the press room only 60.P*9b was analyzed. Then 61.Px9c+ Px9c +B6b R8b
+B7a R8d leads to sennichite which is an advantage for white because the
replay will be with reversed colors. 60.P8f is much stronger.

61.P8gx8f    05:01:00  05:23:00
62.B*6e      05:01:00  05:45:00
63.R9h-9e    06:01:00  05:45:00
64.P4e-4f    06:01:00  05:45:00
65.P4gx4f    06:01:00  05:45:00
66.B6ex3h+!  06:01:00  05:46:00

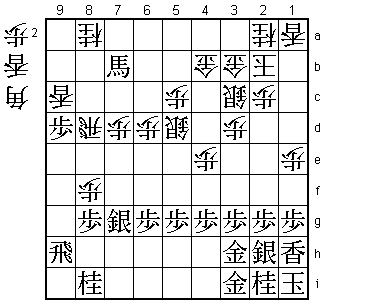
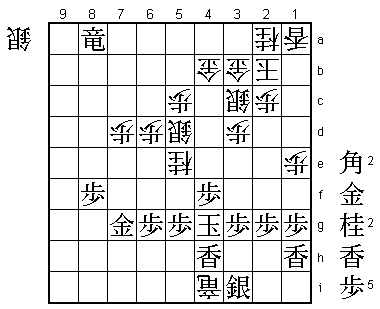
The point. Habu has correctly judged that weakening the Anaguma is worth
the exchange. A mistake would have been 66.Lx9d because of 67.Rx6e and white
doesn't get the chance to get to the Anaguma.

67.G3ix3h    06:01:00  05:46:00
68.P*4g      06:01:00  05:46:00
69.G3hx4g    06:04:00  05:46:00
70.L9cx9d    06:04:00  06:12:00
71.+B7bx9d   06:04:00  06:12:00
72.R8dx9d    06:04:00  06:12:00
73.R9ex9d    06:04:00  06:12:00
74.G*3h!     06:04:00  06:12:00

Again the best move. 74.B*6i is not good because of 75.B*3h Bx4g+ Bx4g G*4h
B*6i and white can hold the position together.

75.R*6h!     06:10:00  06:12:00

Sato plays the best defense. Any other move would be answered by B*6i.
Unfortunately for him, Habu plays another perfect endgame.

76.P*4h      06:10:00  06:25:00
77.R9d-9b+   06:27:00  06:25:00
78.G3hx2i!   06:27:00  07:00:00

This was not analyzed in the press room, but taking this knight is much
better than taking the silver on 2h. The knight can be used on 5e or 3e
to attack the bad gold on 4g. Still, the white attack seems to be slowing
down after Gx2i.

79.K1ix2i    06:27:00  07:00:00
80.P4h-4i+   06:27:00  07:00:00
81.K2i-3h    07:51:00  07:00:00

Sato also felt that there might be something here and spent 1 hour and
24 minutes on this move. In the end, he could only admit that Habu had
been right. There is no way to turn the tables in this position.

82.N*5e      07:51:00  07:04:00

The first knight drop on 5e.

83.G*5h      07:56:00  07:04:00
84.N5ex4g+   07:56:00  07:16:00
85.G5hx4g    07:56:00  07:16:00
86.B*5i      07:56:00  07:17:00
87.R6h-5h    07:56:00  07:17:00
88.G*4h      07:56:00  07:18:00
89.G4gx4h    07:56:00  07:18:00
90.+P4ix4h   07:56:00  07:18:00
91.R5hx4h    07:56:00  07:18:00
92.B5ix4h+   07:56:00  07:18:00
93.K3hx4h    07:56:00  07:18:00
94.P*4g      07:56:00  07:19:00
95.K4hx4g    07:56:00  07:19:00
96.R*4i      07:56:00  07:19:00
97.K4g-5h    07:56:00  07:19:00
98.R4ix8i+   07:56:00  07:19:00
99.+R9bx8a   07:56:00  07:19:00
100.N*5e!    07:56:00  07:28:00

The second knight drop on 5e. Black can now threaten mate with 101.N*2e,
but after 102.+R7h black is forced to drop a gold after which there is no
longer a mating threat and white can win with G*4g.

101.N*5i     07:59:00  07:28:00
102.L*4g     07:59:00  07:39:00
103.S2h-3i   07:59:00  07:39:00
104.G*7h     07:59:00  07:40:00
105.G*6h     07:59:00  07:40:00
106.G7hx7g   07:59:00  07:40:00
107.G6hx7g   07:59:00  07:40:00
108.+R8i-7i  07:59:00  07:40:00
109.N5ix4g   07:59:00  07:40:00
110.N5ex4g+  07:59:00  07:40:00
111.K5hx4g   07:59:00  07:40:00
112.+R7i-4i  07:59:00  07:40:00
113.L*4h     07:59:00  07:40:00
114.N*5e     07:59:00  07:40:00
Resigns      07:59:00  07:40:00

The third knight drop on 5e ends the game. 115.K5f S*6e or 115.K3f S*3e
K2e P2d is mate, so Sato resigned. A very instructive game for those who
have trouble to attack the Anaguma castle. It gives Habu a 2-1 lead in
the match and the black pieces in the next game.
