56th Osho Match Game 2
[Black "Habu Yoshiharu, Osho"]
[White "Sato Yasumitsu, Challenger"]
[Event "56th Osho-sen, Game 2"]
[Date "January 18th and 19th 2007"]
1.P7g-7f     00:00:00  00:00:00
2.P8c-8d     00:00:00  00:01:00

Sato's choice of opening has become very unpredictable these days.
After a lot of Furibisha games, this times he goes back to the Yagura,
his all-time favorite opening.

3.S7i-6h     00:05:00  00:01:00
4.P3c-3d     00:05:00  00:01:00
5.P6g-6f     00:07:00  00:01:00
6.S7a-6b     00:07:00  00:01:00
7.P5g-5f     00:08:00  00:01:00
8.P5c-5d     00:08:00  00:01:00
9.S3i-4h     00:10:00  00:01:00
10.S3a-4b    00:10:00  00:01:00
11.G4i-5h    00:13:00  00:01:00
12.G4a-3b    00:13:00  00:01:00
13.G6i-7h    00:21:00  00:01:00
14.K5a-4a    00:21:00  00:01:00
15.K5i-6i    00:23:00  00:01:00
16.G6a-5b    00:23:00  00:01:00
17.S6h-7g    00:29:00  00:01:00
18.S4b-3c    00:29:00  00:01:00
19.B8h-7i    00:40:00  00:01:00
20.B2b-3a    00:40:00  00:01:00
21.P3g-3f    00:44:00  00:01:00
22.P4c-4d    00:44:00  00:01:00
23.G5h-6g    00:50:00  00:01:00
24.P7c-7d    00:50:00  00:02:00
25.S4h-3g    01:08:00  00:02:00
26.B3a-6d    01:08:00  00:05:00
27.B7i-6h    01:08:00  00:05:00
28.G5b-4c    01:08:00  00:08:00
29.K6i-7i    01:11:00  00:08:00
30.K4a-3a    01:11:00  00:09:00
31.K7i-8h    01:11:00  00:09:00
32.K3a-2b    01:11:00  00:13:00
33.P1g-1f    01:18:00  00:13:00
34.P8d-8e    01:18:00  01:27:00
35.P2g-2f    01:20:00  01:27:00
36.P7d-7e    01:20:00  02:01:00
37.P7fx7e    01:57:00  02:01:00
38.B6dx7e    01:57:00  02:01:00
39.S3g-4f    01:57:00  02:01:00
40.P4d-4e    01:57:00  02:09:00
41.S4f-3g    01:57:00  02:09:00
42.B7e-6d    01:57:00  02:10:00

The current fashion is to allow black the S4f-N3g formation, but Sato
is playing a strategy that was popular about 10 years ago.

43.P2f-2e    02:02:00  02:10:00
44.S6b-5c    02:02:00  03:19:00
45.P4g-4f    02:19:00  03:19:00
46.P4ex4f    02:19:00  03:31:00
47.B6hx4f    02:19:00  03:31:00
48.P*4d      02:19:00  03:36:00
49.R2h-4h    03:24:00  03:36:00
50.P9c-9d    03:24:00  04:24:00

A typical development for a two day title match game. With this move
the first day ended and we are still in known territory.

51.P1f-1e    03:39:00  04:24:00
52.P9d-9e    03:39:00  04:24:00
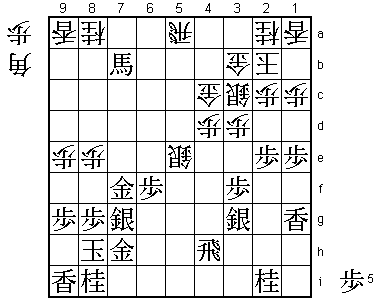
53.L1i-1g!?  03:40:00  04:24:00

Habu has experience with this position, because he also played it with
black in the first game of the Kio title match against Tanigawa in February
1993. In that game he played 53.P*7f and after 54.Bx4f Sx4f P6d P2d Px2d N3g
the game ended in sennichite in the endgame. 53.L1g is a new move, but also
a risky one as it leaves the black castle exposed to an attack on 7f.
The point is that if white plays 54.Bx4f Sx4f P4e S3g S5c-4d to built a
perfect four-general Yagura formation, black can answer with P*7d, threatening
P7c+ Nx7c P*7d. Because black has not dropped the pawn on 7f, this counter
attack is possible. Sato, in character, doesn't hesitate to try and take
advantage of the weakness in the black castle: "There is a weakness that
made me want to attack".

54.P5d-5e    03:40:00  05:10:00
55.B4fx5e    04:00:00  05:10:00
56.P*7f      04:00:00  05:23:00
57.G6gx7f    04:28:00  05:23:00
58.B6dx5e    04:28:00  05:32:00
59.P5fx5e    04:28:00  05:32:00
60.S5c-6d    04:28:00  05:32:00
61.B*7d      04:30:00  05:32:00
62.S6dx5e    04:30:00  06:37:00
63.B7dx6c+   04:33:00  06:37:00
64.B*5b      04:33:00  06:40:00
65.+B6cx5b   04:37:00  06:40:00
66.R8bx5b    04:37:00  06:40:00
67.B*6c      04:37:00  06:40:00
68.R5b-5a    04:37:00  06:41:00
69.B6c-7b+   05:10:00  06:41:00

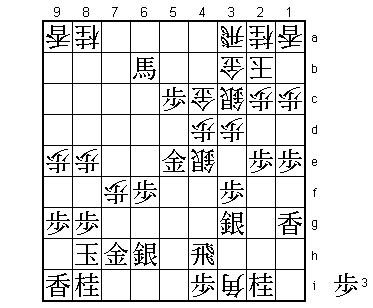
70.P*7e?     05:10:00  07:10:00

Sato is counting on 70.P*7e 71.G6e 72.P7f and now 73.Sx7f S5f +B6b Sx6e
+Bx5a Sx7f gives white two generals for the rook and 73.S6h looks pretty
ugly, because of the hole on 7g. Inoue (8-dan), who was commenting the game
explained to the audience that S6h was not playable... Correct was 70.S6d,
which Sato had rejected because of 71.S6h, but this can be answered by
72.B*5i!. For example, 73.Sx5i Rx5i+ R2h P8f Px8f N7c +B8c S*7e or 73.P*5b
Bx4h+ Px5a+ +B5h G7f-7g R*6i S6g +Bx6g G7gx6g P8f (Px8f P*8g is winning for
white). Both variations are much better than the game, in which Sato never
gets a chance to recover.

71.G7f-6e    05:14:00  07:10:00
72.P7e-7f    05:14:00  07:12:00
73.S7g-6h!   05:18:00  07:12:00

But Habu has a better feel for this position than anybody else. Surprisingly,
white has no proper moves to take advantage of what seem to be obvious weaknesses
of the black position. White is pushed back in the next couple of moves and Sato
is left to desperately trying to built something out of nothing.

74.S5e-5f    05:18:00  07:24:00
75.+B7b-6b   05:18:00  07:24:00
76.R5a-3a    05:18:00  07:34:00
77.G6e-5e    05:38:00  07:34:00
78.S5f-4e    05:38:00  07:37:00
79.P*5c      06:05:00  07:37:00
80.B*3i      06:05:00  07:38:00
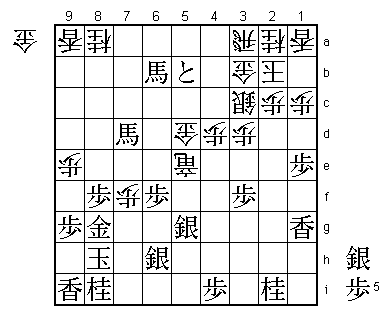
81.P*4i!     06:12:00  07:38:00

Great move. Even after Bx4h+ Sx4h the black position is very compact and white
has no good place to use the rook. Tempting was to rush the attack with 81.P5b+,
but then the white silver returns to action with 82.Sx3f (Sx3f Bx4h+ is good
for white), and white suddenly can fight again.

82.B3ix4h+   06:12:00  07:42:00
83.S3gx4h    06:12:00  07:42:00
84.R*2g      06:12:00  07:42:00
85.B*8c!     06:20:00  07:42:00

Again a good move by Habu. This defends the knight on 2i and again gives white
very few options to use the rook.

86.P8e-8f    06:20:00  07:44:00
87.P8gx8f    06:26:00  07:44:00
88.R2gx2e+   06:26:00  07:44:00
89.P5c-5b+   06:28:00  07:44:00
90.S4e-5d    06:28:00  07:44:00
91.G5ex5d    06:36:00  07:44:00
92.G4cx5d    06:36:00  07:44:00
93.B8c-7d+   06:36:00  07:44:00
94.P*8g      06:36:00  07:52:00
95.G7hx8g    06:44:00  07:52:00
96.+R2e-5e   06:44:00  07:54:00
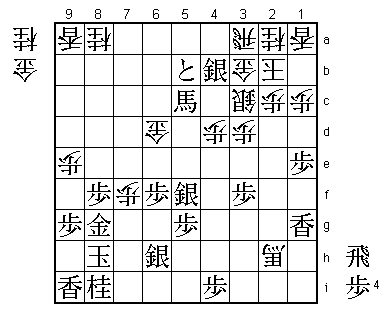
97.S4h-5g!   06:51:00  07:54:00

Habu is showing a lot of patience in this game. Again, the obvious move is
97.+P4a, but then after 98.+Rx6f, the tables are turned.

98.G5d-6d    06:51:00  07:54:00
99.+B7d-5f!  06:52:00  07:54:00

The deciding move. 99.+B4g seems to be more compact, but after 100.G*6c, the
position is not so clear anymore.

100.+R5ex5f  06:52:00  07:54:00
101.S5gx5f   06:52:00  07:54:00
102.B*3h     06:52:00  07:54:00
103.P*5g     06:56:00  07:54:00
104.B3hx2i+  06:56:00  07:54:00
105.+B6b-5c  06:57:00  07:54:00
106.+B2i-2h  06:57:00  07:55:00
107.S*4b     06:58:00  07:55:00
Resigns      06:58:00  07:57:00

The only reasonable move seems to be 108.N*7e, but after 109.Sx3a+ Gx3a +Bx3a
Kx3a R*4a white is mated. White has no proper defense against this, so here
Sato resigned. A perfect game by Habu and a good lesson in how to win a good
position despite having weaknesses in one's own camp. This match has just
started, but Sato will not be happy about this one-sided game.
