56th Meijin Match Game 7
Black: Tanigawa, Meijin
White: Sato, Challenger
56th Meijin-sen, Game 7, June 17th and 18th 1998
1.P7g-7f           0/0          0/0

It has been a very long time since the result of the furigoma has been
watched with so much interest. After six consecutive wins by black, the
toss of the pawns almost seemed to decide the outcome of the game.
Scorekeeper Ohira (3-dan) even practised the furigoma the day before the
game. The "real" furigoma showed three pawns and two tokins, so the black
pieces went to Meijin Tanigawa.

2.P8c-8d           0/0          8/8
3.S7i-6h           14/14        0/8
4.P3c-3d           0/14         4/12
5.P6g-6f           0/14         0/12

A big surprise. After winning games 1, 3 and 5 with the Kakugawari, Tanigawa
changes to the Yagura in the all-deciding game. When asked he told that he
had planned to play Yagura both with black or with white. This despite the
fact that Sato is the leading expert in this type of play.

6.S7a-6b           0/14         5/17
7.P5g-5f           1/15         0/17
8.P5c-5d           0/15         0/17
9.S3i-4h           0/15         0/17
10.S3a-4b          0/15         1/18
11.G4i-5h          1/16         0/18
12.G4a-3b          0/16         0/18
13.G6i-7h          1/17         0/18
14.K5a-4a          0/17         0/18
15.K5i-6i          0/17         0/18
16.G6a-5b          0/17         14/32
17.S6h-7g          11/28        0/32
18.S4b-3c          0/28         1/33
19.B8h-7i          5/33         0/33
20.B2b-3a          0/33         0/33
21.P3g-3f          4/37         0/33
22.P4c-4d          0/37         1/34
23.G5h-6g          15/52        0/34
24.P7c-7d          0/52         4/38
25.S4h-3g          15/67        0/38
26.B3a-6d          0/67         15/53
27.B7i-6h          6/73         0/53
28.G5b-4c          0/73         6/59
29.K6i-7i          1/74         0/59
30.K4a-3a          0/74         4/63
31.K7i-8h          8/82         0/63
32.P9c-9d          0/82         28/91
33.S3g-4f          20/102       0/91
34.S6b-5c          0/102        22/113
35.N2i-3g          10/112       0/113
36.B6d-7c          0/112        7/120
37.P2g-2f          17/129       0/120
38.S3c-2d          0/129        84/204
39.P1g-1f          95/224       0/204
40.P1c-1d          0/224        2/206
41.R2h-3h          11/235       0/206
42.K3a-2b          0/235        4/210
43.L1i-1h          2/237        0/210
44.P9d-9e          0/237        7/217
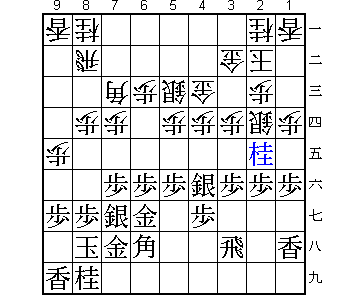
45.N3g-2e          19/256       0/217

In style. The Yagura anaguma after 45.L9h has been played here many times as
well. Tanigawa chooses the more positive 45.N2e.

46.P4d-4e          0/256        10/227
47.S4fx4e          4/260        0/227
48.B7c-1i+         0/260        1/228
49.B6h-4f          1/261        0/228
50.+B1ix4f         0/261        1/229
51.P4gx4f          0/261        0/229
52.B*5i            0/261        2/231
53.B*3g            18/279       0/231
54.B5ix3g+         0/279        21/252
55.R3hx3g          0/279        0/252
56.B*1i            0/279        0/252
57.R3g-3h          1/280        0/252
58.B1ix4f+         0/280        2/254
59.P*4d            0/280        0/254
60.+B4fx4e         0/280        46/300
61.P4dx4c+         0/280        0/300
62.G3bx4c          0/280        0/300
63.B*1i            14/294       0/300
64.P6c-6d          0/294        13/313
65.R3h-4h          4/298        0/313
66.P*4f            0/298        1/314
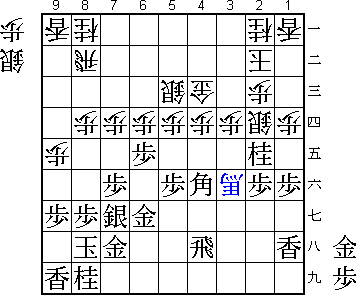
67.B1ix4f          53/351       0/314

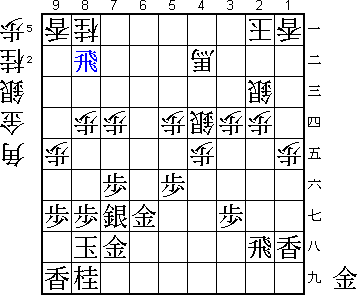
So far the game has not developed into new territory. Both the games between
Morishita and Moriuchi (last year's Junisen) and Kitahama-Namekata (last year's
Zen Nihon Pro Tournament) had the same development. Morishita played 67.Rx4f
here, but Tanigawa chooses Kitahama's Bx4f.

68.P*4d            0/351        42/356
69.P6f-6e          1/352        0/356

New move. Kitahama played B1i here. Tanigawa's P6e seems better.

70.+B4ex3f         0/352        7/363

71.P*3g?!          48/400       0/363

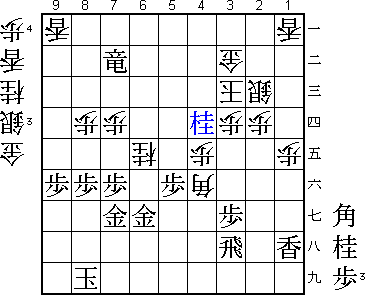
Played after long thought, but probably not so good. The alternative was
71.P*3c Nx3c Px6d S*3g Bx2d Px2d P6c+ and black gets a strong attack for the
sacrifice of his major pieces.

72.+B3fx2f         0/400        65/428
73.G*3f?!          44/444       0/428

Bad moves often come in pairs. Having decided upon a wrong plan, it is
difficult to change. Better was 73.Px6d P4e P6c+ Px4f Rx4f +B4d +Px5c +Bx5c
G*6c! with good chances. Still, the game remains very close, although white
may have a slight edge here. However, white has to be extremely careful with
his weakened king position.

74.+B2f-2g         0/444        2/430
75.P6ex6d          0/444        0/430
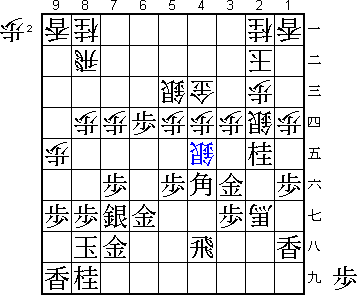
76.S*4e!           0/444        16/446

Good move. It is the only way to contain black's attack.

77.G3fx4e?!        6/450        0/446

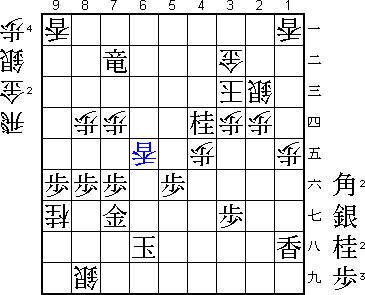
This mistake definitely gives white the advantage. Black should have played
77.Bx2d Px2d P6c+ with good chances for both sides. Both players did not have
much confidence in their positions here.

78.P4dx4e          0/450        0/446
79.S*3f            0/450        0/446
80.+B2gx3f         0/450        20/466
81.B4fx2d          0/450        0/466
82.+B3fx2e         0/450        1/467
83.B2d-5a+         0/450        0/467
84.S5c-4b          0/450        1/468
85.+B5a-4a         7/457        0/468
86.+B2e-2d         0/457        26/494
87.R4h-2h          4/461        0/494
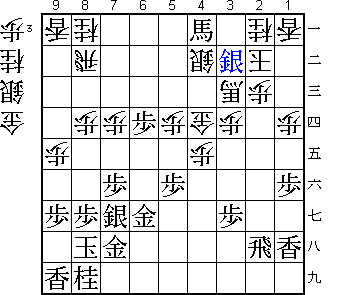
88.+B2d-3c         0/461        0/494

This retreat of the promoted bishop is very good. White has stopped the threat
P6c+, because this would lose the bishop after G*5a. Black has to take drastic
measures to stay in the game.

89.P*4d            24/485       0/494
90.G4cx4d          0/485        0/494
91.S*3b            0/485        0/494

92.P2c-2d?!        0/485        11/505

Of course the biggest mistake white could make would have been 92.+Bx3b +Bx3b
Kx3b B*7a, but defending 2c by 92.N*3a would have killed Tanigawa's attack.
Tanigawa: "I thought that this might give me chances".

93.P6d-6c+         1/486        0/505
94.S*4c!           0/486        7/512

Sato probably counted on the strength of this move when he played 92.P2d. It is
indeed a strong defense, but from this game it is not clear if it is strong
enough.

95.+B4ax4b         13/499       0/512

An alternative is 95.+P5b Sx3b +Bx4b G4c. Tanigawa: "I thought this was very
painful".

96.R8bx4b          0/499        3/515
97.S3bx2a+         4/503        0/515
98.K2bx2a          0/503        0/515
99.+P6c-5c         0/503        0/515
100.R4b-9b         0/503        0/515
101.S*4b           1/504        0/515
102.R9bx4b         0/504        4/519
103.+P5cx4b        0/504        0/519
104.+B3cx4b        0/504        0/519
105.N*3f           1/505        0/519
106.S*2c           0/505        10/529
107.N3fx4d         0/505        0/529
108.S4cx4d         0/505        0/529
109.P1f-1e         3/508        0/529
110.P1dx1e         0/508        0/529
111.R*8b           0/508        0/529

112.B*6d!          0/508        1/530

White looked in trouble after 111.R*8b, but this is a great bishopdrop that
helps both attack and defense. Black is a bit short on material and would love
to take the knight and lance, but white does not allow that. If black gets
too much material, the difference in king defense will become decisive.

113.R8bx8a+        2/510        0/530
114.K2a-2b         0/510        0/530
115.+R8a-7b?       1/511        0/530

The move that loses the meijin title. After 115.P5e Bx5e R5h things are still
very complicated. Now white's attack is faster, but only just.

116.G*3b           0/511        0/530
117.R2h-3h         5/516        0/530
118.N*8e           0/516        0/530
119.G*6e           0/516        0/530
120.B6d-4f         0/516        0/530
121.G6ex5d         0/516        0/530
122.P9e-9f         0/516        1/531
123.P9gx9f         0/516        0/531
124.P*9h           0/516        0/531
125.P8g-8f         2/518        0/531
126.P9hx9i+        0/518        2/533
127.G5dx4d         0/518        0/533
128.+P9ix8i        0/518        4/537
129.K8hx8i         0/518        0/537
130.N8ex7g+        0/518        0/537
131.G7hx7g         0/518        0/537
132.N*6e           0/518        0/537
133.S*3c           6/524        0/537
134.+B4bx3c        0/524        1/538
135.G4dx3c         0/524        0/538
136.K2bx3c         0/524        0/538
137.N*4d           0/524        0/538

White has no defense, but there is a mate.

138.N6ex7g=        0/524        0/538
139.G6gx7g         0/524        0/538
140.N*9g           0/524        0/538
141.K8i-7h         0/524        0/538
142.S*8i           0/524        0/538
143.K7h-6i         4/528        0/538
144.S*6h           0/528        0/538
145.R3hx6h         0/528        0/538
146.B4fx6h+        0/528        0/538
147.K6ix6h         0/528        0/538
148.L*6e           0/528        0/538
Resigns            0/528        0/538
Time:              08:48:00     08:58:00

After 149.P*6f R*2h N*5h G*7h Gx7h Sx7h+ Kx7h Rx5h+ black is mated. Sato's
comment's on the game: "I did not know who was going to win until the very
end. Only when I saw the mate, I was sure of victory".

So, a dream he has had since his early childhood has come true for 28-year
old Sato Yasumitsu, Shin-Meijin ("New Meijin"). He takes his place in history
to win a title that has been part of the Shogiworld since the sixteenth
century. He is only the tenth player to win the title since it has been played
for in tournament form (since the 1930s). The win becomes even more
impressive when one realises what mental toughness Sato had to show to play
catch-up for almost a year. He started the Junisen badly with a 1-3 score and
in the Meijin match itself he had to come from behind three times. Shogi has
a great new champion.
