56th Meijin Match Game 6
Black: Sato, Challenger
White: Tanigawa, Meijin
56th Meijin-sen, Game 6, June 8th and 9th 1998
1.P7g-7f           1/1          0/0
2.P8c-8d           0/1          2/2
3.S7i-6h           2/3          0/2
4.P3c-3d           0/3          1/3
5.P6g-6f           0/3          0/3
6.S7a-6b           0/3          2/5
7.P5g-5f           1/4          0/5
8.P5c-5d           0/4          7/12
9.S3i-4h           0/4          0/12
10.S3a-4b          0/4          1/13
11.G4i-5h          1/5          0/13
12.P6c-6d          0/5          30/43
13.S6h-7g          42/47        0/43
14.S6b-6c          0/47         4/47
15.P2g-2f          0/47         0/47
16.G4a-3b          0/47         36/83
17.P2f-2e          25/72        0/83
18.R8b-5b          0/72         15/98

The aggresive Yagura Nakabisha. White is aiming for an early attack.

19.S4h-5g          28/100       0/98
20.K5a-4a          0/100        34/132
21.P2e-2d          3/103        0/132
22.P2cx2d          0/103        11/143
23.R2hx2d          0/103        0/143
24.P5d-5e          0/103        1/144
25.P5fx5e          0/103        0/144
26.R5bx5e          0/103        0/144
27.R2d-2h          6/109        0/144
28.P*2c            0/109        1/145
29.G5h-6g          28/137       0/145
30.P7c-7d          0/137        14/159
31.G6i-7h          4/141        0/159
32.R5e-5a          0/141        4/163
33.K5i-6i          0/141        0/163
34.S6c-5d          0/141        3/166
35.S7g-6h          27/168       0/166
36.G6a-6b          0/168        11/177
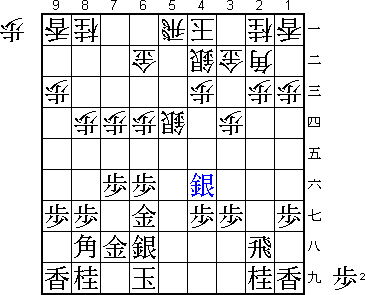
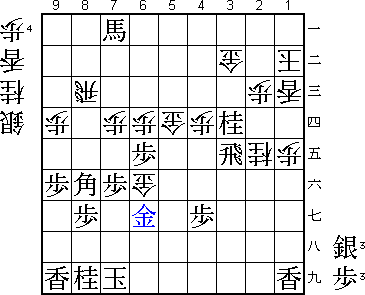
37.S5g-4f!         39/207       0/177

A new move and very strong.

38.P*5e            0/207        74/251

Admits defeat but white had no choice. The aggresive 38.P6e fails to 39.G5f!
and after both 40.P*5e Gx6e and 40.Px6f P*5e black is better. The played move
38.P*5e gives up the idea of attacking early. Black has won the opening
battle.

39.K6i-7i          28/235       0/251
40.G6b-6c          0/235        37/288
41.P3g-3f          52/287       0/288
42.P4c-4d          0/287        23/311
43.N2i-3g          1/288        0/311
44.K4a-3a          0/288        0/311
45.P9g-9f          6/294        0/311
46.S5d-4c          0/294        5/316
47.R2h-2f          10/304       0/316
48.G6c-5d          0/304        4/320
49.P3f-3e          3/307        0/320
50.P1c-1d          0/307        6/326
51.P1g-1f          6/313        0/326
52.P9c-9d          0/313        2/328
53.B8h-7g          4/317        0/328
54.N8a-7c          0/317        11/339
55.P1f-1e          61/378       0/339
56.P1dx1e          0/378        2/341
57.P*1c            7/385        0/341
58.L1ax1c          0/385        23/364
59.P3ex3d          0/385        0/364
60.S4cx3d          0/385        28/392
61.R2f-3f          2/387        0/392
62.S4b-3c          0/387        2/394
63.S4f-3e          20/407       0/394
64.S3dx3e          0/407        31/425
65.R3fx3e          0/407        0/425
66.R5a-5c          0/407        0/425
67.R3e-3f          9/416        0/425
68.S3c-2d          0/416        1/426
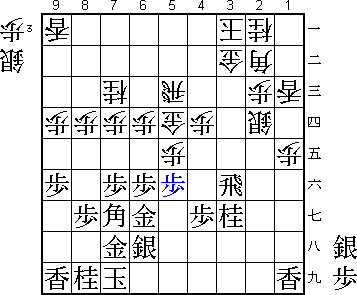
69.P*5f!           9/425        0/426

Very strong move, which gives Sato a big advantage. Black ignores the threat
S*3e and goes straight into the attack.

70.P*3e            0/425        23/449

If 70.S*3e then Rx3e Sx3e Px5e Gx5e B8f! and white has no good defense against
Bx6d.

71.R3f-2f          2/427        0/449
72.P8d-8e          0/427        0/449
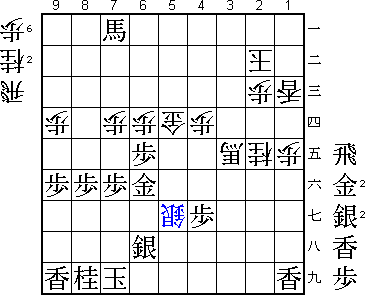
73.S*6b?           41/468       0/449

A serieus misjudgment that lets Tanigawa back in. Sato wants to win the bishop
on 2b by taking the knight on 7c and then drop this knight on 3d (if white
answers this with B3c, then black can play P*2e). However, if white sacrifices
the bishop on 2b, he will have lost material but he has gotten rid of two
pieces that were not working very well and his king is much safer on 2b than
on 3a. The right move would have been 73.N2e! and after 74.Px5f Nx1c+ followed
by L*3d. So white has to play 74.L1d, which gives black another move for his
attack. If Sato would have chosen this line, the game would have been over
quickly.

74.R5c-6c          0/468        3/452
75.P5fx5e          0/468        0/452
76.G5dx5e          0/468        1/453
77.P6f-6e          0/468        0/453
78.G5e-5d          0/468        16/469
79.S6bx7c+         0/468        0/469
80.R6cx7c          0/468        0/469
81.N*3d            0/468        0/469
82.S*3f            0/468        1/470
83.N3dx2b+         4/472        0/470
84.K3ax2b          0/472        0/470
85.B*8b            1/473        0/470
86.R7c-8c          0/473        6/476
87.B8bx9a+         0/473        0/476
88.S3fx3g=         0/473        0/476
89.+B9a-9b?        7/480        0/476

This only helps white. On 5c the rook is much more effective than on 8c.

90.R8c-5c          0/480        2/478
91.R2f-2g          1/481        0/478
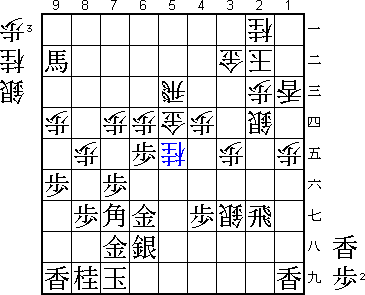
92.N*5e            0/481        8/486

A strong counterattack. Black has to give up the gold on 6g because both
93.G6f Px6e and 93.G5e S3h= followed by Sx4g= are very good for white.

93.+B9b-8a         10/491       0/486
94.P8e-8f          0/491        9/495
95.B7gx8f          8/499        0/495
96.N5ex6g+         0/499        7/502
97.S6hx6g          0/499        0/502
98.N*5e            0/499        0/502
99.S6g-5f          3/502        0/502
100.G*6f           0/502        4/506
101.S5fx5e         31/533       0/506
102.G5dx5e         0/533        0/506
103.L*3d           0/533        0/506
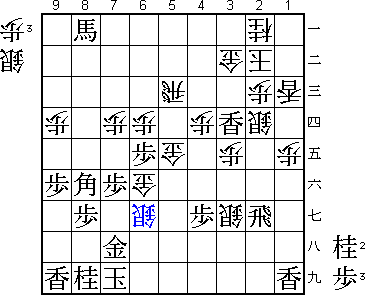
104.S*6g?          0/533        9/515

Tanigawa's attractive style works against him here. He attacks a little too
quickly. Usually his judgment of attack is perfect, but not in this case.
After defending with 104.N3c +B7a G5d (or R5d), black's attack is dead and
white will win. After 104.S*6g, Sato's attack is faster than Tanigawa's
"Speed of Light Attack".

105.+B8a-7a        0/533        0/515
106.G5e-5d         0/533        3/518
107.R2gx3g         2/535        0/518
108.S2d-3c         0/535        4/522
109.L3dx3c+        0/535        0/522
110.R5cx3c         0/535        0/522
111.N*2e           0/535        0/522
112.R3c-8c         0/535        4/526
113.P*3c           1/536        0/526
114.N2ax3c         0/536        1/527
115.N*3d           0/536        0/527
116.K2b-1b         0/536        3/530
117.R3gx3e?        0/536        0/530

Looks good, but is a mistake. After 117.Nx1c+ Kx1c S*2f! white can not defend.
For example L*1d Lx1e Lx1e P*1d and black wins.

118.N3cx2e         0/536        2/532
119.G7hx6g         0/536        0/532

Taking an attack piece with a mating threat (S*2a) is normally winning, but...

120.L*2a!          0/536        1/533

Surprisingly, black's attack is now very difficult.

121.G6gx6f         0/536        0/533
122.R8cx8f         0/536        0/533
123.P*2b           3/539        0/533
124.B*5g           0/539        0/533
125.S*6h           0/539        0/533
126.B5gx3e+        0/539        0/533
127.P2bx2a+        0/539        0/533
128.K1bx2a         0/539        4/537
129.P*2b           0/539        0/537
130.G3bx2b         0/539        0/537
131.N3dx2b+        0/539        0/537
132.K2ax2b         0/539        0/537
133.P8gx8f         0/539        0/537
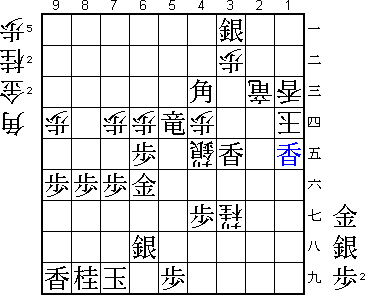
134.S*5g?          0/539        1/538

The mistake that loses the game. After 134.S*8g S*7h R*3h L*4f Sx7h+ Kx7h
+B3d P*5f S*5g the position is unclear. White is not threatening mate, but
with the two defending major pieces, white's king is pretty safe. It might
be that both players have to settle for sennichite here after S*7g Sx6h+
Sx6h S*5g.

135.R*5b           0/539        0/538
136.P*3b           0/539        0/538
137.S*3a           0/539        0/538
138.K2b-3c         0/539        0/538
139.S*4f!          0/539        0/538

Attack and defense. White has to give up his attack by taking this silver.
After this, winning is not difficult anymore for a player of Sato's strength.

140.S5gx4f+        0/539        1/539
141.R5bx5d+        0/539        0/539
142.+S4f-4e        0/539        0/539
143.+B7a-6a        0/539        0/539
144.K3c-2d         0/539        0/539
145.G*3d           0/539        0/539
146.+B3ex3d        0/539        0/539
147.+B6ax3d        0/539        0/539
148.K2dx3d         0/539        0/539
149.L*3f           0/539        0/539
150.S*3e           0/539        0/539
151.B*4c           0/539        0/539
152.K3d-2d         0/539        0/539
153.G*3d           0/539        0/539
154.K2d-1d         0/539        0/539
155.L3fx3e         0/539        0/539
156.R*2i           0/539        0/539
157.P*5i           0/539        0/539
158.N2e-3g+        0/539        0/539
159.G3dx2c         0/539        0/539
160.R2ix2c+        0/539        0/539
161.L1ix1e         0/539        0/539
Resigns            0/539        0/539
Time:              08:59:00     08:59:00

It is said that a game has been really exciting if in the final position five
pieces or less have not moved from their initial square. If that is the case,
this game certainly qualifies with only P4g, L9i and N8i as in the starting
position. Six black wins have tied the Meijin match at 3-3. Everything will
now be decided in the final game seven. Who will get black by the furigoma
and how much of a psychological advantage is that going to be?
