56th Meijin Match Game 5
Black: Tanigawa, Meijin
White: Sato, Challenger
56th Meijin-sen, Game 5, May 28th and 29th 1998
1.P7g-7f           0/0          0/0
2.P8c-8d           0/0          11/11
3.P2g-2f           10/10        0/11
4.G4a-3b           0/10         10/21
5.G6i-7h           4/14         0/21
6.P8d-8e           0/14         0/21
7.B8h-7g           1/15         0/21

Like in games 1 and 3, Tanigawa again plays the Kakugawari opening. Tanigawa
is famous for the variety of openings he plays in title matches, but in this
match his respect for the opening preparation of Sato makes him stick to his
favourite opening.

8.P3c-3d           0/15         0/21
9.S7i-8h           0/15         0/21
10.S3a-4b          0/15         1/22
11.B7gx2b+         2/17         0/22
12.G3bx2b          0/17         0/22

I have always wondered what the point of this exchange was. After all, white
will move the gold back to 3b at some point, resulting in the same position
if white would have played 10.Bx7g+ instead of S4b. In "Igo-Shogi Weekly"
Shima, 8-dan, enlightened me. The idea is to win a move if black plays the
Bogin P2f-S3h-S2g-S2f-S1e. In that case, there is no difference between the
white gold on 3b and the white gold on 2b, so white has an extra move.

13.S8h-7g          0/17         0/22
14.S7a-6b          0/17         2/24
15.S3i-3h          3/20         0/24
16.P6c-6d          0/20         3/27
17.P4g-4f          7/27         0/27
18.S6b-6c          0/27         0/27
19.S3h-4g          2/29         0/27
20.G2b-3b          0/29         2/29

Only after the Bogin is no longer possible, white repairs his bad shaped by
moving the gold back to 3b. We now get a position that has been played many
times before.

21.K5i-6h          14/43        0/29
22.S6c-5d          0/43         12/41
23.K6h-7i          7/50         0/41
24.G6a-5b          0/50         12/53
25.P9g-9f          43/93        0/53
26.P1c-1d          0/93         19/72
27.P1g-1f          5/98         0/72
28.K5a-4a          0/98         21/93
29.G4i-5h          17/115       0/93
30.K4a-3a          0/115        12/105
31.S4g-5f          10/125       0/105
32.P4c-4d          0/125        48/153
33.P6g-6f          22/147       0/153
34.P7c-7d          0/147        26/179
35.P3g-3f          12/159       0/179
36.N8a-7c          0/159        25/204
37.P2f-2e          28/187       0/204
38.S4b-3c          0/187        4/208
39.N2i-3g          1/188        0/208

40.G5b-6c          0/188        25/233

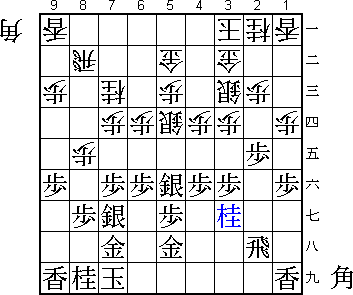
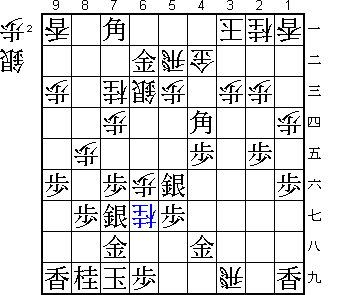
The sealed move and the first move out of the old and famous variations. After
40.P9d, black and white would have exactly the same positions. This position
is not 100% clear, but professional results seem to indicate that black, who
can start the attack, has a slight advantage. Sato instead strengthens his
right side of the board to make black's attack more difficult. An alternative
is 40.P6e.

41.R2h-4h          82/270       0/233

Tanigawa thought long and hard about playing 41.P9e instead, but in the end
decided upon the more aggresive R4h.

42.P6d-6e          0/270        51/284
43.P4f-4e          3/273        0/284
44.B*6d            0/273        25/309
45.B*2f            0/273        0/309
46.P3d-3e          0/273        10/319
47.P3fx3e          72/345       0/319
48.P6ex6f          0/345        16/335
49.P3e-3d          2/347        0/335
50.S3cx3d          0/347        52/387
51.P*3e            6/353        0/387

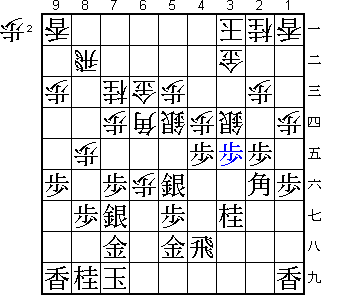
52.S3dx3e?!        0/353        1/388

Probably better is 52.S3d-4c Px4d S5b with the threat to play P*3f next. If
black defends with 55.G4g, then N6e Sx6f P8f Px8f P*8h gives white a good
attack. However, having the silver driven back to 5b is hard to play. Sato
judged that the game variation was better.

53.B2fx3e          1/354        0/388
54.B6dx3g+         0/354        0/388
55.B3ex4d          7/361        0/388
56.+B3gx4h         0/361        17/405
57.G5hx4h          0/361        0/405
58.R*3i            0/361        2/407
59.P*6i            24/385       0/407
60.P*3c            0/385        4/411
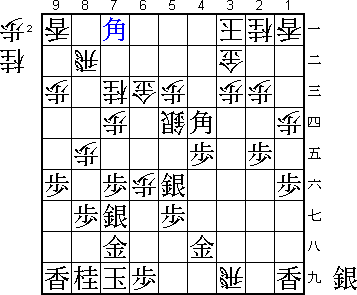
61.B*7a            25/410       0/411

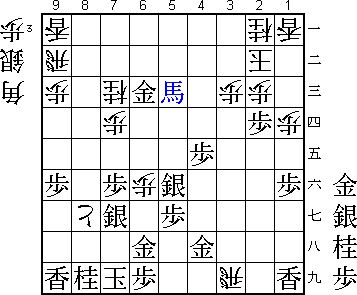
Tanigawa-style attack. The theme of the game now becomes whether or not black
can make his attack work or that he will run out of steam.

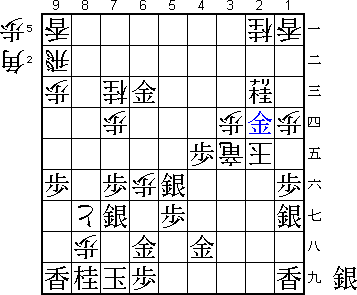
62.R8b-5b?         0/410        39/450

Unlucky! This move is Sato's only mistake in this game, but it is also the
decisive one. The right move was 62.R8a B7ax5c+ K2b +B7a Rx7a Bx7a+ P*5e and
white also has good chances to win. From now on, Tanigawa plays perfectly the
rest of the way and wins the mating race by one move.

63.S*6d!           0/410        0/450

Great silver sacrifice.

64.G3b-4b          0/410        28/478

No choice: 64.Gx6d B7ax5c+ Rx5c Bx5c+ B*4b R*6a P*4a +Bx4b Gx4b Rx6d+ or
64.K2b Sx5c+ or 64.N*6g K8h and black wins.

65.S6dx6c+         0/410        0/478
66.S5dx6c          0/410        0/478
67.G*6b            0/410        0/478
68.N*6g            0/410        3/481

69.G7hx6g!         14/424       0/481

Cool defense. 69.K8h? Rx6i+ Gx6c S*7i Gx7i Nx7i+ and white's attack is quicker.

70.P8e-8f          0/424        1/482

70.Px6g+ Sx6g and white has no continuation.

71.G6g-6h          36/460       0/482

This must have taken some deep calculation. Allowing a promoted pawn near to
the king is very scary.

72.P8fx8g+         0/460        2/484
73.G6bx6c          0/460        0/484
74.R5b-9b          0/460        11/495
75.B7ax5c+         16/476       0/495
76.K3a-2b          0/476        15/510
77.P2e-2d          12/488       0/510
78.G4bx5c          0/488        2/512
79.B4dx5c+         2/490        0/512

80.P*8h            0/490        12/524

The mating threat 80.R8b looks interesting, but after 81.P*8h! +Px7g Nx7g P*8g
Px8g P*8f Px8f S*8g S*8h the white attack is stopped. 80.P*8h is threatening
mate by Px8i+ Kx8i B*7h, but Tanigawa has calculated everything to the end.

81.P2dx2c+         11/501       0/524
82.K2bx2c          0/501        0/524
83.N*3e            0/501        0/524
84.K2c-2d          0/501        1/525
85.P*2e            0/501        0/525
86.K2dx2e          0/501        1/526
87.P*2f            0/501        0/526
88.K2ex2f          0/501        0/526
89.N3e-2c+         0/501        0/526
90.S*3e            0/501        1/527
91.S*1g            9/510        0/527
92.K2f-2e          0/510        0/527
93.+B5c-4c!        0/510        0/527

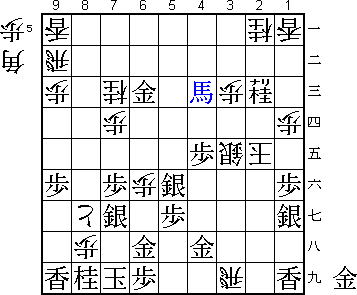
The deciding check.

94.P3c-3d          0/510        5/532

94.B*3d +Bx3c is also hisshi.

95.+B4c-4d!        2/512        0/532

Nice finishing touch.

96.R3i-3f+         0/512        7/539

Sato used his time to the last second to find an escape, but there isn't one.
96.P*2f Sx2f also leads to mate.

97.+B4dx3e         1/513        0/539
98.+R3fx3e         0/513        0/539
99.G*2d            1/514        0/539
Resigns            0/514        0/539
Time:              08:34:00     08:59:00

After both 99.+Rx2d S*2f K3f G3g and 99.K3f S*3g K2g S1g-2h white is mated. A
flawless game by Meijin Tanigawa, who now only needs one win out of two games
to defend his title.
