56th Meijin Match Game 4
Black: Sato, Challenger
White: Tanigawa, Meijin
56th Meijin-sen, Game 4, May 19th and 20th 1998
1.P7g-7f           1/1          0/0
2.P3c-3d           0/1          2/2
3.P2g-2f           2/3          0/2
4.P4c-4d           0/3          2/4
5.P2f-2e           0/3          0/4
6.B2b-3c           0/3          0/4
7.S3i-4h           0/3          0/4
8.R8b-4b           0/3          11/15
9.P5g-5f           5/8          0/15
10.S7a-7b          0/8          6/21
11.K5i-6h          0/8          0/21
12.S3a-3b          0/8          12/33
13.K6h-7h          5/13         0/33
14.G4a-5b          0/13         6/39
15.B8h-7g          37/50        0/39
16.K5a-6b          0/50         24/63
17.K7h-8h          11/61        0/63
18.P9c-9d          0/61         10/73
19.G4i-5h          31/92        0/73
20.P9d-9e          0/92         34/107
21.S4h-5g          3/95         0/107
22.K6b-7a          0/95         6/113
23.P6g-6f          53/148       0/113
24.S3b-4c          0/148        31/144
25.G5h-6g          16/164       0/144
26.P6c-6d          0/164        13/157
27.L9i-9h          18/182       0/157

Often the opening in title matches is already topic of deep discussion, but in
this case the game went more or less as expected. Tanigawa chose the
Shikenbisha, like he played a week earlier against Kato in the Oza tournament.
Sato plays the Anaguma, which he plays a lot against the Furibisha these days.

28.R4b-2b?!        0/182        41/198

Tanigawa wants to play the active P2d, but he will never get the chance.

29.G6i-7h          5/187        0/198
30.P1c-1d          0/187        18/216
31.P1g-1f          4/191        0/216
32.K7a-8b          0/191        23/239
33.P3g-3f          5/196        0/239
34.P4d-4e          0/196        26/265
35.K8h-9i          40/236       0/265
36.S4c-5d          0/236        3/268
37.S7i-8h          52/288       0/268
38.P7c-7d          0/288        5/273
39.S5g-6h          5/293        0/273
40.N8a-7c          0/293        15/288
41.S6h-7i          0/293        0/288
42.P8c-8d          0/293        2/290
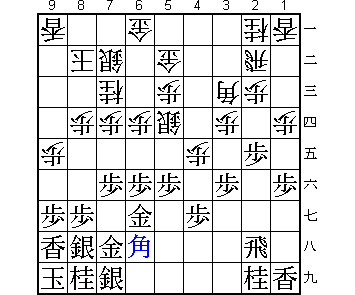
43.B7g-6h!         13/306       0/290

Sato has timed the opening perfectly. With this move, he forced white into a
very risky attack.

44.P6d-6e          0/306        68/358

After the normal 44.S8c, black gets the advantage after 45.P3e Px3e Bx3e.

45.B6h-5g          3/309        0/358
46.P6ex6f          0/309        0/358
47.G6gx6f          0/309        0/358
48.P*6e            0/309        0/358
49.G6f-6g          0/309        0/358
50.S7b-8c          0/309        0/358
51.P8g-8f          25/334       0/358
52.G6a-7b          0/334        2/360
53.G6g-7g          0/334        0/360
54.B3c-4d          0/334        14/374
55.N2i-3g          19/353       0/374
56.N2a-3c          0/353        17/391
57.P2e-2d!         56/409       0/391

Brave move. Black would like to play 57.P*6g first, to kill white's attacking
base, but after 58.G5b-6b P2d Px2d Rx2d Rx2d Bx2d P*2c B6h R*2i R*4a B2f Sato
was afraid of Bx3g+ followed by +B6d and black has trouble breaking down
black defenses. The future P6f is frightening, but black's flow of attack is
more important.

58.P2cx2d          0/409        59/450
59.R2hx2d          0/409        0/450
60.R2bx2d          0/409        0/450
61.B5gx2d          0/409        0/450
62.P6e-6f          0/409        0/450
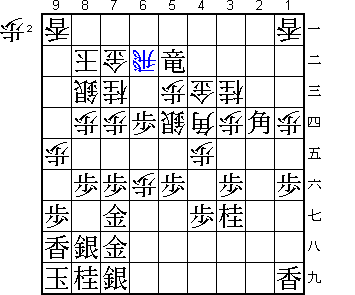
63.R*3b?!          50/459       0/450

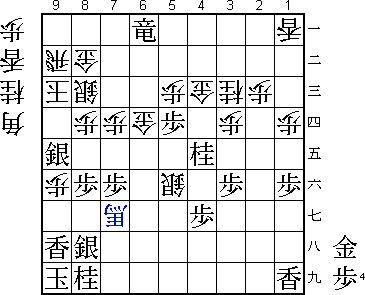
Played after long thought, but not the best. Kobayashi, 8-dan found a great
variation in this position: 63.R*4a S4c Rx1a+ N6e Gx6f! Bx6f L*6h and now:
a) Bx8h+ Sx8h and both the knights on 3c and 6e are hanging and white has the
move B*5e as well, or
b) B4d Lx6e R*2i B1c+ N2e +B2b with an advantage for black.
Both players had overlooked Gx6f.

64.G5b-4c          0/459        2/452
65.P*6c            1/460        0/452
66.S5dx6c          0/460        1/453
67.P*6d            0/460        0/453

This also looks good, but...

68.S6c-5d          0/460        31/484
69.R3b-5b+         1/461        0/484
70.R*6b!           0/461        2/486

"New Tanigawa-style". This moves aims to attack on the sixth file. Black does
not want to give up the dragon here: 70.+Rx6b Gx6b R*3b G7b R5b+ R*6b and
sennichite.

71.+R5b-4a         5/466        0/486
72.N7c-6e          0/466        6/492
73.G7g-8g          14/480       0/492
74.P*2c            0/480        3/495
75.B2d-6h          4/484        0/495
76.P6f-6g+         0/484        0/495
77.G7hx6g          0/484        0/495
78.P*6f            0/484        0/495
79.G6g-7g          0/484        0/495
80.R6bx6d          0/484        1/496
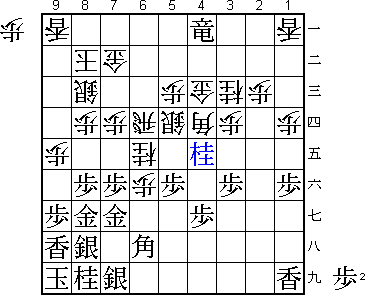
81.N3gx4e!         18/502       0/496

The game looked very close, but with this move Sato makes clear that black is
still a little better. The bishop on 6h is the problem of the black position.
With this knight sacrifice, the bishop can now move to the great square 4f.

82.N6ex7g=         0/502        3/499
83.G8gx7g          0/502        0/499
84.P6f-6g+         0/502        28/527
85.B6h-4f          0/502        0/527
86.G*5e            0/502        0/527
87.P5fx5e          27/529       0/527
88.+P6gx7g         0/529        1/528
89.P5ex5d!?        0/529        0/528

Professional shogi style. Amateurs would settle for 89.Nx7g Sx4e P*6e which is
a safe way to win. Sato wants to take the shortest path to the goal.

90.+P7gx8h         0/529        0/528
91.S7ix8h          0/529        0/528
92.S*5e            0/529        0/528
93.N*5f            2/531        0/528
94.R6d-6i+         0/531        1/529
95.G*7i            0/531        0/529
96.+R6ix7i         0/531        5/534
97.B4fx7i          1/532        0/534
98.S5ex5f          0/532        0/534
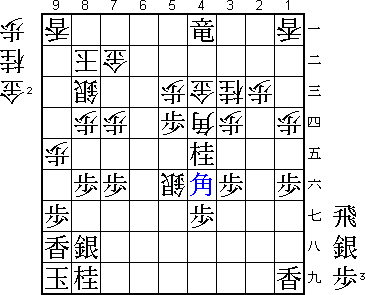
99.B7i-4f?         0/532        0/534

But this is not good. "I thought this was winning" (Sato). The winning move
was S*8g. After B4f the position becomes unexpectedly complicated.

100.P*6d           0/532        0/534
101.B4fx6d         0/532        0/534
102.G*7c           0/532        1/535
103.R*8a           0/532        0/535
104.K8b-9c         0/532        0/535
105.R8ax9a+        1/533        0/535
106.G*9b           0/533        0/535
107.L*7g           0/533        0/535
108.G7cx6d         0/533        0/535
109.P9g-9f         0/533        0/535
110.G9bx9a         0/533        1/536
111.+R4ax9a        0/533        0/536
112.R*9b           0/533        0/536
113.+R9a-8a        1/534        0/536
114.G7b-8b         0/534        0/536
115.+R8a-6a        1/535        0/536
116.P9ex9f         0/535        0/536
117.S*9e           2/537        0/536
118.B4dx7g+!       0/537        0/536

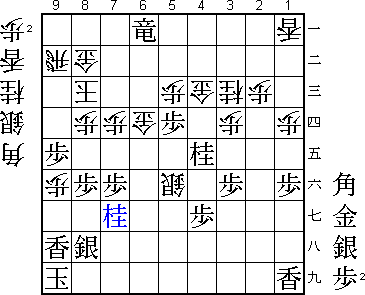
Black looked to have an easy win with a safe king and a strong attack, but this
bishop sacrifice changes that impression. Black can not take this bishop
immediately, since after 119.Nx7g the move 120.L*9d makes the white king
very hard to mate.

119.P*9d           1/538        0/536
120.S8cx9d         0/538        0/536
121.S9ex9d         0/538        0/536
122.K9cx9d         0/538        0/536
123.P*9e           0/538        0/536
124.K9d-8c         0/538        0/536
125.N8ix7g         0/538        0/536

126.L*9g?          0/538        0/536

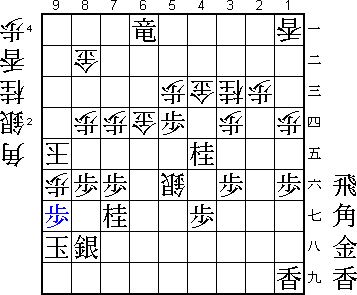
This is the losing move. After 126.P9g+ Lx9g P*9h Kx9h S*7h black has to be
very careful. For example, L9f L*8g Sx8g B*8i is very dangerous.

127.S*9d!          1/539        0/536

The deciding move.

128.R9bx9d         0/539        2/538
129.P9ex9d         0/539        0/538
130.L9gx9h+        0/539        0/538
131.K9ix9h         0/539        0/538
132.K8cx9d         0/539        0/538

After 132.S*9g Sx9g Px9g+ Kx9g L*9e S*9f Lx9f Kx9f white has no mate and
no defense.

133.P*9e           0/539        0/538
134.K9dx9e         0/539        0/538
135.P*9g           0/539        0/538
Resigns            0/539        1/539
Time:              08:59:00     08:59:00

And both 136.Px9g+ Sx9g and 136.B*7h Px9f Bx9f+ P*9g leave white without
defense. A good game, especially by Sato. The best-of-seven match has now
become a best-of-three match. Game 5 will be a pivotal game.
