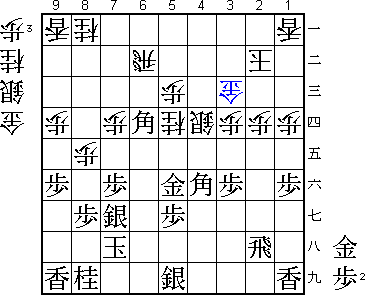
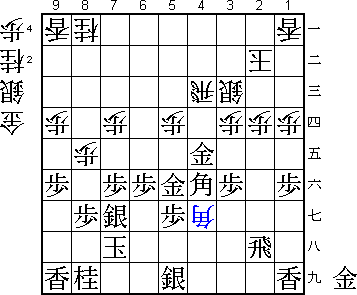
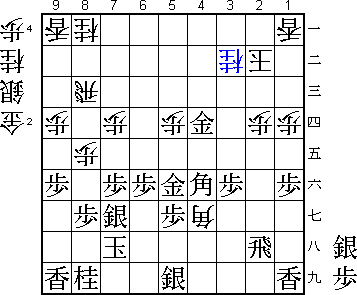
56th Meijin Match Game 3
Black: Tanigawa, Meijin
White: Sato, Challenger
56th Meijin-sen, Game 3, May 7th and 8th 1998
1.P7g-7f           0/0          0/0
2.P8c-8d           0/0          8/8

Only the second move, but already a big surprise for the commentators. In
Shukan Shogi Tanigawa playing the Kakugawari is compared with an Ivanisevic
service game. The point will be made with an ace or if you survive the first
blow, there will be a smash at the net. After the rather one-sided loss in
game 1, Sato was expected to turn to the Yokofudori. However, he decided to
look the 220 km/h service straight in the eye.

3.P2g-2f           3/3          0/8
4.G4a-3b           0/3          5/13
5.G6i-7h           1/4          0/13
6.P8d-8e           0/4          0/13
7.B8h-7g           1/5          0/13
8.P3c-3d           0/5          0/13
9.S7i-8h           1/6          0/13
10.S3a-4b          0/6          10/23
11.B7gx2b+         4/10         0/23
12.G3bx2b          0/10         0/23
13.S8h-7g          0/10         0/23
14.G2b-3b          0/10         1/24
15.S3i-3h          2/12         0/24
16.S7a-7b          0/12         1/25
17.P9g-9f          6/18         0/25
18.P9c-9d          0/18         15/40
19.P3g-3f          31/49        0/40
20.P6c-6d          0/49         31/71
21.P4g-4f          10/59        0/71
22.S7b-6c          0/59         6/77
23.S3h-4g          1/60         0/77
24.S6c-5d          0/60         11/88

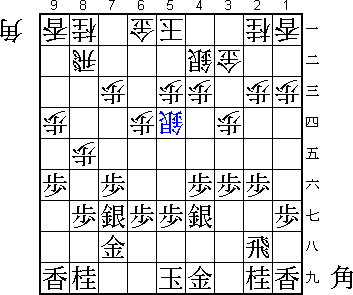
In the first game, Sato played the Bogin attack. Here he chooses the classic
Koshikakegin (Reclining Silver). The game now becomes similar to the fifth
game of last year's Meijin match between Tanigawa and Habu.

25.K5i-6h          8/68         0/88
26.G6a-5b          0/68         3/91
27.G4i-5h          4/72         0/91
28.K5a-4a          0/72         6/97
29.K6h-7i          6/78         0/97
30.K4a-3a          0/78         4/101
31.P1g-1f          20/98        0/101
32.P1c-1d          0/98         20/121
33.N2i-3g          7/105        0/121
34.P4c-4d          0/105        13/134
35.S4g-5f          72/177       0/134
36.P6d-6e          0/177        18/152
37.K7i-8h          5/182        0/152
38.K3a-2b          0/182        49/201
39.P2f-2e          44/226       0/201
40.S4b-3c          0/226        4/205
41.R2h-4h          1/227        0/205
42.G5b-4b          0/227        38/243
43.G5h-4g          26/253       0/243

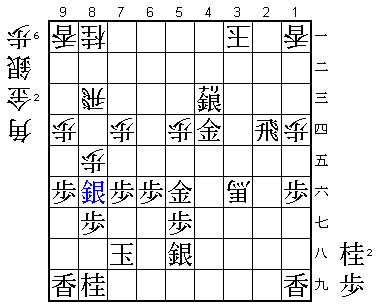
A strange looking move, but Tanigawa has played this before with success. An
example is the Meijin match game against Habu mentioned before.

44.P7c-7d?!        0/253        25/268

Habu played the waiting moves G4c~G4b here. He probably saw what was coming
next. Sato seems to think that this move is a simple improvement.

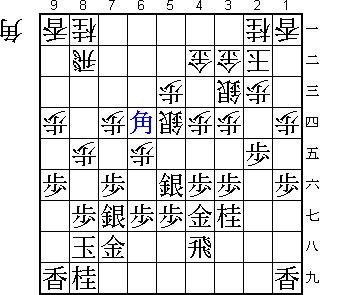
45.B*6d!?          19/272       0/268

It is too early to say whether this is a good move or not, but Tanigawa must
have analysed this deeply during his game against Habu. The white rook is
forced to a bad square and black gets a chance to attack.

46.R8b-9b          0/272        67/335

The amount of time taken for this move suggests that Sato was surprised. White
has no choice. After 46.B*7c Bx7c+ Nx7c B*6d R8c P4e black gets the same attack
in an even better position.

47.P4f-4e          3/275        0/335
48.P4dx4e          0/275        17/352
49.S5fx4e          6/281        0/352
50.S5dx4e          0/281        0/352
51.N3gx4e          0/281        0/352
52.S3c-4d          0/281        0/352
53.G4g-5f          43/324       0/352
54.B*5i?!          0/324        17/369
55.R4h-2h          14/338       0/369
56.P6e-6f          0/338        5/374

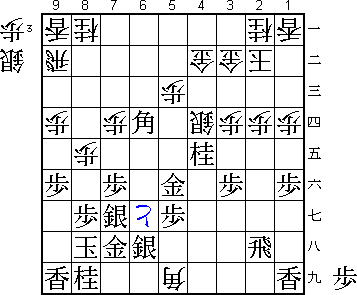
This is what Sato was aiming for. It is a good idea which makes the judgment
of 45.B*6d difficult. However, Sato should have played the moves B*5i and
P6f the other way around. If 54.P6f Px6f B*5i R2h P*6c B4f S*3g then white
has good attacking chances.

57.P2e-2d          30/368       0/374

Now black ignores the pawn push and takes the initiative. Black now has the
advantage.

58.P2cx2d          0/368        31/405
59.S*6h            49/417       0/405
60.P6fx6g+         0/417        22/427

61.S6hx5i?         2/419        0/427

A mistake that lets white back in. After 61.Gx6g P*6c B4f S*3g Rx2d P*2c
Bx9a+! (a move found by Aono, 9-dan) Rx9a Rx3d G3b-4c Rx4d Gx4d Sx5i white's
rook is on a terrible square and black keeps his advantage.

62.R9b-6b          0/419        43/470
63.B*4f            12/431       0/470

Tanigawa: "Here I lost confidence in the position". If 63.P*6e instead, then
black is in big trouble after 64.+Px7h Kx7h Rx6d Px6d B*3g.

64.+P6gx7h         0/431        6/476
65.K8hx7h          0/431        0/476
66.N2a-3c          0/431        4/480
67.N4ex3c+         12/443       0/480
68.G4bx3c          0/443        1/481
69.N*4e            8/451        0/481
70.N*5d            0/451        5/486
71.N4ex3c+         28/479       0/486
72.G3bx3c          0/479        3/489

73.P*6c!           2/481        0/489

A difficult move to play, since it leaves black without pawns after the next
move. Tanigawa judges that having the rook on 6c, where it does not defend
the white king and where it can be attacked after Bx9a+ followed by +B8a, is
worth it. Since the white king is not very well defended, black still seems
to have the edge here.

74.R6bx6c          0/481        3/492
75.P*6f            0/481        0/492
76.N5dx4f          0/481        10/502
77.B6dx4f          0/481        0/502
78.P5c-5d          0/481        0/502
79.N*4e            4/485        0/502
80.R6c-4c          0/485        23/525
81.N4ex3c+         8/493        0/525
82.S4dx3c          0/493        0/525
83.G*4e            0/493        0/525
84.B*4g            0/493        2/527

85.G*4d?           14/507       0/527

A Tanigawa-like move, but not good. Here he should have played Bx9a+, after
which he will probably win.

86.S3cx4d          0/507        4/531
87.G4ex3d          0/507        0/531
88.R4c-8c?         0/507        7/538

This mistake decides the game in black's favour. Black is not threatening mate,
so this is the time to attack. After 88.P*6h!, black has a tough task ahead.
For example 89.Gx4c B6i+ K8h G*7h K9g (K9h N*8f Sx8f G*8h K9g Gx8g Kx8g G8h
leads to mate) +B7i and now black has to drop the rook R*8h, after which he
has no mate. Also, 89.S5ix6h S*6i K8h G*7h K9h N*8f Px8f Px8f and white
continues threatening mate. The only move is 89.Kx6h. The post-mortem
analysis could not show a clear win for either player after this.

89.G3dx4d          2/509        0/538
90.N*3b            0/509        0/538

91.P*2c            11/520       0/538
92.K2bx2c          0/520        0/538
93.S*3d            0/520        0/538
94.K2c-2b          0/520        0/539
95.S5i-5h!         1/521        0/538

The winning move. Black still had to be careful for N*8f Px8f Px8f, but after
chasing away the bishop this is no longer dangerous.

96.B4gx3f+         0/521        1/539

After 96.Bx5h+ Rx5h Nx4d, black has many ways of winning and white has no
attack.

97.B4fx2d          0/521        0/539
98.N3bx2d          0/521        0/539
99.R2hx2d          0/521        0/539
100.K2b-3a         0/521        0/539
101.S3d-4c+        0/521        0/539
102.N*8f           0/521        0/539
103.S7gx8f         2/523        0/539
Resigns            0/523        0/539
Time:              08:43:00     08:59:00

An up and down game, but Tanigawa takes the lead again. Sato is now under
pressure to keep his service game with black.
