56th Meijin Match Game 2
Black: Sato, Challenger
White: Tanigawa, Meijin
56th Meijin-sen, Game 2, April 24th and 25th 1998
1.P7g-7f           1/1          0/0
2.P8c-8d           0/1          8/8
3.S7i-6h           2/3          0/8
4.P3c-3d           0/3          2/10
5.P6g-6f           0/3          0/10
6.S7a-6b           0/3          5/15
7.P5g-5f           1/4          0/15
8.P6c-6d           0/4          18/33
9.G6i-7h           22/26        0/33
10.S6b-6c          0/26         3/36
11.S3i-4h          0/26         0/36
12.S3a-4b          0/26         8/44
13.P2g-2f          8/34         0/44
14.P4c-4d          0/34         17/61
15.P2f-2e          27/61        0/61

It is interesting that there is already a little trap in this quiet position.
If black does not play 15.P2e here, but 15.K6i instead, white can choose
16.S4c G5h R4b P2e B3c S7g K6b B7i and now instead of R2b he can play G5b and
P4e next, which takes the initiative.

16.B2b-3c          0/61         7/68
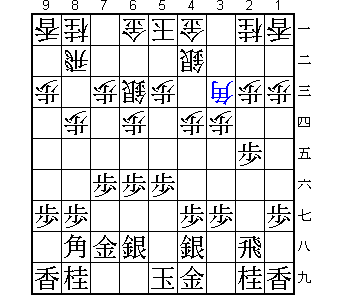
A careful beginning of this game for both players. After this move it is
clear that we are heading for a Yodofuribisha opening. This was not too much
of a surprise, since Tanigawa plays this regularly. It was expected that
Sato had prepared against this strategy.

17.S6h-7g          1/62         0/68
18.S4b-4c          0/62         10/78
19.B8h-7i          1/63         0/78
20.R8b-2b          0/63         6/84

Now black is one move quicker with this than in the variation above, so white
has to choose the more defensive R2b to avoid a break-through on the second
file.

21.K5i-6i          4/67         0/84
22.K5a-6b          0/67         10/94
23.G4i-5h          2/69         0/94
24.P7c-7d          0/69         12/106
25.G5h-6g          23/92        0/106
26.G4a-5b          0/92         4/110
27.B7i-6h          45/137       0/110
28.P9c-9d          0/137        34/144
29.P9g-9f          1/138        0/144
30.K6b-7a          0/138        57/201
31.K6i-7i          19/157       0/201
32.S6c-7b 0/157 15/216
It is a bit of a waste to retreat this silver now, but after 32.N7c this move
is no longer possible, because the head of the knight becomes to weak.
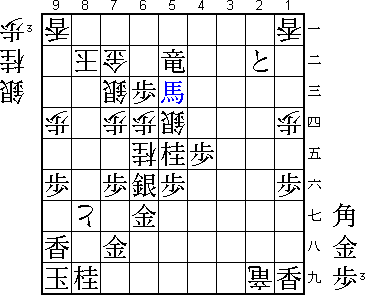
33.K7i-8h 58/215 0/216
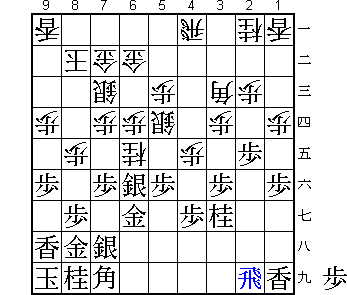
The sealed move. The question here is whether black should play the anaguma
or not.
34.P4d-4e 0/215 31/247
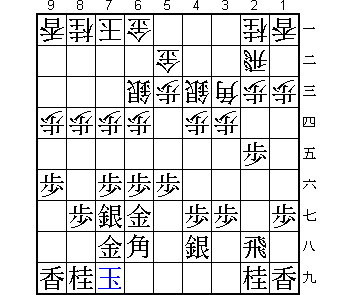
35.L9i-9h?! 84/299 0/247
After long thought, Sato chooses to develop his king position into an anaguma.
This decision backfires, but there is not much else black can do.
36.N8a-7c 0/299 29/276
37.K8h-9i 0/299 0/276
38.P6d-6e 0/299 1/277
39.P6fx6e 7/306 0/277
40.N7cx6e 0/306 1/278
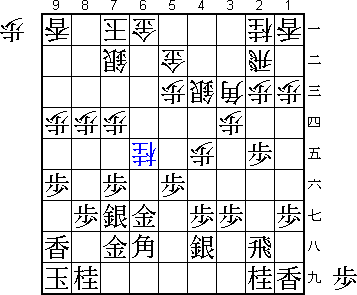
41.S7g-6f          0/306        0/278

No choice. After 41.S8h P*6f black is in big trouble. After the played move he
will never be able to make a proper anaguma castle. Tanigawa seems to have
the advantage here. All Sato can do is wait for what Tanigawa is going to do
next.

42.S7b-7c          0/306        23/301
43.S4h-5i          7/313        0/301
44.G6a-7b          0/313        6/307
45.S5i-5h          4/317        0/307
46.P*6d            0/317        8/315
47.G7h-8h          0/317        0/315
48.P8d-8e          0/317        20/335
49.S5h-6i          1/318        0/335
50.S4c-5d          0/318        1/336
51.S6i-7h          1/319        0/336
52.K7a-8b          0/319        0/336
53.P3g-3f          2/321        0/336
54.G5b-6b          0/321        3/339
55.P1g-1f          7/328        0/339
56.P1c-1d          0/328        8/347
57.N2i-3g          15/343       0/347
58.R2b-4b          0/343        18/365
59.B6h-7i          16/359       0/365
60.R4b-4a          0/359        24/389
61.R2h-2i          12/371       0/389
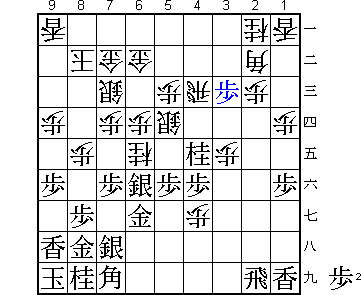
62.B3c-2b? 0/371 11/400
Sometimes Tanigawa's aggresive playing style gets the better of him. In this
position he feels that he is better and does not want to settle for sennichite,
even though he is white. Instead, he forces the issue and makes a big mistake.
The tactical justification of 62.B2b is 63.P2d Px2d Rx2d B1c. Of course, in
a game for the meijin title such a simple trap is not the real reason behind
this move. What Tanigawa is really aiming for is 63.P2d Px2d Bx2d B4d B7i P*2f
followed by N3c and R2a and white has a winning position. However, Tanigawa
overlooks a simple countermove. Tanigawa should have played 62.L1b here. Then
if 63.R5i P1e P5e S6c Px1e Lx1e P*1f Lx1f Lx1f P*1e and after picking up the
lance, white has the severe L*8c.
63.P2e-2d 6/377 0/400
64.P2cx2d 0/377 1/401
65.P3f-3e! 9/386 0/401
This simple move was overlooked by Tanigawa. Sato now grabs back the
initiative.
66.P4e-4f 0/386 53/454
67.P4gx4f 24/410 0/454
68.R4a-4c 0/410 6/460
69.R2ix2d 4/414 0/460
70.P*2c 0/414 0/460
71.R2d-2i 3/417 0/460
72.P3dx3e 0/417 2/462
73.N3g-4e 1/418 0/462
74.P*4g 0/418 10/472
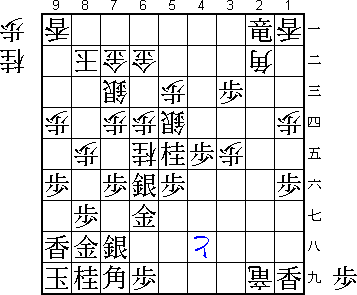
75.P*3c! 8/426 0/472
The decider. White can no longer avoid the promotion of the black rook, a move
he invited with 62.B2b.

76.N2ax3c          0/426        1/473
77.R2ix2c+         2/428        0/473
78.P*2a            0/428        0/473
79.P*6c            13/441       0/473
80.G6bx6c          0/441        4/477
81.+R2c-3b         1/442        0/477
82.N3cx4e          0/442        0/477
83.P4fx4e          2/444        0/477
84.R4c-3c          0/444        8/485
85.+R3bx2a         6/450        0/485
86.R3c-2c          0/450        0/485
87.N*5e            6/456        0/485
88.R2c-2i+         0/456        5/490
89.P*6i            7/463        0/490
90.G6c-6b          0/463        8/498
91.P*3c            11/474       0/498
92.P4g-4h+?!       0/474        6/504
This quickens the end. Better is 92.P8f P3b+ Px8g+ Gx8g +R2h B6h Bx5e Px5e
+Rx2a +Px2a S6c, but after R*3a it still looks like white will be losing.
92.P4h+ is too far from the king and black's attack is quicker.

93.P3c-3b+         2/476        0/504
94.+P4h-5h         0/476        0/504
95.+P3bx2b         3/479        0/504
96.+P5hx6i         0/479        1/505
97.B7ix3e          7/486        0/505
98.+P6i-7i         0/486        0/505
99.P*6c            1/487        0/505
100.+P7ix7h        0/487        8/513
101.G8hx7h         0/487        0/513
102.G6b-5b         0/487        0/513
103.+R2a-6a        10/497       0/513
104.P8e-8f         0/497        4/517
105.+R6ax5b        2/499        0/517
106.P8fx8g+        0/499        0/517
107.B3ex5c+        0/499        0/517
Resigns            0/499        0/517
Time:              08:19:00     08:37:00

The first win in the meijin match for Sato, which will give him a lot of
confidence for the games to come. We might see a very interesting match from
here.