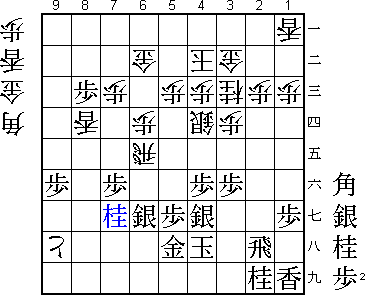
56th Meijin Match Game 1
Black: Tanigawa, Meijin
White: Sato, Challenger
56th Meijin-sen, Game 1, April 9th and 10th 1998
1.P7g-7f 0/0 0/0
2.P8c-8d 0/0 11/11
3.P2g-2f 10/10 0/11
4.G4a-3b 0/10 6/17
5.G6i-7h 2/12 0/17
6.P8d-8e 0/12 1/18
7.B8h-7g 1/13 0/18
8.P3c-3d 0/13 0/18
9.S7i-8h 1/14 0/18
10.B2bx7g+ 0/14 2/20
11.S8hx7g 0/14 0/20
The Kakugawari (Bishop Exchange) opening comes as no surprise. In recent
years Tanigawa has become one of the leading experts in this opening. The
question was: what would Sato play against it?
12.S3a-4b 0/14 0/20
13.S3i-3h 7/21 0/20
14.S7a-7b 0/21 0/20
15.P9g-9f 16/37 0/20
16.S4b-3c 0/37 47/67
17.P4g-4f 7/44 0/67
18.K5a-4b 0/44 4/71
19.S3h-4g 12/56 0/71
20.P9c-9d 0/56 28/99
21.P3g-3f 27/83 0/99
22.S7b-8c 0/83 19/118
23.P6g-6f 30/113 0/118
24.S8c-8d 0/113 1/119
25.G4i-5h 31/144 0/119
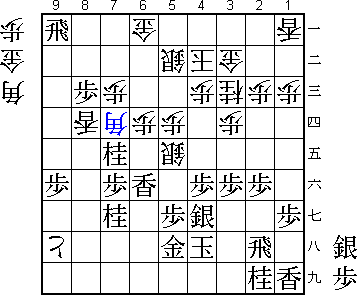
26.P9d-9e 0/144 67/186
Sato chooses the aggresive Climbing Silver edge attack. One would think he
played this to force Tanigawa, who is famous for his attack, in a defending
position. However, this is not how it works out.
27.P9fx9e 22/166 0/186
28.S8dx9e 0/166 0/186
29.L9ix9e 0/166 0/186
30.L9ax9e 0/166 0/186
31.P*9g 3/169 0/186
32.S3c-4d 0/169 24/210
This is not a very convincing looking move. Still, it was often played by
Moriuchi, 8-dan, and can therefore not be discarded so lightly. Sato has
studied this position well and decided to give it a try. Still, this silver
move gives black the possibility to set up his own attack.
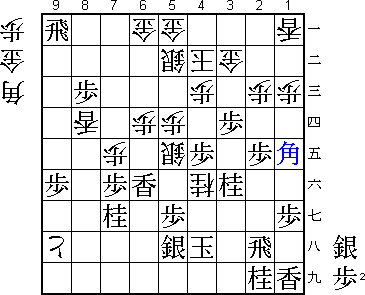
33.P2f-2e 49/218 0/210
A Tanigawa-like move. Since this opens up the diagonal to the king, it is
not a move that can be played easily. However, after the safer 33.P1f P*9h
S8h L*9a there is no attack for black. The text move makes a counter attack
much easier.

34.P*9h            0/218        62/272

Played after long thought. Sato probably underestimated the strength of
P2e in his preparation.

35.S7g-8h          1/219        0/272
36.P8e-8f          0/219        2/274
37.P8gx8f          14/233       0/274
38.R8bx8f          0/233        3/277
39.S8h-8g          16/249       0/277
40.R8f-8b          0/249        78/355
41.S8gx9h          30/279       0/355
42.P*8h            0/279        8/363
43.P*8c            5/284        0/363
44.R8b-6b          0/284        2/365

White can not take the pawn because of B*9d.

45.G7hx8h          73/357       0/365
46.L*8d            0/357        3/368
47.S9h-8g?!        0/357        0/368

Better is the simple 47.G7h Lx8i+ Sx8i Lx9g+ K4h and black has a small, but
clear advantage. For example, after R9b to bring the rook into play, black
can play the tesuji P*9c. After Nx9c the rook is again blocked and after
Rx9c black plays P8b+.

48.B*9i            0/357        29/397
49.G8h-9h          4/361        0/397
50.B9ix6f+         0/361        0/397
51.P2e-2d          2/363        0/397
52.P2cx2d          0/363        1/398
53.R2hx2d          0/363        0/398
54.P*2c            0/363        5/403
55.R2d-2e          0/363        0/403
56.R6b-9b          0/363        31/434
57.K5i-4h          4/367        0/434
58.N2a-3c          0/367        7/441
59.R2e-2h          29/396       0/441
60.P*8f            0/396        8/449
61.S8g-9f!         15/411       0/449
Very strange looking move, but it is the only one in this position. After
61.S7h (which Tanigawa had originally planned) white can play 62.+Bx7f P4e
Nx4e P*4f +Bx9h Px4e S3c and the position is unclear. Tanigawa's move is
keeping the small advantage he got from the opening.
62.L9ex9f 0/411 6/455
63.P*6d! 0/411 0/455
This combination of S9f and P*6d shows Tanigawa's power to attack from
any position.
64.P6cx6d 0/411 7/462
65.B*6c 0/411 0/462
66.P8f-8g+ 0/411 9/471
67.B6cx8a+ 2/413 0/471
68.R9b-9e 0/413 3/474
69.+B8a-6c 6/419 0/474
70.+P8gx9h 0/419 2/476
71.P9gx9f 2/421 0/476
72.R9e-6e 0/421 5/481
73.L*6h 10/431 0/481
74.S*6b 0/431 38/519
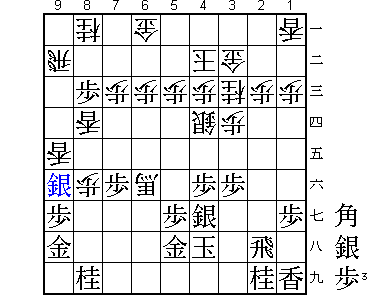
75.N8i-7g?! 14/445 0/519
A mistake that almost loses the game. The simple 75.Lx6f Rx6f +Bx6b Gx6b
S*6g R6e N7g (diagram) is much easier to win for black.
76.R6e-2e!         0/445        0/519

Great effort to turn things around.

77.P*2f!           21/466       0/519

The 21 minutes Tanigawa took for this move prove that he was surprised.
Fortunately, his position is still good enough to have a way out. It seems
like it is very dangerous for white to give up the rook in this position, but
after 77.Rx2e Nx2e R*4a K3c it is surprisingly hard to mate the white king.
Tanigawa is lucky here that the patient but slow move P*2f still wins.

78.S6bx6c          0/466        0/519
79.L6hx6f          0/466        0/519
80.R2e-5e          0/466        0/519
81.N*6g            3/469        0/519
82.R5e-5d          0/469        0/519
83.N6g-7e          4/473        0/519
84.S6c-5b          0/473        1/520
85.B*8a            0/473        0/520
86.S4d-5e          0/473        0/520
87.B8ax5d+         8/481        0/520
88.P5cx5d          0/481        0/520
89.R*9a            1/482        0/520
90.B*7d            0/482        19/539
91.S*6c            4/486        0/539
92.G*5a            0/486        0/539
93.S6cx7d=         2/488        0/539
94.P7cx7d          0/488        0/539
95.P3f-3e          0/488        0/539
96.P7dx7e          0/488        0/539
97.P3ex3d          0/488        0/539
98.N3c-4e          0/488        0/539
99.P4fx4e          0/488        0/539
100.N*4f           0/488        0/539
101.N*2e           13/501       0/539
102.N4fx5h+        0/501        0/539
103.S4gx5h         0/501        0/539
104.S*2d           0/501        0/539
105.N*3f           4/505        0/539
106.S2dx2e         0/505        0/539
107.P2fx2e         0/505        0/539
108.N*4f           0/505        0/539
109.B*1e!          10/515       0/539
The winning move.

110.P2c-2d         0/515        0/539

Also, 110.K5c B2f! and white can not defend.

111.N3fx2d         0/515        0/539
112.N4fx5h+        0/515        0/539
113.K4hx5h         0/515        0/539
114.S5ex6f         0/515        0/539
115.N2dx3b+        7/522        0/539
116.K4b-5c         0/522        0/539
117.P8c-8b+        1/523        0/539
118.B*3f           0/523        0/539
119.G*4g           0/523        0/539
120.S*4i           0/523        0/539
121.K5h-4h         2/525        0/539
Resigns            0/525        0/539
Time:              08:45:00     08:59:00

White can not continue his attack and has no defence against black's attack.
A good start for Tanigawa in pursuit of his sixth Meijin title.