55th Oza Match Game 1
[Black "Kubo Toshiaki, Challenger"]
[White "Habu Yoshiharu, Oza"]
[Event "55th Oza-sen, Game 1"]
[Date "September 6th 2007"]
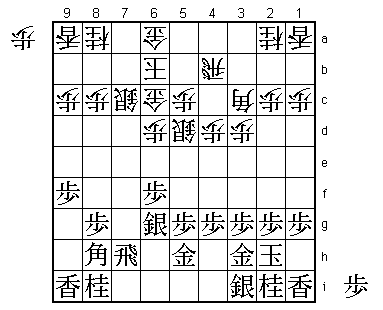
1.P7g-7f 00:00:00 00:00:00
2.P3c-3d 00:00:00 00:01:00
3.P7f-7e 00:01:00 00:01:00
Unlike most top professionals, Kubo is very forthcoming about the openings
he is playing. He only plays Furibisha and recently he exclusively plays
the Ishida variation with black and the Gokigen Nakabsha with white. It is
Habu's task to shoot a hole in these openings.
4.P4c-4d 00:01:00 00:04:00
5.R2h-7h 00:07:00 00:04:00
6.S3a-3b 00:07:00 00:04:00
7.P9g-9f 00:11:00 00:04:00
8.B2b-3c 00:11:00 00:04:00
9.P7e-7d 00:24:00 00:04:00
10.P7cx7d 00:24:00 00:08:00
11.R7hx7d 00:25:00 00:08:00
12.R8b-4b 00:25:00 00:09:00
A small surprise. Recently, Habu often plays the Ai-Furibisha opening, but
the general opinion was that he would use it as a second weapon. Playing
the Ai-Furibisha from the start will have been a surprise for Kubo as well.
13.K5i-4h 00:42:00 00:09:00
14.S7a-8b 00:42:00 00:18:00
15.G6i-5h 00:53:00 00:18:00
16.G4a-5b 00:53:00 00:27:00
17.K4h-3h 00:59:00 00:27:00
18.S8b-7c 00:59:00 00:55:00
19.R7d-7h 01:01:00 00:55:00
20.P6c-6d 01:01:00 00:55:00

White is aiming for the Yagura formation, which is considered a strong castle
in the Ai-Furibisha opening. There is another theme in this position that is
going to be important: the square 7d. Professionals like to delay the drop of
a pawn here as long as possible. With the pawn in hand, there might be other
options. If the opponent doesn't make a mistake where this pawn is going to
be valuable, the pawn will eventually dropped back on 7d to complete the Yagura
formation. Delaying the pawn drop has important merits, but it also makes the
timing of actually dropping the pawn back on 7d difficult. This is a game where
Habu cannot find the right time to drop back the pawn. By the way, here 20.P*7d
looks strong because after 21.S8b white cannot easily complete the Yagura formation,
but after 22.S6h G6c followed by R7b, black simply loses the pawn on 7d.

21.S7i-6h    01:10:00  00:55:00
22.G5b-6c    01:10:00  00:56:00
23.P6g-6f    01:20:00  00:56:00
24.K5a-6b    01:20:00  00:58:00
25.S6h-6g    01:20:00  00:58:00
26.S3b-4c    01:20:00  00:58:00
27.K3h-2h    01:47:00  00:58:00
28.S4c-5d    01:47:00  01:10:00
29.G4i-3h    01:51:00  01:10:00
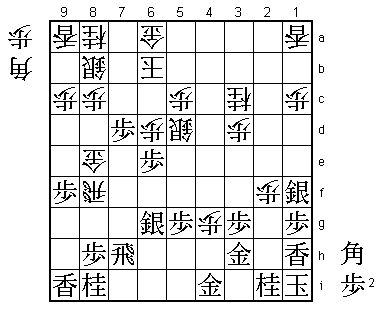
Kubo is looking to build an Anaguma castle, but the order in which he does it might
seem unusual. The classic order is 29.L1h P4e K1i, but then after P4f Px4f P6e Px6e
P*6f Sx6f Rx4f is good for white. This fork is made possible by the gold on 4i,
which is undefended in this variation. However, the deeper principle behind 29.G3h
is the idea of building a castle formation without leaving pieces hanging or being
far away from the king. When you keep your pieces close and defended, you will be
alright even if the attack of the opponent comes before the castle is finished.
This notion has changed many of the classic orders in which castle formations are
being built by professionals these days.
30.P4d-4e 01:51:00 01:17:00
31.G5h-4h 01:55:00 01:17:00
32.P2c-2d 01:55:00 01:25:00
33.L1i-1h 01:56:00 01:25:00
34.P2d-2e 01:56:00 01:28:00
35.K2h-1i 01:56:00 01:28:00
36.P4e-4f 01:56:00 01:32:00
37.P4gx4f 01:56:00 01:32:00
38.R4bx4f 01:56:00 01:34:00
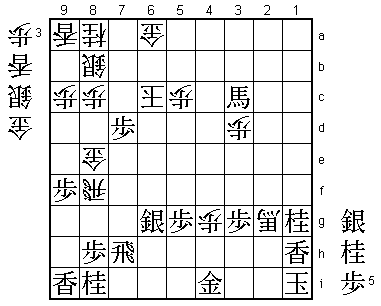
39.P*7d! 02:16:00 01:34:00

Habu has missed the right moment to drop the pawn on 7d and here he is punished for it.

40.G6cx7d    02:16:00  02:14:00

No choice. 40.Sx7d P*7e S8e N7g loses the silver.

41.P*7e      02:26:00  02:14:00
42.G7d-8d    02:26:00  02:16:00

Now the white position is in complete disarray and black already has a significant advantage.

43.P8g-8f    02:26:00  02:16:00
44.P2e-2f    02:26:00  02:23:00
45.P2gx2f    02:29:00  02:23:00
46.R4fx2f    02:29:00  02:23:00
47.P8f-8e    02:46:00  02:23:00

Another example of not dropping back the pawn. 47.P*2g is the reflex move that amateurs
would play to keep the anaguma castle complete. However, Kubo didn't like this because
of 48.R2e S7f P*7d and white is given the chance to erase its own problems on the 7th file.

48.G8dx8e    02:46:00  02:43:00
49.P7e-7d    02:47:00  02:43:00
50.S7c-8b    02:47:00  02:43:00
51.P6f-6e    03:26:00  02:43:00
52.P*4g      03:26:00  02:58:00
53.G4h-4i    03:42:00  02:58:00
54.P*2h      03:42:00  03:50:00
55.S3ix2h    03:42:00  03:50:00
56.P*2g      03:42:00  03:50:00
57.S2hx2g    04:03:00  03:50:00
58.R2f-8f    04:03:00  03:50:00
59.B8hx3c+   04:03:00  03:50:00
60.N2ax3c    04:03:00  03:50:00
61.P*8h      04:10:00  03:50:00
62.P*2f      04:10:00  03:50:00
63.S2g-1f    04:14:00  03:50:00
By not dropping the pawn on 2g, black has allowed white to get an attack against the
anaguma, creating a stronghold on 2g. This looks risky (and it is), but to win at this
level it is important to walk close to the abyss. Things are not so easy, but Kubo is
winning here.

64.P1c-1d    04:14:00  03:54:00
65.B*2b      04:15:00  03:54:00
66.P1d-1e    04:15:00  03:54:00
67.B2bx1a+   04:16:00  03:54:00
68.P1ex1f    04:16:00  03:54:00
69.P6ex6d    04:17:00  03:54:00
70.P1fx1g+   04:17:00  04:30:00
71.N2ix1g    04:17:00  04:30:00
72.P2f-2g+   04:17:00  04:30:00
73.G3hx2g    04:23:00  04:30:00
74.B*4e      04:23:00  04:30:00
75.L*6c      04:28:00  04:30:00
76.S5dx6c    04:28:00  04:31:00
77.P6dx6c+   04:29:00  04:31:00
78.K6bx6c    04:29:00  04:31:00
79.+B1ax3c   04:35:00  04:31:00
80.B4ex2g+   04:35:00  04:37:00
81.G4i-3h?   04:41:00  04:37:00

In the end, a small mistake in the order of moves decides the outcome of this game.
Correct was 81.N*5e first and if white plays 82.K7b then 83.G3h is the
right time because 84.+Bx3h S*6c K7a Rx3h is a mating threat. Of course, Kubo had seen
this, but after 82.K7b G3h, he thought that white could play P*2h Gx2h +Bx2h Rx2h P*8d
and the white king can escape. However, he overlooked that then +B4c is winning. This
threatens mate starting with S*6c. White can try to defend with L*5b, but then S*6c K8c
+B6e is strongly threatening P7c+ next (Kx7d +B7d and mate), but there is no good defence.
Going back, after 81.N*5e, white plays 82.K5d and then 83.S*5f results in a complicated
position where black is probably winning. (In the post-mortem analysis the variation
83.S5f Rx5f Px5f +Bx4i +B4c K4e R*4d was played and both players agreed that this was mate.
However, it was later shown that even though it looked mate, there was no mate in this position.)
A complicated endgame, especially with limited time. Unfortunately for Kubo, his only
mistake is a decisive one.

82.+B2gx3h   04:41:00  04:45:00
83.N*5e      04:42:00  04:45:00
84.K6c-5d    04:42:00  04:45:00
85.R7hx3h    04:44:00  04:45:00
86.L*2f      04:44:00  04:46:00
87.P*2g      04:57:00  04:46:00
88.P*2h      04:57:00  04:47:00
89.R3hx2h    04:59:00  04:47:00
90.S*3i      04:59:00  04:47:00
91.+B3c-4c   04:59:00  04:47:00
92.K5d-4e    04:59:00  04:54:00
93.B*6c      04:59:00  04:54:00
94.K4ex5e    04:59:00  04:55:00
95.S6g-5f    04:59:00  04:55:00
96.K5e-6d    04:59:00  04:55:00
97.R2h-6h    04:59:00  04:55:00
98.P*6g      04:59:00  04:55:00
99.R6hx6g    04:59:00  04:55:00
100.P*6f     04:59:00  04:55:00
101.S5f-6e   04:59:00  04:55:00
102.K6dx6c   04:59:00  04:56:00
103.P*6d     04:59:00  04:56:00
104.K6c-6b   04:59:00  04:56:00
Resigns      04:59:00  04:56:00
No mate after 104.S*6c K5a +Bx6a K4a (or K4b) and there is no defence, so Kubo resigned.
It would have been very important for Kubo's confidence had he picked up this first game.
Now he already is with his back against the wall, needing to win the second game with white
to stay in this match.