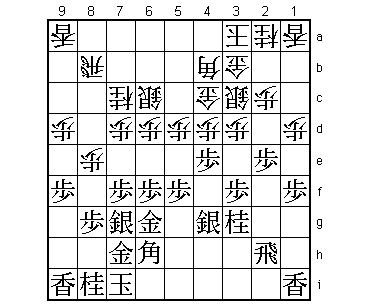
55th Osho Match Game 7
[Black "Sato Yasumitsu, Challenger"]
[White "Habu Yoshiharu, Osho"]
[Event "55th Osho-sen, Game 7"]
[Date "March 21st and 22nd 2006"]
1.P7g-7f 00:01:00 00:00:00
Habu and Sato have played more than 100 games against each other, but this
one was special. After Habu won the first three games of this match, it looked
like it would be over quickly, but Sato came back to win the next three games.
This hasn't happened in 28 years. The only other player who did the same thing
was Yonenaga, who came back from 3-0 down to tie the 17th 10-dan match
(now Ryu-O tournament) against Nakahara in 1978. Nakahara won the final game
to win the match, so in professional shogi no-one has ever come back from 3-0
down to win a match. Sato can be the first and the signs seem to be in his favor.
Habu just lost Kio title to Moriuchi and also lost the Meijin challenger
play-off against Tanigawa. On the other hand, Sato just beat Watanabe in the
Oi league and is in the middle of a seven game winning streak. Even the pawns
give the nod to Sato in this game, as the furigoma results in three tokins and
Sato can start with the black pieces.
2.P8c-8d 00:01:00 00:02:00
3.S7i-6h 00:05:00 00:02:00
4.P3c-3d 00:05:00 00:04:00
5.S6h-7g 00:06:00 00:04:00
6.S7a-6b 00:06:00 00:07:00
7.G6i-7h 00:13:00 00:07:00
8.P5c-5d 00:13:00 00:11:00
9.K5i-6i 00:16:00 00:11:00
10.S3a-4b 00:16:00 00:16:00
11.S3i-4h 00:17:00 00:16:00
12.G4a-3b 00:17:00 00:24:00
13.P2g-2f 00:55:00 00:24:00
14.K5a-4a 00:55:00 00:41:00
15.P5g-5f 00:55:00 00:41:00
16.G6a-5b 00:55:00 01:05:00
17.P3g-3f 00:56:00 01:05:00
18.P4c-4d 00:56:00 01:13:00
19.P4g-4f 01:00:00 01:13:00
20.G5b-4c 01:00:00 01:35:00
21.G4i-5h 01:00:00 01:35:00
22.P7c-7d 01:00:00 01:37:00
23.N2i-3g 01:08:00 01:37:00
24.S4b-3c 01:08:00 01:42:00
25.S4h-4g 01:38:00 01:42:00
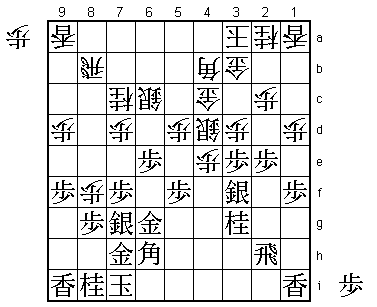
26.P8d-8e 01:38:00 01:56:00
27.P2f-2e 01:39:00 01:56:00
Sato is not playing a fashionable opening, but instead plays the seldom
seen Yonenaga quick attack (a tribute to the only other player coming back
from 3-0 down?).
28.P1c-1d 01:39:00 02:23:00
29.P9g-9f 01:59:00 02:23:00
30.P9c-9d 01:59:00 02:25:00
31.P1g-1f 02:05:00 02:25:00
32.P6c-6d 02:05:00 02:36:00
33.P6g-6f 02:21:00 02:36:00
34.S6b-6c 02:21:00 02:36:00
35.B8h-7i 02:22:00 02:36:00
36.B2b-3a 02:22:00 02:36:00
37.G5h-6g 02:31:00 02:36:00
38.B3a-4b 02:31:00 02:36:00
39.B7i-6h 02:32:00 02:36:00
40.K4a-3a 02:32:00 02:36:00
41.K6i-7i 02:32:00 02:36:00
42.N8a-7c 02:32:00 02:36:00
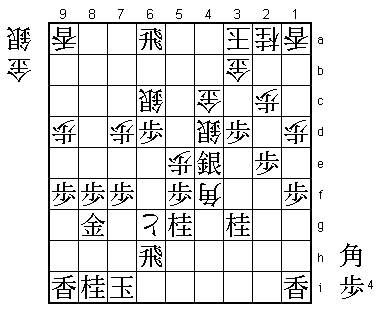
43.P4f-4e 03:55:00 02:36:00
In the end, Sato decided not to open the game too early with a quick P4e
attack, which is the way Yonenaga played this opening. In a two-day match,
starting the attack on the first day is not a good idea. Therefore, Sato has
played it more slowly and the game has settled down in a symmetric Yagura
opening. Sato has a difficult decision to make here and takes more than an
hour to play 43.P4e. Starting the attack with the king on 7i is dangerous,
but if black moves to king into the castle with 43.K8h, white can start
attacking first with 44.P6e.
44.P4dx4e 03:55:00 03:44:00
The only move, but Habu takes his time to play it and seals it to end the
first day. The second day will start with all the complications.
45.P3f-3e 04:13:00 03:44:00
46.S3c-4d 04:13:00 05:07:00
47.S4g-3f 04:45:00 05:07:00
48.P6d-6e 04:45:00 05:10:00
Sato was worried about 48.P4f here. If then 49.Bx4f Px3e Sx3e P*3f leads
to an unclear position. It is hard to say which is better and it Habu seemed
to have overlooked this option. Still, with the king still on 7i, black
has to be very careful with his attack because giving white a major piece
in hand can be very dangerous.
49.P6fx6e 04:57:00 05:10:00
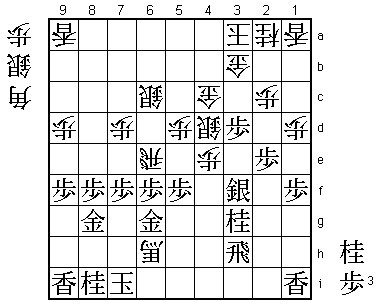
50.P8e-8f! 04:57:00 05:14:00
Well timed pawn push. If black takes this pawn with the silver, the 6th
file is weakened and P5e next is strong. On the other hand, taking with
the pawn gives white the classic attack against the yagura with the knight
to 6e, joining pawn on 8e and dangling pawn on 8g. However, at this point
both players still thought that black had the slightly better position.

51.P8gx8f    05:45:00  05:14:00
52.N7cx6e    05:45:00  05:57:00
53.S7g-6f    05:49:00  05:57:00
54.P*8e      05:49:00  06:00:00
55.P8fx8e    05:54:00  06:00:00
56.P*8f      05:54:00  06:00:00
57.P3ex3d    06:15:00  06:00:00
58.B4b-6d    06:15:00  06:18:00
59.R2h-3h    06:21:00  06:18:00
60.B6d-4f    06:21:00  06:19:00
61.S6fx6e    06:40:00  06:19:00
62.P8f-8g+   06:40:00  06:26:00
63.G7hx8g    06:40:00  06:26:00
64.R8bx8e    06:40:00  06:26:00
65.P*8f      06:44:00  06:26:00
66.R8ex6e    06:44:00  06:26:00
67.P*6f      06:44:00  06:26:00
68.B4fx6h+   06:44:00  06:27:00
69.R3hx6h?   07:03:00  06:27:00

Sato took almost 20 minutes to decide with which piece to take the bishop
and in the end picks the wrong one. Better was 69.Kx6h and then 70.R6d P3c+
Sx3c Nx4e and the black attack seems to be stronger.

70.R6e-6d    07:03:00  06:34:00
71.S3fx4e    07:03:00  06:34:00
72.B*4f      07:03:00  06:36:00

The problem. Black suddenly has to defend very carefully.

73.N*5g?     07:24:00  06:36:00

Difficult to see, but correct was 73.Sx4d. Then 74.S*5i S*5g Sx6h+ Kx6h
Bx3g+ Sx4c+ Gx4c N*3e R*4i and the position is still unclear.

74.P5d-5e!   07:24:00  06:39:00
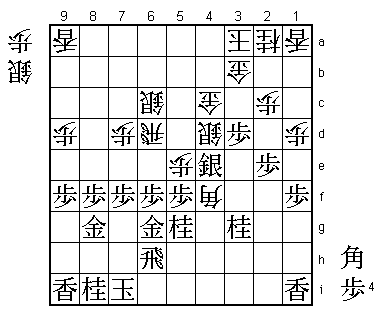
Sato had overlooked this strong move. The rook on 6d, which seemed to be
dead, suddenly comes back to life. 75.Sx4d is answered by 76.Rx4d and
75.K8h Px5f Gx5f Bx3g+ is also good for white.

75.P6f-6e?   07:43:00  06:39:00

This allows P*6f and thus only worsens the black position. However, there
doesn't seem to be a good alternative.

76.P*6f      07:43:00  07:29:00
77.P6ex6d    07:43:00  07:29:00
78.P6fx6g+   07:43:00  07:29:00
79.R*6a?     07:43:00  07:29:00
The final mistake. Habu was worried about the immediate 79.Rx6g. If then
80.Px5f like in the game, black can still fight with 81.R*5a.

80.K3a-2b    07:43:00  07:29:00
81.R6hx6g    07:43:00  07:29:00
82.P5ex5f    07:43:00  07:39:00
83.K7i-8h    07:43:00  07:39:00
84.P5fx5g+   07:43:00  07:40:00
85.R6g-6e    07:43:00  07:40:00
86.B4f-5e!   07:43:00  07:51:00

The deciding move. Black has to give white the rook, but the king position
is too weak to defend against a rook attack.

87.R6ex5e    07:52:00  07:51:00
88.S4dx5e    07:52:00  07:51:00
89.R6ax9a+   07:53:00  07:51:00
90.R*5h      07:53:00  07:52:00
91.K8h-9g    07:53:00  07:52:00
92.S*7h      07:53:00  07:52:00
93.L*8h      07:59:00  07:52:00
94.S7hx8g=   07:59:00  07:52:00
95.K9gx8g    07:59:00  07:52:00
96.G*7h      07:59:00  07:53:00
97.S*9g      07:59:00  07:53:00
98.+P5g-6g   07:59:00  07:53:00
Resigns      07:59:00  07:53:00
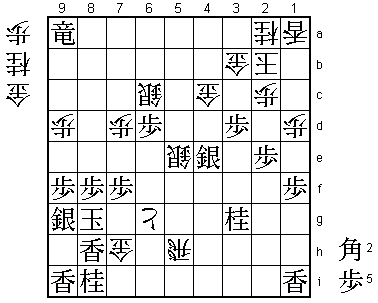
White threatens mate with 100.G7g Nx7g +R7h etc. If 99.P8e, then 100.G7g K8f
Gx7f Kx7f R7h+ and mate. Finally, 99.P9e N*8d is hisshi. Against the odds,
Habu played an almost perfect game to keep his Osho title. This game was
played at Sado island, and it seemed that Habu slept on the boat to the
island, despite the strong wind and high sea. This seems to indicate that
he didn't feel any pressure, but his reaction after the post-mortem analysis
was finished and Sato had left the room was telling: he gave a big sigh of
relief before getting up and leaving the playing room himself. Another great
Habu-Sato match narrowly ending in Habu's favor.