55th Osho Match Game 6
[Black "Sato Yasumitsu, Challenger"]
[White "Habu Yoshiharu, Osho"]
[Event "55th Osho-sen, Game 6"]
[Date "March 6th and 7th 2006"]
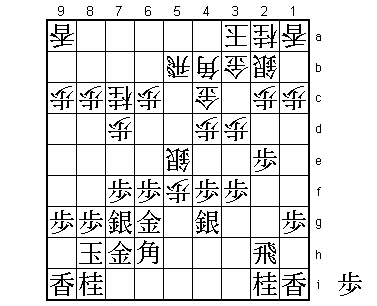
1.P7g-7f 00:00:00 00:00:00
2.P3c-3d 00:00:00 00:03:00
3.P2g-2f 00:02:00 00:03:00
4.G4a-3b 00:02:00 00:05:00
5.G6i-7h 00:05:00 00:05:00
6.P4c-4d 00:05:00 00:09:00
7.P2f-2e 00:14:00 00:09:00
8.B2b-3c 00:14:00 00:13:00
9.S3i-4h 00:14:00 00:13:00
10.G6a-5b 00:14:00 00:18:00
11.P5g-5f 00:40:00 00:18:00
12.S3a-2b 00:40:00 00:55:00
13.B8h-7g 00:42:00 00:55:00
14.G5b-4c 00:42:00 01:33:00
15.B7g-6h 00:43:00 01:33:00
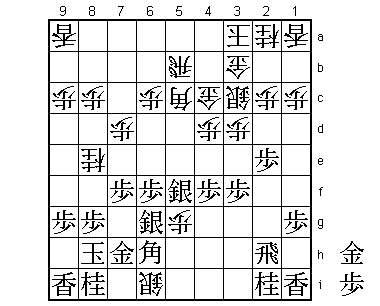
This is a similar development to the game between Habu and Morishita
in the A Junisen just played a couple of days earlier on March 3rd.
In that game Habu exchanged the bishops, which seems to be idea behind
black's strategy, but in this game Sato doesn't do this and the game
settles into a normal Yagura formation.
16.K5a-4a 00:43:00 01:34:00
17.K5i-6i 00:48:00 01:34:00
18.P5c-5d 00:48:00 01:38:00
19.S7i-8h 00:59:00 01:38:00
20.S7a-6b 00:59:00 01:42:00
21.S8h-7g 01:01:00 01:42:00
22.S6b-5c 01:01:00 01:47:00
23.P3g-3f 01:02:00 01:47:00
24.K4a-3a 01:02:00 02:22:00
25.G4i-5h 01:09:00 02:22:00
26.S5c-6d 01:09:00 02:29:00
Instead of playing the silver to 3c, eliminating the wall silver, Habu
moves up the right silver quickly to put pressure on the black formation.
Judging from this game, that might have been a little bit too much.
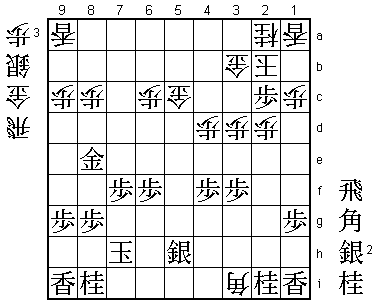
27.P6g-6f 01:57:00 02:29:00
28.P5d-5e 01:57:00 02:46:00
29.P5fx5e 02:03:00 02:46:00
30.S6dx5e 02:03:00 02:46:00
31.P4g-4f 02:04:00 02:46:00
32.R8b-5b 02:04:00 03:07:00
33.S4h-4g 02:13:00 03:07:00
34.B3c-4b 02:13:00 03:18:00
35.G5h-6g 02:43:00 03:18:00
36.P7c-7d 02:43:00 03:29:00
37.K6i-7i 02:54:00 03:29:00
38.N8a-7c 02:54:00 03:44:00
39.K7i-8h 03:12:00 03:44:00
40.P*5f!? 03:12:00 03:54:00
The main strategic point of this game. The pawn on 5f looks like a thorn
in black's side, but Sato could have prevented this multiple times by
dropping a pawn on 5f himself. However, then white can put the silver
in a very good position with S6d-S5c-S5d and it will be difficult for
black to attack. By not playing P*5f, Sato is more or less daring Habu
to play a pawn there himself. After some thought, Habu decides to go for it.
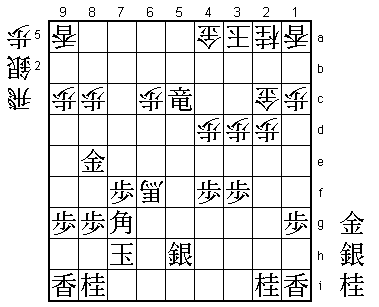
41.R2h-5h! 03:47:00 03:54:00
Sato counted on this positive reply, and rightly so. Black cannot afford
a move like 41.N3g, because the white attack after P6d and P6e is too strong.
42.S2b-3c 03:47:00 03:57:00
43.G6gx5f 04:33:00 03:57:00
44.S5ex5f 04:33:00 03:59:00
45.S4gx5f 04:34:00 03:59:00
46.G*6i 04:34:00 04:08:00

White seems to be winning material, but...

47.P*5c!     04:36:00  04:08:00

There is no good way to take this pawn. After 48.Gx5c or Bx5c, black can
save the bishop with B5g and after 48.Rx5c S*6b R5b Sx7c+ black has the
advantage.

48.B4bx5c    04:36:00  05:04:00
49.B6h-5g    04:37:00  05:04:00
50.N7c-8e    04:37:00  05:06:00
51.S7g-6h    04:46:00  05:06:00
52.G6ix6h    04:46:00  05:16:00
53.B5gx6h    04:49:00  05:16:00
54.S*6i      04:49:00  05:18:00
55.R5h-2h    05:26:00  05:18:00
56.P*5g      05:26:00  05:39:00
57.S*6g!     06:03:00  05:39:00
Strong defense. 57.Bx5g is good for white after 58.Sx7h+ Kx7h P7e P8f Px7f
Px8e B8f! (this move would not have been possible with the bishop on 6h).

58.B5c-6d    06:03:00  05:59:00
59.P*5e      06:21:00  05:59:00
60.B6dx5e    06:21:00  06:03:00
61.S5fx5e    06:21:00  06:03:00
62.R5bx5e    06:21:00  06:03:00
63.B6h-8f    06:21:00  06:03:00
64.P7d-7e    06:21:00  06:03:00
65.G*6e      06:31:00  06:03:00
66.R5e-5b    06:31:00  06:06:00
67.G6ex7e    06:31:00  06:06:00
68.P5g-5h+   06:31:00  06:06:00
69.G7ex8e    06:31:00  06:06:00
70.K3a-2b    06:31:00  06:06:00
71.P*5c      06:59:00  06:06:00
72.R5bx5c    06:59:00  06:06:00
73.B8fx5c+   06:59:00  06:06:00
74.G4cx5c    06:59:00  06:06:00
75.P2e-2d    06:59:00  06:06:00
76.S3cx2d    06:59:00  06:09:00
77.S6gx5h    07:10:00  06:09:00
78.S6ix7h+   07:10:00  06:09:00
79.K8hx7h    07:10:00  06:09:00
80.B*3i      07:10:00  06:09:00

Black seems to have the advantage, but things are not so simple. This move
forces Sato into an attack for which the outcome is unclear. During the game,
neither player knew if the black attack would be strong enough. By forcing
Sato's hand, Habu is basically saying: "Try to kill me if you can. Any mistake
will be punished". Quite a lot of pressure with the Osho title hanging in
the balance.

81.R2hx2d    07:19:00  06:09:00
82.P2cx2d    07:19:00  06:15:00
83.P*2c      07:19:00  06:15:00
84.G3bx2c?   07:19:00  07:10:00

Habu makes the first and decisive mistake. After 55 minutes, he picks the
wrong defense. The reasoning behind Gx2c is clear: after this, neither N*1e
nor S*4b is a mating threat, so white gets the time to play Bx6f+, which puts
the bishop in a very good position for both attack and defense. Unfortunately
for Habu, black can counter this. Best was 84.Kx2c. For example, 85.N*1e K3c
S*2c is a mating threat after B*5a G*4b Sx3b+ Kx3b S*2c K4c Bx4b+ Kx4b R*3b,
but Bx6f+ is the perfect counter, defending against the mate by allowing an
escape up the board and also threatening mate. Black's best option seems to
be 85.R*5a but then 86.R*5e S*6g B4h+ N*4g Rx8e Rx5c+ G*4c +R5a P*5g and there
seems to be no win for black: +Rx2a G*2b +Rx1a Px5h+ N*3e Px3e Nx3e Rx3e Px3e
+B5i K8h N*9e which is threatening mate and white seems to be winning. This is
a very long variation that was played in the post-mortem analysis, but several
options were tried without finding a winning variation for black. Habu should
have played 84.Kx2c instead of Gx2c.

85.S*3a      07:29:00  07:10:00
86.K2bx3a    07:29:00  07:11:00
87.R*5a      07:29:00  07:11:00
88.G*4a      07:29:00  07:13:00
89.R5ax5c+   07:29:00  07:13:00
90.B3ix6f+   07:29:00  07:13:00

89.Rx5c+ is not a mating threat, so Habu thought that this move was good enough.

91.B*7g!     07:31:00  07:13:00
The perfect counter. Why this is good will become clear later.

92.R*5f      07:31:00  07:15:00
93.N*4c      07:32:00  07:15:00
94.K3a-3b    07:32:00  07:17:00

Here is the point of 91.B*7g. The best defense is to move the king to 2b, but
then 95.Bx6f Rx6f is not a mating threat, so black wins after N3a+ Gx3a S*4b.
The main problem of moving to 2b becomes clear after 95.Bx6f Rx5c because Bx4d
forks the king and rook. Putting the king on 3b means that it is closer to
black's attacking pieces and this is just enough for the black attack to be
decisive.

95.G*3a      07:33:00  07:17:00
96.K3b-3c    07:33:00  07:34:00
97.B7gx6f    07:34:00  07:34:00
98.R5fx5c    07:34:00  07:34:00
99.S*5e      07:35:00  07:34:00
100.K3c-2b   07:35:00  07:42:00
101.G3ax4a   07:35:00  07:42:00
102.K2b-1b   07:35:00  07:42:00
103.G4a-3a   07:39:00  07:42:00
104.S*2b     07:39:00  07:49:00
105.G*3b     07:53:00  07:49:00
106.S*6e     07:53:00  07:55:00
107.G3ax2a   07:56:00  07:55:00
108.S6ex6f   07:56:00  07:55:00
109.N*1e     07:56:00  07:55:00
110.B*5f     07:56:00  07:57:00
111.K7h-6i   07:56:00  07:57:00
Resigns      07:56:00  07:57:00
No mate after 112.R*3i K6h. Also 112.Rx4c Gx1a Kx1a L*1b Kx1b B*2a K1a Nx2c=
leads to mate. White has no defense, so Habu resigned. This is only the second
time in shogi history that someone has won three consecutive games after losing
the first three. The other time was the 1978 Judan match between Nakahara and
Yonenaga. Yonenaga could not finish his amazing comeback from 3-0 down, as
Nakahara won the final game to defend his title. Sato has a chance to carve
his name in shogi history by doing the virtually impossible if he can win
the final game.