55th Osho Match Game 4
[Black "Sato Yasumitsu, Challenger"]
[White "Habu Yoshiharu, Osho"]
[Event "55th Osho-sen, Game 4"]
[Date "February 14th and 15th 2006"]
1.P7g-7f     00:00:00  00:00:00
2.P8c-8d     00:00:00  00:02:00
3.P2g-2f     00:02:00  00:02:00
4.G4a-3b     00:02:00  00:06:00
5.G6i-7h     00:04:00  00:06:00
6.P3c-3d     00:04:00  00:10:00
7.P2f-2e     00:06:00  00:10:00
8.B2bx8h+    00:06:00  00:24:00
9.S7ix8h     00:06:00  00:24:00
10.S3a-2b    00:06:00  00:24:00
11.P1g-1f    00:18:00  00:24:00
12.P1c-1d    00:18:00  01:00:00
13.S3i-4h    00:21:00  01:00:00
14.S2b-3c    00:21:00  01:01:00
15.P3g-3f    00:36:00  01:01:00
16.S7a-6b    00:36:00  01:35:00
17.P9g-9f    00:47:00  01:35:00
18.P9c-9d    00:47:00  01:55:00
19.S4h-3g    00:58:00  01:55:00
20.P6c-6d    00:58:00  02:28:00
21.S3g-4f    01:03:00  02:28:00
22.S6b-6c    01:03:00  02:28:00
23.P3f-3e    01:04:00  02:28:00

So far the game is following the A class Junisen game of February 1st
between the same players.

24.P4c-4d    01:04:00  02:28:00

This move is different. Even though Habu won the Junisen game, it is
clear that Sato has prepared something, so Habu changes the moves to
avoid Sato's homework.

25.P3ex3d    01:20:00  02:28:00
26.S3cx3d    01:20:00  02:28:00
27.P2e-2d    01:21:00  02:28:00
28.P2cx2d    01:21:00  02:30:00
29.R2hx2d    01:21:00  02:30:00
30.G3b-2c    01:21:00  02:30:00
31.R2d-2h    01:21:00  02:30:00
32.P*2d      01:21:00  02:31:00
33.P5g-5f    02:07:00  02:31:00
34.N2a-3c    02:07:00  02:41:00
35.S8h-7g    02:09:00  02:41:00
36.P4d-4e    02:09:00  03:13:00
37.S4f-5e    03:07:00  03:13:00
38.S3d-4c    03:07:00  03:25:00
39.B*3e      03:21:00  03:25:00
40.K5a-6b    03:21:00  04:14:00
41.B3ex2d    03:28:00  04:14:00
42.P*2e      03:28:00  04:14:00
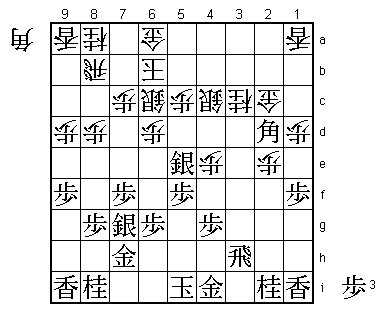
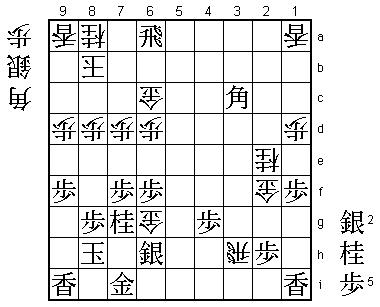
43.R2h-3h!   04:19:00  04:14:00

This move shows that Sato's positive attitude has not changed even though
he is 3-0 behind. Black has won a pawn and 43.B6h seems good enough, but
Sato is looking for more, saying after the game that he didn't like 43.B6h
G5b P*2d G2b and it seems difficult for black to continue. 43.R3h is a
difficult move to play, because white seems to have the strong counter
44.B*2g. Many professionals would not have dared to play R3h because of
this, but Sato has analyzed this deeply and after the game he showed the
following variation: 44.B*2g R3g Bx4i+ Kx4i Gx2d Rx3c+ B*6i (S4c-5b K5h!
but not +Rx2d? because of B*5g threatening mate and rook) G6h Bx4g+ P*4h
P*3b +R4b G5b B*7a (Kx7a +R3a followed by Px4g).

44.S4c-3d    04:19:00  04:56:00

Habu confirms that Sato was right. Black has won the opening and Habu
doesn't seem to have much hope to recover with his pieces all over the
place.

45.B2d-6h    04:20:00  04:56:00
46.P2e-2f    04:20:00  04:57:00
47.P*2h      04:24:00  04:57:00
48.G6a-5b    04:24:00  04:59:00
49.K5i-6i    05:27:00  04:59:00
50.G5b-4c    05:27:00  05:32:00
51.B6h-5i    05:44:00  05:32:00
52.S3d-2e    05:44:00  05:37:00
53.K6i-7i    05:48:00  05:37:00
54.G2c-3d    05:48:00  05:39:00
55.K7i-8h    05:48:00  05:39:00
56.P7c-7d    05:48:00  05:59:00
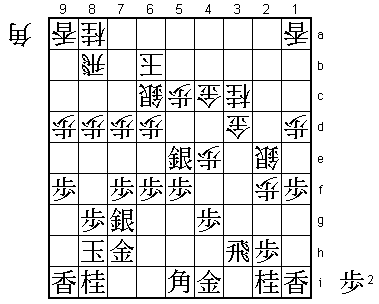
57.P6g-6f!   06:15:00  05:59:00

Sato can not afford to be complacent. This move is necessary, because
white threatened to bring the rook into play with K7c. After P6f, K7c
is met with B3g and the black attack along the long diagonal is hard
to defend against.

58.P5c-5d    06:15:00  06:15:00
59.N2i-1g    06:17:00  06:15:00
60.P5dx5e    06:17:00  06:15:00
61.N1gx2e    06:17:00  06:15:00
62.N3cx2e    06:17:00  06:15:00
63.B5ix2f    06:17:00  06:15:00
64.S*4d      06:17:00  06:15:00
65.S*3b      06:38:00  06:15:00
66.G4c-3c    06:38:00  06:17:00
67.S3b-2c+   06:38:00  06:17:00
68.N*3g      06:38:00  06:22:00
69.+S2cx3c   06:39:00  06:22:00
70.G3dx3c    06:39:00  06:22:00
71.G*2d      06:42:00  06:22:00
72.K6b-7c    06:42:00  06:28:00
73.G2dx3c    06:43:00  06:28:00
74.S4dx3c    06:43:00  06:28:00
75.B2f-7a+   06:47:00  06:28:00
76.G*7b      06:47:00  06:28:00
77.+B7a-6a   07:11:00  06:28:00
78.P5ex5f    07:11:00  06:44:00
79.G4i-4h    07:13:00  06:44:00
80.S*2i      07:13:00  06:57:00
81.R3h-3i    07:14:00  06:57:00
82.P5f-5g+   07:14:00  06:57:00
83.R3i-5i    07:17:00  06:57:00
84.P*5f      07:17:00  07:00:00

85.+B6a-5a?  07:27:00  07:00:00

Just going for the bad silver on 3c is not good, letting Habu back in.
Correct was 85.+Bx2e N9c +B2f N8e +Bx3g.

86.K7c-8c    07:27:00  07:01:00
87.+B5ax3c   07:27:00  07:01:00
88.B*6g      07:27:00  07:03:00
89.G7hx6g    07:37:00  07:03:00
90.+P5gx6g   07:37:00  07:03:00
91.G*7i      07:38:00  07:03:00
92.S2i-3h+   07:38:00  07:09:00
93.R5ix5f    07:43:00  07:09:00
94.+S3hx4h   07:43:00  07:09:00
95.S*6h      07:46:00  07:09:00
96.+S4h-5h   07:46:00  07:11:00
97.+B3c-2d   07:47:00  07:11:00
98.P4e-4f    07:47:00  07:19:00
99.+B2dx4f   07:47:00  07:19:00
100.+P6gx7g  07:47:00  07:19:00
101.N8ix7g   07:50:00  07:19:00
102.+S5hx6h  07:50:00  07:22:00
103.+B4fx6h  07:50:00  07:22:00
104.S*5d     07:50:00  07:22:00
105.R5f-2f   07:50:00  07:22:00
106.S5d-5e   07:50:00  07:34:00
107.S*6g     07:50:00  07:34:00
108.G*3d     07:50:00  07:36:00
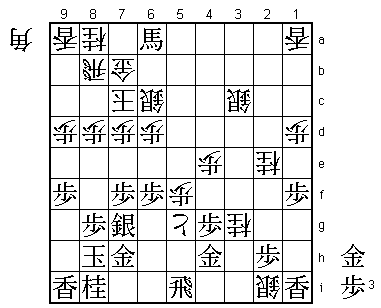
109.P*3e?    07:51:00  07:36:00

Correct was 109.B*2b.

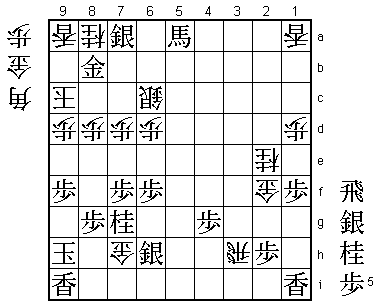
110.S*5i!    07:51:00  07:36:00

Habu magic! This move was completely overlooked by Sato. If 110.+Bx5i
then Gx3e and the black rook dies.

111.+B6h-5g  07:55:00  07:36:00
112.S5i-4h=  07:55:00  07:36:00
113.+B5gx4h  07:55:00  07:36:00

Overlooking the silver drop must have been a shock for Sato, especially
when his time is running out. However, he has stayed cool and even
though losing the rook cannot be helped, the promoted bishop is placed
better on 4h than on 5i. Sato is very lucky that he still has a minuscule
edge in this position.

114.G3dx3e   07:55:00  07:36:00
115.B*3c     07:55:00  07:36:00
116.G*4e     07:55:00  07:39:00
117.P*5f     07:56:00  07:39:00
118.G3ex2f   07:56:00  07:53:00
119.P5fx5e   07:56:00  07:53:00
120.N3g-4i+  07:56:00  07:53:00
121.+B4hx4i  07:56:00  07:53:00
122.P*5f     07:56:00  07:53:00
123.P5e-5d   07:56:00  07:53:00
124.P5f-5g+  07:56:00  07:58:00
125.P5d-5c+  07:56:00  07:58:00
126.+P5gx6g  07:56:00  07:59:00
127.+B4ix6g  07:56:00  07:59:00
128.R*3h     07:56:00  07:59:00
129.S*6h     07:56:00  07:59:00
130.S*5f     07:56:00  07:59:00
131.+B6gx5f  07:56:00  07:59:00
132.G4ex5f   07:56:00  07:59:00
133.+P5cx6c  07:56:00  07:59:00
134.G7bx6c   07:56:00  07:59:00
135.S*7a     07:56:00  07:59:00
136.G5f-6g   07:56:00  07:59:00
137.S7ax8b+  07:56:00  07:59:00
138.K8cx8b   07:56:00  07:59:00
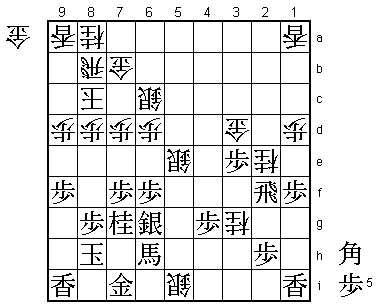
139.R*6a     07:57:00  07:59:00

Finally, the black win is clear.

140.S*7b     07:57:00  07:59:00

No choice. 140.Gx6h is answered by 141.S*8c K9c (Kx8c Rx6c+ S*7c S*7b
and mate) S*8b Kx8c Rx6c+ S*7c (or B*7c) Sx7c+ Nx7c S*7b and mate.

141.S*7a     07:57:00  07:59:00
142.K8b-9b   07:57:00  07:59:00
143.R6ax6c+  07:58:00  07:59:00
144.S7bx6c   07:58:00  07:59:00
145.G*8b     07:58:00  07:59:00
146.K9b-9c   07:58:00  07:59:00
147.B3c-5a+  07:58:00  07:59:00
148.R*7h     07:58:00  07:59:00
149.G7ix7h   07:58:00  07:59:00
150.G6gx7h   07:58:00  07:59:00
151.K8h-9h   07:58:00  07:59:00
Resigns      07:58:00  07:59:00

Habu could have tried 152.G8h here, because 153.Kx8h?? Rx6h+ leads to
mate. However, Sato would undoubtedly have played 153.K9g, after which
there is no mate. On the other hand, black has the multiple mating
threats R*8c and N*8e Px8e S*8d and there is no way to defend against
this. A fine win by Sato, even though he got a little scare in the middle
of it. He is still 3-1 down and needs to win all the remaining games,
so his situation has only improved slightly.
