55th Osho Match Game 2
[Black "Sato Yasumitsu, Challenger"]
[White "Habu Yoshiharu, Osho"]
[Event "55th Osho-sen, Game 2"]
[Date "January 19th and 20th 2006"]
1.P7g-7f 00:00:00 00:00:00
2.P3c-3d 00:00:00 00:03:00
3.P2g-2f 00:01:00 00:03:00
4.P4c-4d 00:01:00 00:05:00
5.P2f-2e 00:02:00 00:05:00
6.B2b-3c 00:02:00 00:07:00
7.S3i-4h 00:02:00 00:07:00
8.P9c-9d 00:02:00 00:09:00
9.P9g-9f 00:12:00 00:09:00
10.R8b-4b 00:12:00 00:34:00
11.K5i-6h 00:13:00 00:34:00
12.S3a-3b 00:13:00 00:35:00
13.K6h-7h 00:13:00 00:35:00
14.S3b-4c 00:13:00 00:36:00
15.P5g-5f 00:16:00 00:36:00
16.S7a-7b 00:16:00 00:52:00
17.G4i-5h 00:20:00 00:52:00
18.K5a-6b 00:20:00 00:54:00
19.S4h-5g 00:31:00 00:54:00
20.P6c-6d 00:31:00 00:56:00
21.B8h-5e 01:07:00 00:56:00
22.S7b-6c 01:07:00 01:18:00
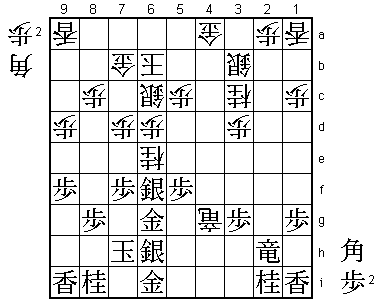
23.B5e-7g!? 01:36:00 01:18:00

Sato's new idea. The normal way of playing after B5e is to retreat
the bishop to 3g and to keep the pressure on the white position from
there. Sato is aiming for something more subtle, giving white the
choice between playing with the silver on 6c (weak castle formation)
or losing a move by retreating the silver to 7b. Habu choose the first
option, but he is not able to completely solve the white opening problems.
24.P7c-7d 01:36:00 02:01:00
25.P6g-6f 01:38:00 02:01:00
26.N8a-7c 01:38:00 02:02:00
27.G5h-6g 01:42:00 02:02:00
28.P4d-4e 01:42:00 02:13:00
Positive play. Black seems to be aiming for a strong castle formation
and white is taking the time to build this formation to set up a strong
attack.
29.P6f-6e!? 02:07:00 02:13:00
Even more positive response by Sato. Rather than waiting, he opens up
the game himself. A rather violent fights ensues.
30.N7cx6e 02:07:00 03:06:00
31.B7gx3c+ 02:08:00 03:06:00
32.N2ax3c 02:08:00 03:06:00
33.S5g-6f 02:11:00 03:06:00
34.G6a-7b 02:11:00 04:14:00
35.P2e-2d 02:37:00 04:14:00
36.P2cx2d 02:37:00 04:17:00
37.R2hx2d 02:37:00 04:17:00
38.P4e-4f 02:37:00 04:17:00
39.P4gx4f 03:28:00 04:17:00
40.S4c-3b 03:28:00 04:19:00
41.R2d-2b+ 03:37:00 04:19:00
42.R4bx4f 03:37:00 04:20:00
43.S7i-6h 03:39:00 04:20:00
44.P*2a 03:39:00 05:29:00
45.+R2b-2h 03:59:00 05:29:00
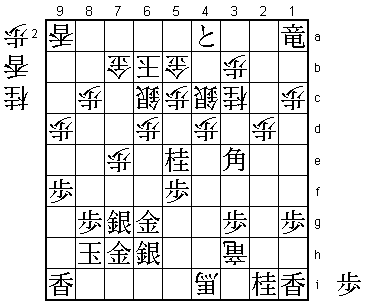
46.R4f-4g+?! 03:59:00 05:30:00
Promoting on 4i might have been better here, but after Sato's reply the
promotion on 4g is correct.
47.K7h-8h?! 04:39:00 05:30:00
Probably better was 47.P*4h and only after white retreats the promoted
rook (for example to 4b), black plays 49.K8h. In that case white doesn't
have many attacking options and after the slow 50.K8a G7h K8b, black has
the better position because of his stronger castle. Sato may have been
reluctant to use a pawn on 4h, but the white attack is looking pretty
dangerous. Still, he might have calculated it all correctly.
48.B*4i 04:39:00 05:42:00
49.G6i-7h 04:49:00 05:42:00
50.B4i-3h+ 04:49:00 05:50:00
51.+R2h-2d 04:56:00 05:50:00
52.+B3h-4i 04:56:00 06:39:00
53.+R2dx3d 05:22:00 06:39:00
54.P*4d 05:22:00 06:39:00
55.P*2d 06:07:00 06:39:00
56.P2a-2b 06:07:00 06:39:00
57.P2d-2c+ 06:12:00 06:39:00
58.P2bx2c 06:12:00 06:39:00
59.P*2d 06:12:00 06:39:00
60.P2cx2d 06:12:00 06:41:00
61.P*2c 06:12:00 06:41:00
62.G4a-3a 06:12:00 06:49:00
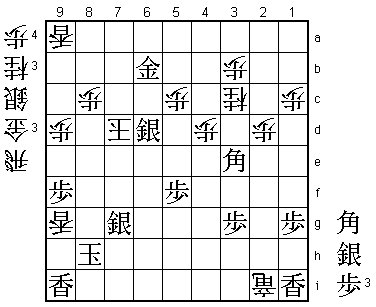
63.B*3e! 06:19:00 06:49:00

Strong move. This bishop works both in attack and defense. The pawn on 2c
now becomes very effective.

64.G3a-4b    06:19:00  07:00:00

The obvious 64.P7e fails to 65.P2b+ Gx2b S5e and black will probably win
the attacking race (for example, +R4h next is answered by +Rx4d). The
bishop on 3e is holding the black position together.

65.P2c-2b+   06:20:00  07:00:00
66.S3b-4c    06:20:00  07:00:00
67.+R3d-2c   06:20:00  07:00:00
68.P7d-7e    06:20:00  07:14:00
69.+P2b-3a   06:54:00  07:14:00
70.P7ex7f    06:54:00  07:19:00
71.+R2c-2b   06:55:00  07:19:00
72.G4b-5b    06:55:00  07:21:00
73.+P3a-4a   06:55:00  07:21:00
74.P*3b      06:55:00  07:30:00
75.+R2bx1a   07:12:00  07:30:00
76.+R4g-3h   07:12:00  07:34:00
77.L*7e      07:23:00  07:34:00
78.P7f-7g+   07:23:00  07:47:00
79.N8ix7g    07:23:00  07:47:00
80.N6ex7g+   07:23:00  07:48:00
81.S6fx7g    07:25:00  07:48:00
82.P*7d      07:25:00  07:48:00
83.N*5e      07:31:00  07:48:00
84.P7dx7e    07:31:00  07:48:00
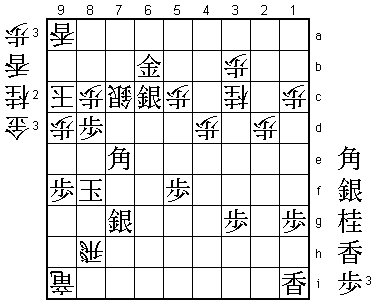
85.+P4a-5a?! 07:37:00  07:48:00

Black is still winning after this move, so it can not really be called
a mistake, but Sato could have made things easier for himself by playing
85.+P4b here. Then 86.Gx4b Nx6c+ Gx6c S*5a K5b (K7c Sx4b+) +R3a L*4a Sx4b+
Lx4b G*5a K6b P*7d and black has a winning attack.

86.L*7f      07:37:00  07:49:00
87.+P5ax5b   07:39:00  07:49:00
88.S4cx5b    07:39:00  07:49:00
89.S7gx7f    07:49:00  07:49:00
90.P7ex7f    07:49:00  07:49:00
91.L*7e      07:49:00  07:49:00
92.S*7g      07:49:00  07:51:00
93.K8h-9h    07:50:00  07:51:00

Black can not take the silver on 7g or P*7d will become possible.

94.N*7d      07:50:00  07:55:00

Not the best looking move, but white has no choice. 94.+Bx6g looks good
because after both 95.Sx6g or 95.Gx6g the black king is mated after G*8h etc.
However, after 95.Gx7g Px7g+ S*7a and wins or 95.Gx7g G*8h K9h and there is
no mate. Close, but black wins by one move.

95.G6gx7g    07:52:00  07:55:00
96.P7fx7g+   07:52:00  07:55:00
97.G7hx7g    07:52:00  07:55:00
98.+R3hx2i   07:52:00  07:55:00
99.N5ex6c+   07:53:00  07:55:00
100.S5bx6c   07:53:00  07:55:00
101.L7ex7d   07:58:00  07:55:00
102.S6cx7d   07:58:00  07:55:00
103.S*6a     07:58:00  07:55:00
104.L*9g     07:58:00  07:55:00
105.K9h-8h   07:58:00  07:55:00
106.N*7f     07:58:00  07:55:00
107.G7gx7f   07:58:00  07:55:00
108.+B4ix7f  07:58:00  07:55:00
109.+R1a-5a  07:58:00  07:55:00
110.K6b-7c   07:58:00  07:55:00
111.S6ax7b+  07:58:00  07:55:00
112.K7cx7b   07:58:00  07:55:00
113.N*8d     07:59:00  07:55:00
114.K7b-6c   07:59:00  07:56:00
115.N*7e     07:59:00  07:56:00
116.+B7fx7e  07:59:00  07:56:00
117.G*6b     07:59:00  07:56:00
118.K6c-7c   07:59:00  07:56:00
119.+R5a-7a  07:59:00  07:56:00
120.K7cx8d   07:59:00  07:56:00
121.S*7c     07:59:00  07:56:00
122.K8d-8e   07:59:00  07:56:00
123.G*8f     07:59:00  07:56:00
124.+B7ex8f  07:59:00  07:57:00
125.P8gx8f   07:59:00  07:57:00
126.K8ex8f!  07:59:00  07:58:00

A long sequence of checks that ultimately should have led to mate. Sato
may have been put off by this move. He mainly analyzed 126.K7f B*6g K6e
Sx6d+ Kx6d B4f K5d +Rx7d K4e S*3d and white has no defense while the rook
on 7d makes it impossible to mate the black king. Because of the working
of the rook on 7d, Habu chooses the more dangerous 126.Kx8f. This should
have ended in mate, but with Sato in byoyomi, it was the right choice to
try and win this game.

127.S6h-7g   07:59:00  07:58:00
128.K8f-7e   07:59:00  07:58:00
129.S7cx6d=  07:59:00  07:58:00
130.K7e-6e   07:59:00  07:58:00
131.+R7ax7d  07:59:00  07:58:00
132.K6ex7d   07:59:00  07:58:00
133.S6d-6c=? 07:59:00  07:58:00

Here Sato throws it all away. The reason this move only gets a single
question mark is the fact that the winning move was the awful looking 133.S*6c,
which makes the black attack really heavy. In this special case, it is mate:
134.Kx6d 135.B4f and now 136.K6e B*7d K7e P*7f K8d B5g K7c G7b B4f or 136.K7e
P*7f K8d B*7e K8e P*8f (not mate with a pawn drop because the lance on 9g is
blocking the lance on 9i!) Kx9f Lx9g. When this mate was shown to him after
the game, Sato said that he had never been so surprised in his whole shogi
career. Truth to be told, Habu had also completely overlooked this mate.

134.K7d-8d   07:59:00  07:58:00
135.B3e-5g   07:59:00  07:58:00
136.P*7e     07:59:00  07:58:00
137.P*8e     07:59:00  07:58:00
138.K8d-9c   07:59:00  07:58:00
139.K8hx9g   07:59:00  07:58:00
140.+R2ix9i  07:59:00  07:58:00
141.K9g-8f   07:59:00  07:58:00
142.S*7c     07:59:00  07:58:00
143.B5gx7e   07:59:00  07:58:00
144.N*8d     07:59:00  07:58:00
145.P8ex8d   07:59:00  07:58:00
146.R*8h     07:59:00  07:58:00
Resigns      07:59:00  07:58:00
Mate after 147.Sx8h +Rx8h L*8g G*8e etc. or 147.K7f G*8e K6g L*6e etc. A great
fight that should have been won by Sato, but recently Habu has his magic powers
in full working order, snatching victory from the jaws of defeat. Tough luck
for Sato, who now needs to win the third game to get back in this match.