55th Osho Match Game 1
[Black "Habu Yoshiharu, Osho"]
[White "Sato Yasumitsu, Challenger"]
[Event "55th Osho-sen, Game 1"]
[Date "January 12th and 13th 2006"]
1.P7g-7f     00:00:00  00:00:00

This is the 100th official game between Habu and Sato. Most professionals
play only about 30 games against each other in their entire career.
Getting to a 100 well before turning 40 shows that Habu and Sato have
a long rivalry at the top level. Sato has been on the receiving end for
most of his career (coming into this game, Habu leads the head-to-head
68-31), but in recent years he seems to have found ways to make it more
difficult for Habu. Like the matches they played last summer, this Osho
match is expected to be close.

2.P3c-3d     00:00:00  00:02:00
3.P2g-2f     00:02:00  00:02:00
4.G4a-3b     00:02:00  00:05:00
5.G6i-7h     00:20:00  00:05:00
6.P4c-4d     00:20:00  00:23:00
7.P2f-2e     00:33:00  00:23:00
8.B2b-3c     00:33:00  00:27:00
9.S3i-4h     00:37:00  00:27:00
10.G6a-5b    00:37:00  01:13:00
11.P5g-5f    01:27:00  01:13:00
12.S3a-2b    01:27:00  01:20:00
13.B8h-7g    01:29:00  01:20:00
14.G5b-4c    01:29:00  01:55:00
15.B7g-6h    01:40:00  01:55:00
16.K5a-4a    01:40:00  02:34:00
17.S7i-8h    02:10:00  02:34:00
18.S7a-6b    02:10:00  03:29:00
19.S8h-7g    02:39:00  03:29:00
20.P5c-5d    02:39:00  03:29:00
21.K5i-6i    02:41:00  03:29:00
22.S6b-5c    02:41:00  03:30:00
23.P3g-3f    02:49:00  03:30:00
24.K4a-3a    02:49:00  04:04:00
25.G4i-5h    02:59:00  04:04:00
26.P8c-8d    02:59:00  04:29:00
27.P6g-6f    03:15:00  04:29:00

The sealed move.

28.B3c-5a    03:15:00  04:30:00
29.P2e-2d    03:32:00  04:30:00
30.P2cx2d    03:32:00  04:34:00
31.B6hx2d    03:32:00  04:34:00
32.S5c-4b    03:32:00  04:35:00
33.B2d-6h    03:43:00  04:35:00
34.S4b-3c    03:43:00  04:35:00
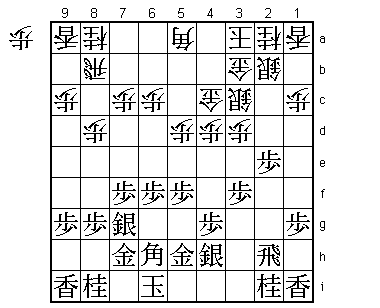
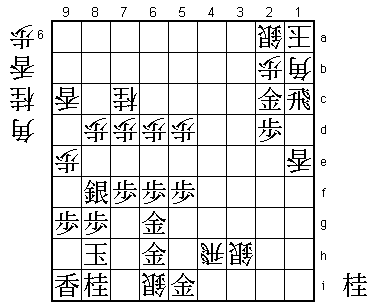
35.P*2e!     04:04:00  04:35:00

A surprising development. Sato's strongpoint in his recent title match
games against Habu has been his ideas in the opening, taking the initiative
in most games. However, in this game Sato's opening strategy ends in failure.
After 35.P*2e, white is unable to improve the position of the wall silver
on 2b, because moving it to 2c would make the attacking base on 2e too
strong. From now on, white can only wait for black to make his move.

36.P9c-9d    04:04:00  04:42:00
37.K6i-7i    04:17:00  04:42:00
38.P9d-9e    04:17:00  04:46:00
39.G5h-6g    04:17:00  04:46:00
40.P7c-7d    04:17:00  04:58:00
41.K7i-8h    04:24:00  04:58:00
42.L9a-9c    04:24:00  05:37:00
43.P4g-4f    04:40:00  05:37:00
44.R8b-9b    04:40:00  05:41:00
45.S4h-4g    04:40:00  05:41:00
46.N8a-7c    04:40:00  05:46:00
47.S7g-8f    04:43:00  05:46:00
48.B5a-4b    04:43:00  05:46:00
49.B6h-5g    04:56:00  05:46:00
50.R9b-8b    04:56:00  06:14:00
51.N2i-3g    05:00:00  06:14:00
52.P*2c      05:00:00  06:15:00
53.R2h-2i    05:16:00  06:15:00
54.P1c-1d    05:16:00  06:17:00
55.P1g-1f    05:16:00  06:17:00
56.S2b-1c    05:16:00  06:23:00
57.B5g-3i    05:20:00  06:23:00
58.K3a-2b    05:20:00  06:29:00
59.B3i-1g    05:21:00  06:29:00
60.L1a-1b    05:21:00  06:33:00
61.P3f-3e    05:35:00  06:33:00
62.P3dx3e    05:35:00  06:34:00
63.B1gx3e    05:35:00  06:34:00
64.K2b-1a    05:35:00  06:35:00

Sato has found a way to get rid of the wall silver: moving into the
anaguma. A very modern way of playing shogi: when the opening fails,
just move into the anaguma and wait for a chance with the strong castle.
This no-nonsense approach is often seen in the games of Ryu-O Watanabe
and he has a lot of success with it. This being said, Habu has built a
perfect attacking formation and it is hard to see how the white position
can survive, even with the strong anaguma.

65.B3e-2f    05:36:00  06:35:00
66.B4b-6d    05:36:00  06:43:00
67.S4g-3f    05:45:00  06:43:00
68.B6dx4f    05:45:00  06:59:00
69.P1f-1e    05:48:00  06:59:00
70.P1dx1e    05:48:00  06:59:00
71.P*4e      05:48:00  06:59:00
72.S1c-2b    05:48:00  07:13:00
73.S3f-3e    06:08:00  07:13:00
74.B4f-6d    06:08:00  07:14:00
75.P4ex4d    06:11:00  07:14:00
76.G4c-3d    06:11:00  07:15:00
77.S3ex3d    06:23:00  07:15:00
78.S3cx3d    06:23:00  07:15:00
79.P*3e      06:23:00  07:15:00
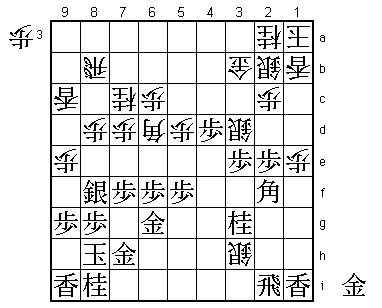
80.S*3h!     06:23:00  07:32:00

It is unclear if Habu made a mistake somewhere, but after this silver
drop things are getting quite complicated. Black can not play 81.R6i
because of 82.S2g+ Bx1e Sx3e, but after the game continuation, it is
very questionable whether the black attack is strong enough.

81.R2i-2h    06:26:00  07:32:00
82.S3dx3e    06:26:00  07:32:00
83.B2fx3e    06:35:00  07:32:00
84.B6dx3g+   06:35:00  07:32:00
85.P4d-4c+   06:36:00  07:32:00
86.G3bx4c    06:36:00  07:33:00
87.B3e-7a+   06:37:00  07:33:00
88.R8b-4b    06:37:00  07:37:00
89.P2e-2d    06:41:00  07:37:00
90.+B3gx2h   06:41:00  07:38:00
91.P2dx2c+   06:41:00  07:38:00
92.S2bx2c    06:41:00  07:38:00
93.P*4d      06:43:00  07:38:00
94.G4c-3c    06:43:00  07:39:00
95.L1ix1e    07:04:00  07:39:00

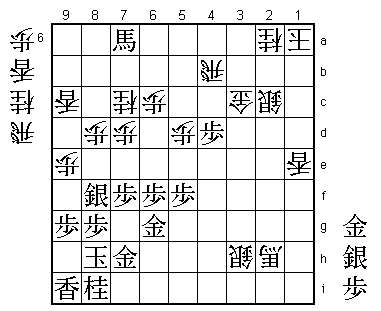
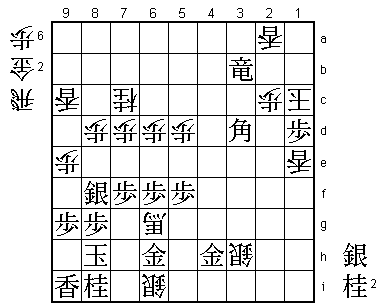
"Without pawns in hand the game is lost" as the proverb goes. Habu
needs a pawn to strengthen his attack. How important this is, will
become clear soon.

96.L1bx1e?   07:04:00  07:56:00

An important mistake. Sato is a little to eager here, probably because
he thinks that it is easier for the white king to escape up the board
here. However, with a pawn in hand and the lance not on 1b, the black
attack is just strong enough to win this game.

97.+B7a-5c   07:06:00  07:56:00
98.+B2h-6d   07:06:00  07:56:00
99.+B5cx6d   07:07:00  07:56:00
100.P6cx6d   07:07:00  07:56:00
101.S*3a     07:07:00  07:56:00
102.R4b-3b   07:07:00  07:57:00
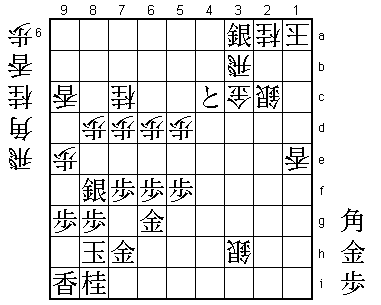
103.P4d-4c+! 07:07:00  07:57:00

The point. Because black has a pawn and the lance is on 1e, 104.Gx4c
fails to 105.P*2d Sx2d G*2c and black wins.

104.R3bx3a   07:07:00  07:57:00
105.B*4b!    07:09:00  07:57:00

This gives the black attack decisive strength.

106.G3c-3b   07:09:00  07:58:00
107.P*2d     07:09:00  07:58:00

There is the only pawn again.

108.S2c-1b   07:09:00  07:58:00
109.G*2c     07:11:00  07:58:00
110.G3bx4b   07:11:00  07:59:00
111.+P4cx4b  07:11:00  07:59:00
112.P*2b     07:11:00  07:59:00
113.+P4bx3a  07:11:00  07:59:00
114.S*6i     07:11:00  07:59:00
115.+P3ax2a  07:38:00  07:59:00

White has a lot of pieces in hand, so finding the right way to win
this game took some time. Habu thought about this move for 27 minutes.
Sato is already in byoyomi here.

116.S1bx2a   07:38:00  07:59:00
117.G7h-6h   07:38:00  07:59:00
118.R*4h     07:38:00  07:59:00
119.R*1c     07:41:00  07:59:00
120.B*1b     07:41:00  07:59:00
121.G*5i     07:42:00  07:59:00

Here Habu felt certain about victory. Moving the rook just picks up
the silver on 6i, but with the rook in hand black has a long (but not
too complicated) mate.

122.B*4i     07:42:00  07:59:00
123.G5ix4h   07:48:00  07:59:00
124.B4ix6g+  07:48:00  07:59:00
125.G2cx1b   07:48:00  07:59:00
126.S2ax1b   07:48:00  07:59:00
127.R*3a     07:48:00  07:59:00
128.L*2a     07:48:00  07:59:00
129.R1cx1b+  07:48:00  07:59:00
130.K1ax1b   07:48:00  07:59:00
131.B*4e     07:48:00  07:59:00
132.P*3d     07:48:00  07:59:00
133.B4ex3d   07:48:00  07:59:00
134.N*2c     07:48:00  07:59:00
135.P2dx2c+  07:48:00  07:59:00
136.P2bx2c   07:48:00  07:59:00
137.R3a-3b+  07:48:00  07:59:00
138.K1b-1c   07:48:00  07:59:00
139.P*1d     07:48:00  07:59:00
Resigns      07:48:00  07:59:00

Mate after 140.Kx1d N*2f K2d S*2e K1c S1d K2d Bx2c+ etc., or 140.K2d
S*2e K3e B4c+ etc. An interesting game that seemed to end in a one-sided
victory for Habu, but suddenly got very complicated. In the end, like so
many times before in their encounters, Habu prevailed. Still, the match
is still young and Sato will have a chance to level the match with the
black pieces in game 2.
