55th Meijin Match Game 4
Black: Habu Yoshiharu, Meijin
White: Tanigawa Koji, Challenger
55th Meijin-sen, Game 4, May 19th and 20th 1997
1.P7g-7f 0/0 0/0
2.P8c-8d 0/0 5/5
3.S7i-6h 7/7 0/5
4.P3c-3d 0/7 6/11
5.S6h-7g 14/21 0/11
6.S7a-6b 0/21 5/16
7.P5g-5f 1/22 0/16
8.P5c-5d 0/22 6/22
9.S3i-4h 3/25 0/22
10.S3a-4b 0/25 2/24
11.G4i-5h 20/45 0/24
12.G4a-3b 0/45 11/35
13.P6g-6f 4/49 0/35
14.K5a-4a 0/49 20/55
15.G5h-6g 4/53 0/55
16.P7c-7d 0/53 11/66
17.G6i-7h 12/65 0/66
18.S6b-5c 0/65 42/108
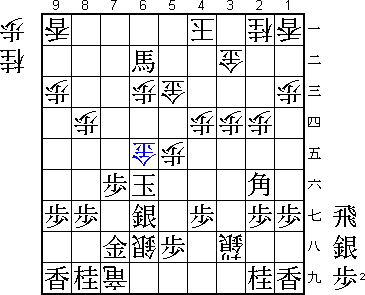
The first step to the dangerous Quick Attack Yagura. Dangerous for both
sides, that is.
19.K5i-6i 33/98 0/108
20.P5d-5e 0/98 19/127
21.P5fx5e 9/107 0/127
22.B2bx5e 0/107 4/131
23.B8h-7i 6/113 0/131
24.B5e-2b 0/113 56/187
25.B7i-4f 42/155 0/187
Habu regretted playing this move, feeling that he had to play too defensively
after this. However, neither he or Shukan Shogi give an alternative.
26.S5c-6d 0/155 30/217
27.P*5f 67/222 0/217
28.N8a-7c 0/222 9/226
29.P3g-3f 4/226 0/226
30.R8b-5b 0/226 27/253
31.S4h-5g 28/254 0/253
32.P*5e 0/254 4/257
33.R2h-5h 3/257 0/257
34.P5ex5f 0/257 42/299
35.S5gx5f 13/270 0/299
36.P*5e 0/270 5/304
37.S5f-4e 4/274 0/304
38.S4b-3c 0/274 0/304
39.P3f-3e 2/276 0/304
40.P3dx3e 0/276 0/304
41.B4fx3e 0/276 0/304
42.S3c-4d 0/276 13/317
43.S4ex4d 0/276 0/317
44.P4cx4d 0/276 0/317
It now has become even more unclear why Habu regretted B4f, because he has
come out of the opening with an advantage. White's bishop on 2b is not working
and that is crucial in this type of quick fight Yagura. Still, Habu has to
be very careful.
45.P7f-7e! 52/328 0/317

Great move. White wants to play S*5f as soon as possible, so a natural move
like K7i is very dangerous. Instead, Habu pushes his own castle pawn on 7f
to screw up white's attacking formation.

46.S6dx7e      0/328     19/336
47.S*8c        12/340    0/336
48.R5b-5d      0/340     18/354
49.P*7f        7/347     0/354
50.S7e-6d      0/347     1/355
51.S8cx7d=     0/347     0/355
52.G6a-6b      0/347     13/368
53.P6f-6e      30/377    0/368
54.N7cx6e      0/377     45/413
55.S7g-6f      1/378     0/413
56.S*5f        0/378     1/414
57.R5h-3h?      35/413    0/414

A mistake that gives Tanigawa the opportunity to strengthen his attack. Better
would have been 57.S7dx6e Sx6e Sx6e Sx6e N*4f and after both R7d S*7e R7b
N7g or R5b P*5d black has the better position.

58.P*3d        0/413     42/456
59.B3e-2f?      31/444    0/456

Habu clearly underestimates Tanigawa's next move. This makes things worse.
Better would have been B6h as will be explained below.

60.B2b-3c!      0/444     0/456
This looks slow, but gives Tanigawa the upper hand. The king now has an
escape route and the white bishop comes into play.
61.P*5h 23/467 0/456
One of the extra advantages of B3c is shown after 61.Gx5f Px5f S7dx6e Sx6e
Sx6e R5e S*6f Rx6e Sx6e P5g+. Black now would like to play the counterattack
R*8a, but after P*5a there is no follow-up. By the way, this variation is also
the reason why Habu's B2f was not good. If the bishop would have been pulled
back to 6h, white can not promote the pawn on 5g and white's attack becomes
much more difficult.
62.B3c-2d 0/467 4/460
63.S7dx6e 12/479 0/460
64.S6dx6e 0/479 3/463
65.S6fx6e 0/479 0/463
66.S5fx6e 0/479 0/463
67.S*2e 1/480 0/463
68.S6e-5f 0/480 23/486
69.S2ex2d 10/490 0/486
70.P2cx2d 0/490 0/486
71.N*6f 18/508 0/486
72.R5d-5b 0/508 3/489
73.N6f-7d 0/508 0/489
74.G6b-5c 0/508 9/498
75.B*7a 1/509 0/498
76.S*4i 0/509 7/505
77.R3h-4h 2/511 0/505
78.S5fx6g+ 0/511 0/505
79.G7hx6g 0/511 0/505
80.S*5f 0/511 0/505
81.S*6h 2/513 0/505
82.S5fx6g+ 0/513 4/509
83.S6hx6g 0/513 0/509
84.S*5f 0/513 0/509
This looks a little like sennichite, but actually Tanigawa has swapped his
silvers for golds, making his attack stronger and Habu's defense more difficult
("without a gold there is no defense"). After this, even though it seems still
problematic to win, Habu never gets a chance to get back into it.
85.S*6h 0/513 0/509
86.G*3h 0/513 2/511
87.R4hx3h 2/515 0/511
88.S5fx6g+ 0/515 2/513
89.S6hx6g 0/515 0/513
90.S4ix3h+ 0/515 0/513
91.N7d-6b+ 3/518 0/513
92.R*3i 0/518 1/514
93.K6i-7h 15/533 0/514
94.P*7g 0/533 1/515
95.K7hx7g 4/537 0/515
96.R3i-7i+ 0/537 0/515
97.G*7h 0/537 0/515
98.S*6h 0/537 1/516
99.K7g-6f 0/537 0/516
100.R5bx6b 0/537 0/516
101.B7ax6b+ 0/537 0/516
102.G*6e 0/537 0/516
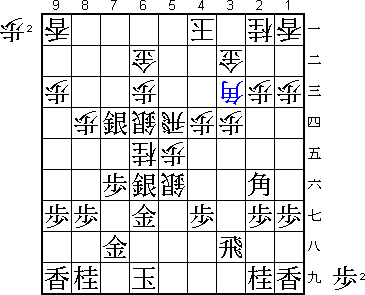
And one of the easiest resignation diagrams in this meijin match. After
103.Kx6e G6d K6f either N*7d or N*5d is mate.
Resigns 0/537 0/516
Time: 08:57:00 08:36:00