54th Oza Match Game 3
[Black "Sato Yasumitsu, Challenger"]
[White "Habu Yoshiharu, Oza"]
[Event "54th Oza-sen, Game 3"]
[Date "September 27th 2006"]
1.P7g-7f     00:00:00  00:00:00
2.P3c-3d     00:00:00  00:01:00
3.P2g-2f     00:00:00  00:01:00
4.P9c-9d     00:00:00  00:04:00
5.P2f-2e     00:01:00  00:04:00
6.P9d-9e     00:01:00  00:05:00

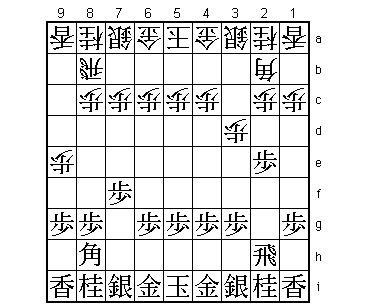
This is an idea by Akutsu (5-dan). The plan is to force black into
a quick attack. If black settles for a slow game, the pawn on 9e
is an important advantage. However, it is not easy to break down
the white position quickly. The first two games with this opening
were losses for white, but after a pause this position was played
twice again and this time white won both games. Habu said after the
game that he didn't think it was such a good strategy, but that the
white results were surprisingly good, so he decided to give it a try.
There might also have been a psychological reason for playing this.
Sato is 2-0 down and already has to force the issue. By playing a
strategy that puts even more pressure on black to build a successful
attack, Habu might push Sato into an overplay.

7.G6i-7h     00:28:00  00:05:00
8.R8b-4b     00:28:00  00:28:00
9.P2e-2d     00:28:00  00:28:00
10.P2cx2d    00:28:00  00:28:00
11.R2hx2d    00:28:00  00:28:00
12.K5a-6b    00:28:00  00:32:00
13.R2d-2h    01:27:00  00:32:00

The reason that black cannot promote the rook is: 13.R2c+ Bx8h+ Sx8h
R2b and even though there are numerous variations after that, there
is no way for black to break through.

14.G4a-3b    01:27:00  00:33:00
15.S3i-4h    01:30:00  00:33:00
16.P4c-4d    01:30:00  00:53:00
17.P*2d      01:33:00  00:53:00
18.R4b-4c    01:33:00  00:53:00
19.P3g-3f    01:33:00  00:53:00
20.K6b-7b    01:33:00  00:56:00
21.K5i-6h    02:25:00  00:56:00
22.P4d-4e    02:25:00  01:08:00
23.G4i-5h    02:37:00  01:08:00
24.B2bx8h+   02:37:00  01:23:00
25.S7ix8h    02:37:00  01:23:00
26.P*2b      02:37:00  01:23:00
27.S4h-3g    02:51:00  01:23:00
28.S3a-4b    02:51:00  01:46:00
29.S8h-7g    02:55:00  01:46:00
30.S4b-3c    02:55:00  01:50:00
31.K6h-7i    02:57:00  01:50:00
32.S3c-4d    02:57:00  01:52:00
33.K7i-8h    03:16:00  01:52:00
34.K7b-8b    03:16:00  01:58:00
35.G5h-6h    03:28:00  01:58:00
36.S7a-7b    03:28:00  02:00:00
37.P5g-5f    03:28:00  02:00:00
38.P5c-5d    03:28:00  02:26:00
39.S3g-4h    03:29:00  02:26:00
40.P3d-3e    03:29:00  02:50:00
41.P3fx3e    03:38:00  02:50:00
42.B*6d      03:38:00  02:54:00
43.S4h-3g    03:53:00  02:54:00
44.S4dx3e    03:53:00  02:56:00
45.R2h-2e    03:58:00  02:56:00
46.S3e-4d    03:58:00  03:14:00

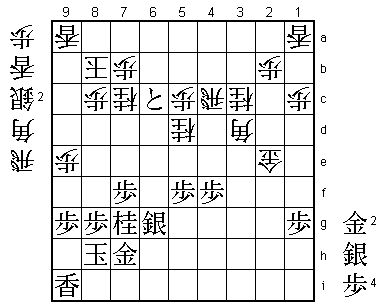
47.P6g-6f?   04:12:00  03:14:00

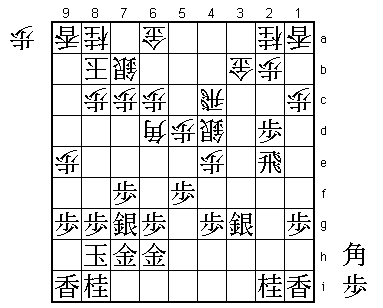
It is unclear if this mistake was caused by Sato's eagerness to attack
the white position or just a simple oversight. Better was 47.L1h.
For example, 48.P1d P1f P*3h B*2h R3c B1g R3d and even though this
is not really how black wants to play this position, it is much better
than the main line. It seems that white has won the opening battle,
which makes this opening an interesting object of study.

48.P*3f      04:12:00  03:23:00
49.S3gx3f    04:16:00  03:23:00

This allows a simple bishop promotion, but black has no choice. Sato
thought that he could play 49.P6e here and after 50.Bx3g+ Nx3g Px3g+
P2c+ Px2c P*2d Px2d Rx2d P*2c R3d black has the better position.
However, Sato suddenly realized that instead of P*2c, white can also
play S*2c and then black is pushed back.

50.B6dx1i+   04:16:00  03:24:00
51.S3f-3e    04:16:00  03:24:00
52.S4d-3c    04:16:00  03:51:00
53.R2e-2f!   04:16:00  03:51:00

Sato is trying to make the best of a bad situation. White is clearly
better, but black keeps finding ways to make things difficult for him.

54.+B1i-6d   04:16:00  04:05:00
55.R2f-3f    04:17:00  04:05:00
56.P5d-5e    04:17:00  04:13:00
57.N2i-3g    04:18:00  04:13:00
58.P5ex5f    04:18:00  04:13:00
59.N3g-2e    04:18:00  04:13:00
60.P4e-4f    04:18:00  04:13:00
61.S3ex4f    04:19:00  04:13:00
62.L*4d      04:19:00  04:15:00
63.N2ex3c+   04:20:00  04:15:00
64.G3bx3c    04:20:00  04:18:00
65.S*6e      04:34:00  04:18:00
66.L4dx4f    04:34:00  04:19:00
67.S6ex6d    04:34:00  04:19:00
68.P5f-5g+   04:34:00  04:19:00
69.P4gx4f    04:34:00  04:19:00
70.+P5gx6h   04:34:00  04:19:00
71.S6dx7c+   04:34:00  04:19:00
72.S7bx7c    04:34:00  04:27:00
73.S7gx6h    04:34:00  04:27:00
74.N*5d      04:34:00  04:28:00

75.B*7g!     04:40:00  04:28:00

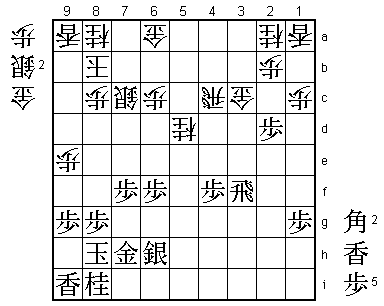
A move that took even top professional Abe by surprise: "I wouldn't
think of that move in a lifetime". When the position is bad, common
sense requires that moves must have both an attacking and defending
purpose, or one is just pushed off the board. However, 75.B*7g is a
defense only move in a bad position. Normally, such a move means that
resignation is near. This case is different. Sato thought that after
this move the black position surprisingly holds together. Habu agreed,
saying that after 75.B*7g he no longer knew how to continue. Abe was
speechless: Habu and Sato agreeing on the strength of a move he would
never think of, despite being an A-class professional...

76.S*7b      04:40:00  04:37:00
77.B*1f!     04:43:00  04:37:00

Another "strange" bishop drop. It forces white to drop his last pawn,
so black can attack with L*7e. Still, dropping a bishop on this end of
the board just to force a pawn drop looks like a very low percentage move.

78.P*3d      04:43:00  04:38:00
79.L*7e      04:43:00  04:38:00
80.G*5e      04:43:00  04:47:00
81.L7ex7c+   04:43:00  04:47:00
82.S7bx7c    04:43:00  04:47:00
83.S*6g      04:49:00  04:47:00
84.G6a-7b    04:49:00  04:48:00
85.P*3e      04:52:00  04:48:00
86.G3cx2d    04:52:00  04:52:00
87.P3ex3d    04:52:00  04:52:00
88.S*2e      04:52:00  04:52:00
89.P3d-3c+   04:52:00  04:52:00
90.N2ax3c    04:52:00  04:52:00
91.P*5f      04:57:00  04:52:00
92.G5ex6f    04:57:00  04:53:00
93.B1fx2e    04:58:00  04:53:00
94.G2dx2e    04:58:00  04:56:00
95.R3f-3d    04:58:00  04:56:00
96.G6fx7g    04:58:00  04:56:00
97.N8ix7g    04:58:00  04:56:00
98.P*5c      04:58:00  04:56:00

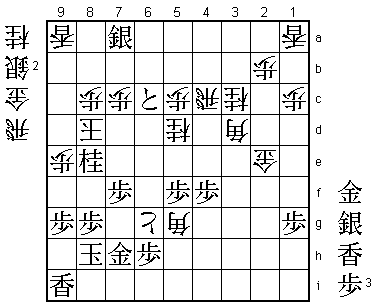
99.P*6d?     04:58:00  04:56:00

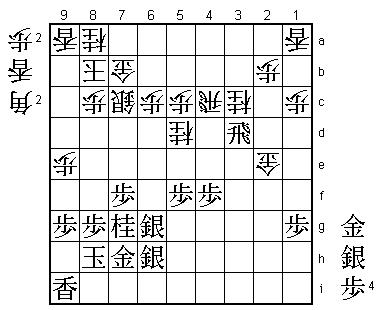
This looks good, because it threatens Px6c+ Gx6c S*5b and 100.Px6d
leaves an important hole on 6c. Unfortunately, Habu has a great counter.
Better was 99.S*4d Rx4d Rx4d L*6f R*3b B*4i P*6d S*6b and even though
the position is difficult, it seems hard for black to win. For example,
black cannot take on 6c because the white attack would get too powerful
after Lx6g+ Sx6g P*6f. Furthermore, white has the drop P*7a to stop the
black attack for a while. Despite this, black has infinitely more chances
to win than in the game.

100.B*1b     04:58:00  04:56:00
101.S*5b     04:58:00  04:56:00
102.B1bx3d   04:58:00  04:56:00
103.P6dx6c+  04:58:00  04:56:00
104.G7bx6c   04:58:00  04:56:00
105.S5bx6c+  04:58:00  04:56:00
106.P*7b     04:58:00  04:56:00
107.+S6cx7c  04:58:00  04:56:00
108.N8ax7c   04:58:00  04:59:00
109.P*6d     04:59:00  04:59:00
110.P*6f     04:59:00  04:59:00
111.P6d-6c+  04:59:00  04:59:00
112.P6fx6g+  04:59:00  04:59:00
113.S6hx6g   04:59:00  04:59:00

114.B*5g!    04:59:00  04:59:00

Habu admitted after the game that he was not sure what the strongest
move was here. In byoyomi, his endgame sense is perfect.

115.G*7d     04:59:00  04:59:00
116.L*7a     04:59:00  04:59:00
117.P*6h     04:59:00  04:59:00
118.P*6f!    04:59:00  04:59:00

The deciding move. 119.S5h is answered by 120.Bx4f+ followed by +Bx5f next.

119.G7dx7c   04:59:00  04:59:00
120.P7bx7c   04:59:00  04:59:00
121.N7g-8e   04:59:00  04:59:00
122.S*8d     04:59:00  04:59:00
123.S*6b     04:59:00  04:59:00
124.S8dx8e   04:59:00  04:59:00
125.S6bx7a=  04:59:00  04:59:00
126.K8b-9c   04:59:00  04:59:00
127.N*7g     04:59:00  04:59:00
128.P6fx6g+  04:59:00  04:59:00
129.N7gx8e   04:59:00  04:59:00
130.K9c-8d   04:59:00  04:59:00
Resigns      04:59:00  04:59:00

No mate because of the bishop on 5g and black cannot take the pawn on
6g: 130.Px6g S*7g Kx7g N*6e and mate. With this win, Habu wins the match
3-0 for his 15th consecutive Oza title, extending his own previous record.
It also is his 65th title, which means that he passed Nakahara on the
all-time list and is now alone in second place behind Oyama. And this all
on his 36th birthday, although after the game he pretended that he had
forgotten all about his birthday. For Sato, it is another sad end to an
Oza challenge. But as Abe put it: "Habu is really strong, winning so often
against a player like Sato, who is also incredibly strong". Sato can take
that into his next title match, the Ryu-O match against Watanabe.
