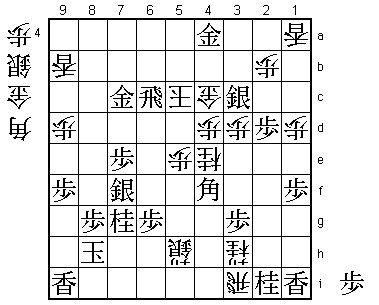
54th Oza Match Game 2
[Black "Habu Yoshiharu, Oza"]
[White "Sato Yasumitsu, Challenger"]
[Event "54th Oza-sen, Game 2"]
[Date "September 16th 2006"]
1.P7g-7f     00:00:00  00:00:00
2.P3c-3d     00:00:00  00:00:00
3.P2g-2f     00:02:00  00:00:00
4.P1c-1d     00:02:00  00:00:00
5.P2f-2e     00:06:00  00:00:00
6.B2bx8h+    00:06:00  00:00:00
7.S7ix8h     00:06:00  00:00:00

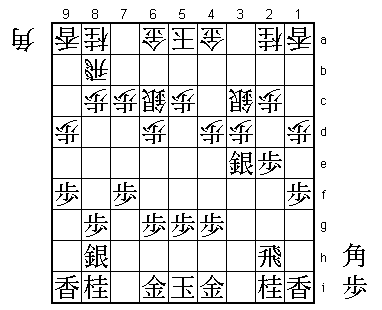
The Kakugawari with tempo loss. Instead of 4.P1d, moving the gold up
with 4.G3b is more often played, but the waiting move P1d has the
advantage that the white position is more flexible in dealing with
the black attack plans.

8.S3a-2b     00:06:00  00:00:00
9.P1g-1f     00:08:00  00:00:00
10.S2b-3c    00:08:00  00:00:00
11.S3i-4h    00:09:00  00:00:00
12.P9c-9d    00:09:00  00:03:00
13.P9g-9f    00:11:00  00:03:00
14.S7a-6b    00:11:00  00:07:00
15.P3g-3f    00:23:00  00:07:00
16.P6c-6d    00:23:00  00:10:00
17.S4h-3g    00:28:00  00:10:00
18.S6b-6c    00:28:00  00:12:00
19.S3g-4f    01:08:00  00:12:00

Habu plays an early silver attack. White has lost a tempo with the
bishop exchange and the waiting move 4.P1d might also be just a loss
of tempo if black starts a quick attack. This silver is going to
play a very important role in this game.

20.P4c-4d    01:08:00  00:50:00
21.P3f-3e    01:17:00  00:50:00
22.P3dx3e    01:17:00  00:51:00
23.S4fx3e    01:19:00  00:51:00
24.P*3d      01:19:00  00:51:00

25.S3e-2f?!  01:28:00  00:51:00

Tempting is 25.P2d, but this doesn't work after 26.Px2d Sx2d B*5e
P*3g P*2g and black has to give up one of the silvers (Rx2g Bx8h+
or R4h Sx2d). Therefore, Habu thought that he had no choice but to
pull back the silver to 2f. This doesn't look like a bad position
for the silver. Black has a pawn in hand and the option of starting
an edge attack next. However, after Sato's next move, black has to
retreat even further. Black has another option here: 25.S2d!. Habu
hadn't thought for a second about this move, but Sato said he had
seen it, but didn't expect Habu to play it. Actually, Sato had played
a similar silver move against Fukaura in the challenger final of the
Oza tournament. After 25.S2d, a variation that was played in the
post-mortem analysis went as follows: 26.Px2d Px2d B*5e B*4f S*2g!
Rx2g Bx8h+ P2c+ P4e B2h +Bx9i +Px3c +Bx3c Rx2a+ S*2b B1g and even
though the black promoted rook dies, black has a lot of pieces in
hand and the position seems good for black.

26.R8b-4b!   01:28:00  00:54:00

The point. White now strongly threatens a counter attack with P4e.

27.S2f-3g    01:34:00  00:54:00

Defends against the attack on the 4th file, but the silver is now
back to where it was on move 17.

28.P7c-7d    01:34:00  00:55:00
29.K5i-6h    01:34:00  00:55:00
30.G4a-3b    01:34:00  01:26:00
31.G4i-5h    01:36:00  01:26:00
32.K5a-4a    01:36:00  01:48:00
33.K6h-7h    01:44:00  01:48:00
34.K4a-3a    01:44:00  01:52:00
35.S3g-3f    02:06:00  01:52:00

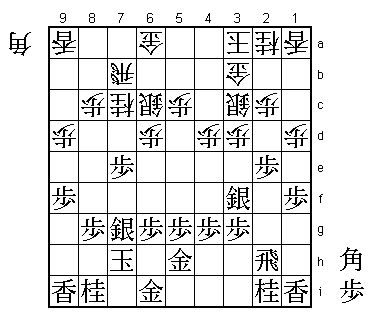
There the silver goes again. This looks very risky because the silver
is hanging and the diagonal to the rook is now open. It might be that
Habu deliberately showed a small weakness to force Sato into action
with the current formation instead of allowing him time to strengthen
his position further.

36.P7d-7e    02:06:00  02:09:00
37.P7fx7e    02:10:00  02:09:00
38.R4b-7b    02:10:00  02:09:00
39.S8h-7g    02:10:00  02:09:00
40.N8a-7c?!  02:10:00  02:10:00

Sato regretted this move. After the game he said that he wanted to keep
the option of jumping to either 8e or 6e open, but that 40.N9c was better,
giving white the extra option of just taking the pawn on 7e with the rook.
After 41.P8f, white can play P8d followed by P8e.

41.P*3g!     03:08:00  02:10:00

Shogi is a complicated game. This is a textbook example of a bad move.
It drops the pawn that black took so much trouble to get in hand back
on its original square. Furthermore, it is a defense-only move, defending
against N8e S8f B*5e. After the game, Habu also admitted that he didn't
like it, but he saw no other move that could keep his position together.
Sato was taken by surprise by 41.P*3g for the same reasons. It is a very
hard move to play because it admits the failure of the opening strategy.
However, thinking about it from the current position, there are a number
of important advantages: the silver on 3f is no longer undefended and the
dangerous diagonal to the rook has been closed. Sato admitted after the
game that even though he felt very good about his position up to this point,
after 41.P*3g he saw no good way to continue his attack.

42.N7c-6e    03:08:00  02:15:00
43.S7g-7f    03:12:00  02:15:00
44.B*3i?!    03:12:00  03:03:00

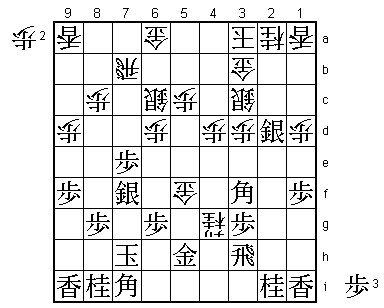
Probably better was 44.B*5d threatening Nx5g+ followed by Bx7f next. It
seems difficult for black to defend against this threat, but that doesn't
necessarily make it a good way to play for white. The bishop has been
dropped on the wrong diagonal and is therefore difficult to use. It can
also easily become a target for attack.

45.R2h-3h    03:30:00  03:03:00
46.B3ix5g+   03:30:00  03:03:00
47.G5hx5g    03:30:00  03:03:00
48.N6ex5g+   03:30:00  03:03:00
49.P2e-2d    03:30:00  03:03:00
50.P2cx2d    03:30:00  03:04:00
51.B*7i      03:34:00  03:04:00
52.G*5f      03:34:00  03:59:00
53.G6i-5h    03:41:00  03:59:00
54.P3d-3e    03:41:00  03:59:00
55.S3fx3e    03:46:00  03:59:00
56.P*3d      03:46:00  04:00:00
57.S3ex2d    03:57:00  04:00:00

The tale of the right silver continues. It has again advanced and is a
perfect combination with the bishop on 7i.

58.+N5gx4g   03:57:00  04:00:00
59.B*3f!     04:07:00  04:00:00

It looks like 59.Gx4g Gx4g R2h is good enough, but Habu is not satisfied
with "good enough".

60.+N4gx3h   04:07:00  04:14:00
61.B3fx6c+   04:07:00  04:14:00
62.P*7g      04:07:00  04:14:00
63.N8ix7g    04:12:00  04:14:00
64.R7b-9b!   04:12:00  04:49:00

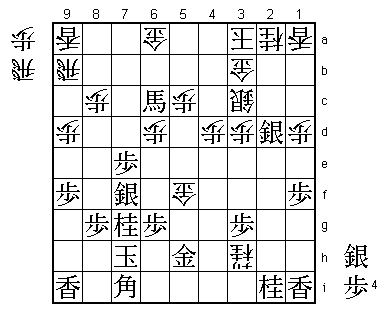
With his back against the wall, Sato is fighting back. Of course +Bx7b Gx7b
is terrible, but just moving the rook away looks even worse. Sato is no longer
thinking about attack, just about keeping his position together at all costs.

65.S2dx3c+?  04:22:00  04:49:00

Here the long journey of the silver ends, but prematurely. Habu should have
played 65.P*4c directly here. Then 66.Sx2d Bx2d wins quickly for black, so
the Saga of the Right Silver could have continued. Habu misses the shortest
route to victory, but Sato doesn't get a chance to get back in the game.

66.N2ax3c    04:22:00  04:51:00
67.P*4c      04:24:00  04:51:00
68.G3bx4c    04:24:00  04:54:00
69.P*5d      04:32:00  04:54:00
70.P5cx5d    04:32:00  04:56:00
71.+B6cx6d   04:41:00  04:56:00
72.K3a-3b    04:41:00  04:56:00
73.P*2d      04:42:00  04:56:00
74.P*2b      04:42:00  04:56:00
75.P*4b      04:42:00  04:56:00
76.N3c-4e    04:42:00  04:57:00
77.P4b-4a+   04:44:00  04:57:00
78.K3bx4a    04:44:00  04:58:00
79.+B6d-7d   04:44:00  04:58:00
80.G6a-5b    04:44:00  04:58:00
81.P*5c      04:46:00  04:58:00
82.G4cx5c    04:46:00  04:58:00
83.S*3c      04:46:00  04:58:00
84.G5c-4c    04:46:00  04:58:00
85.S*3b      04:49:00  04:58:00
86.K4a-5a    04:49:00  04:58:00
87.S3bx4c+   04:50:00  04:58:00
88.G5bx4c    04:50:00  04:58:00
89.G*4a      04:50:00  04:58:00
90.K5a-6b    04:50:00  04:58:00
91.+B7dx5f   04:50:00  04:58:00
92.R*3i      04:50:00  04:59:00
93.+B5fx8c   04:51:00  04:59:00
94.S*6i      04:51:00  04:59:00
95.K7h-8h    04:51:00  04:59:00
96.S6ix5h+   04:51:00  04:59:00
97.B7i-4f    04:52:00  04:59:00
98.P5d-5e    04:52:00  04:59:00
99.G*7c      04:53:00  04:59:00
100.K6b-5c   04:53:00  04:59:00
101.+B8cx9b  04:53:00  04:59:00
102.L9ax9b   04:53:00  04:59:00
103.R*6c     04:53:00  04:59:00
Resigns      04:53:00  04:59:00

Finally, the game ends with a beginner's mate: 104.K5d S6e or 104.K5b
R6b+ Kx4a S3b+. Habu quickly takes a 2-0 lead to get within one game of
his 15th consecutive Oza title. Sato has been making Habu's life very
difficult in title matches, but for some reason the Oza is different.
This is Sato's third Oza challenge and he has yet to win a game against
Habu. He will have to be quick or this match will be over.
