54th Oza Match Game 1
[Black "Sato Yasumitsu, Challenger"]
[White "Habu Yoshiharu, Oza"]
[Event "54th Oza-sen, Game 1"]
[Date "September 7th 2006"]
1.P7g-7f     00:00:00  00:00:00
2.P3c-3d     00:00:00  00:01:00
3.P6g-6f     00:04:00  00:01:00
4.R8b-3b     00:04:00  00:09:00
5.B8h-7g     00:10:00  00:09:00
6.P3d-3e     00:10:00  00:11:00
7.R2h-8h     00:21:00  00:11:00

Habu and Sato seem to make a point of playing as many different
opening strategies as possible, but a Aifuribisha opening is a rarity.
This is their 113th encounter, but only one time before this game the
opening was Aifuribisha (a double Opposing Rook in the 4th game of last
year's Oi match, which Habu convincingly won).

8.S7a-8b     00:21:00  00:17:00
9.K5i-4h     00:27:00  00:17:00
10.K5a-6b    00:27:00  00:27:00
11.S7i-6h    00:38:00  00:27:00
12.G4a-5b    00:38:00  00:31:00
13.P5g-5f    00:44:00  00:31:00
14.P4c-4d    00:44:00  00:53:00
15.P4g-4f!?  00:59:00  00:53:00

To professionals this is a strange move. Pushing the pawn on the head of
the king without even protecting the king with moving the gold to 5h first
looks strange. The point is of course that Sato doesn't want to allow the
vanguard pawn P4e. Having a white pawn on 4e is not necessarily bad for
black, but Sato sends a clear message that he will not allow Habu to dictate
the pace of the game.

16.S3a-4b    00:59:00  01:29:00
17.S6h-5g    00:59:00  01:29:00
18.S4b-4c    00:59:00  01:29:00
19.G6i-5h    01:03:00  01:29:00
20.P7c-7d    01:03:00  01:29:00
21.G5h-4g    01:22:00  01:29:00
22.G6a-7b    01:22:00  01:33:00
23.K4h-3h    01:22:00  01:33:00
24.P1c-1d    01:22:00  01:37:00
25.K3h-2h    01:22:00  01:37:00
26.P1d-1e    01:22:00  01:45:00
27.L1i-1h    01:22:00  01:45:00
28.P2c-2d    01:22:00  02:07:00
29.K2h-1i    01:22:00  02:07:00
30.N2a-3c    01:22:00  02:07:00
31.S3i-2h    01:23:00  02:07:00
32.N3c-2e    01:23:00  02:08:00
33.G4i-3h    01:25:00  02:08:00
34.S4c-3d    01:25:00  02:09:00
35.P6f-6e    01:31:00  02:09:00
36.S8b-7c    01:31:00  02:09:00
37.P9g-9f    01:49:00  02:09:00
38.P9c-9d    01:49:00  02:14:00
39.P8g-8f    02:05:00  02:14:00
40.K6b-7a    02:05:00  02:28:00
41.R8h-6h    02:09:00  02:28:00
42.B2b-3c    02:09:00  02:32:00
43.N8i-9g    02:13:00  02:32:00
44.L1a-1c    02:13:00  02:37:00
45.S5g-4h    02:20:00  02:37:00
46.R3b-1b    02:20:00  02:38:00
47.S4h-3i    02:20:00  02:38:00
48.G5b-6b    02:20:00  02:46:00
49.B7g-6f    03:13:00  02:46:00
50.S7c-8b    03:13:00  03:06:00

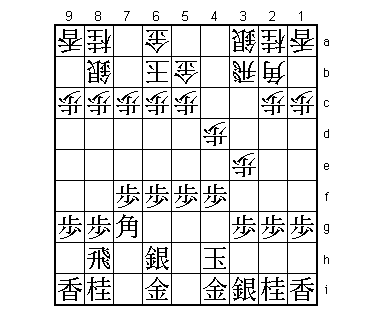
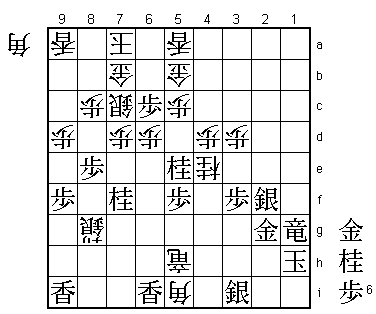
It seems like white has won the opening. The white pieces are perfectly
positioned to start a devastating edge attack as soon as white gets a pawn
in hand (P1f Px1f P*1g and the anaguma falls apart). Because of this,
black cannot easily start an attack of his own. Moreover, it is hard to
see how black can start an attack at all in this position...

51.P4f-4e!   03:20:00  03:06:00

Great vision by Sato. He has seen that if the silver on 3d moves away
from the attack area, the white edge attack is not powerful enough. Habu
has no choice but too attack now, even though he also must have realized
that his edge attack is not good enough anymore.

52.P1e-1f    03:20:00  03:30:00
53.P1gx1f    03:20:00  03:30:00
54.S3dx4e    03:20:00  03:30:00
55.P2g-2f    03:20:00  03:30:00
56.P*1g      03:20:00  03:30:00
57.N2ix1g    03:21:00  03:30:00
58.N2ex1g+   03:21:00  03:30:00
59.S2hx1g    03:22:00  03:30:00
60.S4e-5d    03:22:00  03:41:00
61.N9g-8e    03:36:00  03:41:00
62.P2d-2e    03:36:00  03:51:00
63.S3i-2h    03:37:00  03:51:00
64.S5dx6e    03:37:00  04:07:00
65.B6f-5g    03:47:00  04:07:00
66.S6ex7f    03:47:00  04:08:00
67.N*5e      04:05:00  04:08:00
68.P*1e      04:05:00  04:13:00
69.P1fx1e    04:06:00  04:13:00
70.N*3d      04:06:00  04:14:00
71.P*6d      04:18:00  04:14:00
72.P6cx6d    04:18:00  04:14:00
73.B5gx3e    04:18:00  04:14:00
74.P*1f      04:18:00  04:16:00
75.S1gx1f    04:18:00  04:16:00
76.N3dx2f    04:18:00  04:16:00
77.P*6c      04:18:00  04:16:00
78.G6b-5b    04:18:00  04:33:00

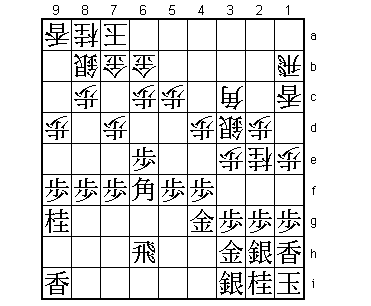
79.G3h-2g?   04:32:00  04:33:00

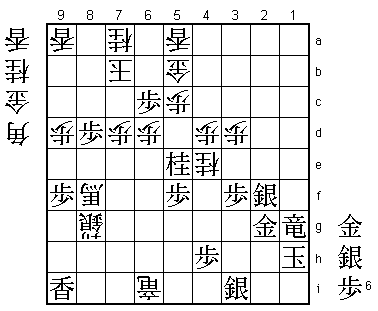
An important mistake based on a rather unusual oversight, especially for
someone of Sato's caliber. Correct was 79.P*2d R2b Bx2f Px2f P2c+ Rx2c N*3e
and black is probably better.

80.P*3d      04:32:00  04:35:00
81.G2gx2f    04:32:00  04:35:00
82.P2ex2f    04:32:00  04:39:00

This is the move that Sato overlooked. He had only thought about 32.Px3e
Gx2e after which black would have had the better position. To be honest,
this simple looking oversight is caused by underestimating Habu's next move.

83.B3ex2f    04:33:00  04:39:00
84.N8a-7c!   04:33:00  04:40:00

The point of Habu's play. He is aiming at N*3e after an exchange of knights.
A white knight there would be more than the black position could take.

85.P3g-3f    04:48:00  04:40:00

Sato spend 15 minutes of pure agony on this move. It is a defense only move
that is admitting complete failure. Sato was therefore very embarrassed to
play it, but 15 minutes of thought showed that he had no choice. Because it
was obvious that Sato was playing this move more or less with the tears
streaming down his face (not literally of course), the professionals in
the press room predicted a quick victory for Habu from here. However, things
are not so easy...

86.N7cx8e    04:48:00  04:43:00
87.P8fx8e    04:48:00  04:43:00
88.P*2e      04:48:00  04:52:00
89.S1fx2e    04:49:00  04:52:00
90.B3cx1e    04:49:00  04:52:00
91.L1hx1e    04:50:00  04:52:00
92.L1cx1e    04:50:00  04:52:00
93.P*1f      04:50:00  04:52:00
94.L1ex1f    04:50:00  04:52:00
95.S2ex1f    04:51:00  04:52:00
96.R1bx1f    04:51:00  04:52:00
97.S2h-1g    04:51:00  04:52:00
98.N*1d      04:51:00  04:52:00
99.S1gx1f    04:58:00  04:52:00
100.N1dx2f   04:58:00  04:52:00
101.S1f-2g   04:58:00  04:52:00
102.P*1g     04:58:00  04:53:00
103.R*1a     04:59:00  04:53:00
104.L*5a     04:59:00  04:53:00
105.R1ax1g+  04:59:00  04:53:00
106.P*1h     04:59:00  04:56:00
107.K1i-2i   04:59:00  04:56:00
108.B*5i     04:59:00  04:56:00
109.R6h-9h   04:59:00  04:56:00
110.S*3g     04:59:00  04:58:00
111.N*4i     04:59:00  04:58:00
112.S7f-8g+  04:59:00  04:58:00
113.R9h-5h   04:59:00  04:58:00
114.G*4h     04:59:00  04:58:00
115.G4gx3g   04:59:00  04:58:00
116.G4hx5h   04:59:00  04:58:00
117.S2gx2f   04:59:00  04:58:00
118.G5hx4i   04:59:00  04:58:00
119.K2ix1h   04:59:00  04:58:00
120.N*4e     04:59:00  04:58:00
121.G3g-2g   04:59:00  04:58:00
122.G4i-3i   04:59:00  04:58:00

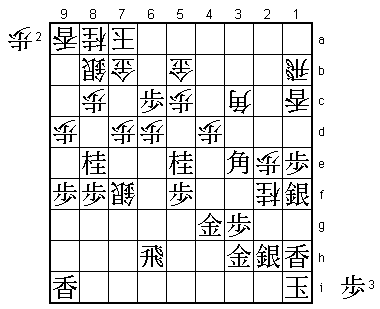
123.S*2h?    04:59:00  04:58:00

It is hard to call this a blunder, but Sato had a hidden win in this
position. After 123.+R1b 124.Bx2f+ 125.Gx2f 126.N3g+ the black king looks
to be in a lot of danger, but this is actually not a mating threat.
Therefore, black has time to play 127.B*6a!!. This is threatening mate
after Bx7b+ Kx7b B*6a K8a G*7b K9b Gx8b Kx8b +Rx5b Lx5b Bx8c+ Kx8c L*8d.
Taking the bishop on 6a doesn't work: 128.Kx6a is mate after 129.S*6b
G5bx6b +Rx6b. Therefore, white has to play 128.S*2i K1i (K1g R*1h) R*1h
+Rx1h Sx1h+ Kx1h but then after Kx6a black has R*8a. Dropping a piece on
7a means that white no longer has a mating threat, while S7a (G7a S*6b and
mate) is mate after N*7c Gx7c S*6b Gx6b Px6b+ Kx6b P*6c Gx6c Nx6c+ Kx6c
Rx8c+ etc. A little difficult to find in one minute of byoyomi, even for Sato.

124.R*7h     04:59:00  04:58:00
125.L*6i     04:59:00  04:58:00
126.R7h-3h+  04:59:00  04:58:00
127.B*4g     04:59:00  04:58:00
128.+R3hx4g  04:59:00  04:58:00
129.S2hx3i   04:59:00  04:58:00
130.S8b-7c   04:59:00  04:59:00
131.N*7f     04:59:00  04:59:00
132.+R4g-5h  04:59:00  04:59:00

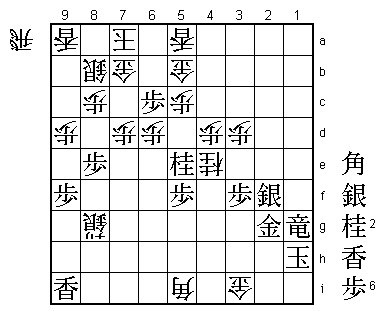
It seems like the game is over. White takes the lance on 6i and at the same
time defends the vital pawn on 6d. There seems to be no way for black to
fight back.

133.P*4h?    04:59:00  04:59:00

To Habu's dismay and Sato's surprise, the game is still a win for black
here. Sato himself suggested the winning move after the game: 133.G2h!.
The point is the that promoted rook on 1g is now attacking the silver,
far away on 8g. After 134.+Rx6i N*8d Px8d Nx8d white seems to be winning
with the move N*1d, but then Nx7b+ (+Rx1d loses), Kx7b +Rx8g is threatening
S*8c Kx8c P8d Sx8d G*8b (a very nice mate indeed) and Nx2f is no longer
effective because the black king can escape up the board. This is still
a complicated position, but the conclusion after the post-mortem analysis
was that black wins after 133.G2h instead of 133.P*4h.

134.+R5hx6i  04:59:00  04:59:00
135.N*8d     04:59:00  04:59:00
136.P8cx8d   04:59:00  04:59:00
137.N7fx8d   04:59:00  04:59:00
138.B5i-8f+  04:59:00  04:59:00
139.N8dx7b+  04:59:00  04:59:00
140.K7ax7b   04:59:00  04:59:00
141.G*8d     04:59:00  04:59:00
142.S7cx8d   04:59:00  04:59:00
143.P8ex8d   04:59:00  04:59:00
144.N*7a     04:59:00  04:59:00
Resigns      04:59:00  04:59:00

White has moves like +Rx3i and black has no chances to escape up the board.
On the other hand, the black attack has no strength and white can escape up
the board whenever he likes. Without any hopes for attack or defense, Sato
resigned. A rather strange game where nothing was like it seemed. Habu had
the perfect looking edge attack, but it was not strong enough. Then in the
endgame, Habu seemed to be winning easily, but actually Sato was the player
having the won position. Let's see if the rest of the match holds more
exciting stuff like this.
