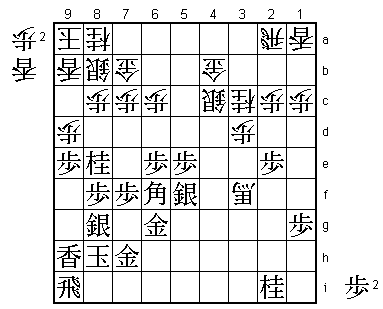
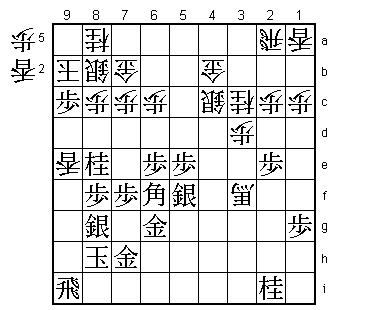
54th Osho Match Game 4
[Black "Habu Yoshiharu, Challenger"]
[White "Moriuchi Toshiyuki, Osho"]
[Event "54th Osho-sen, Game 4"]
[Date "February 9th and 10th 2005"]
1.P7g-7f     00:00:00  00:00:00
2.P3c-3d     00:00:00  00:07:00
3.P2g-2f     00:02:00  00:07:00
4.P4c-4d     00:02:00  00:11:00
5.P2f-2e     00:05:00  00:11:00
6.B2b-3c     00:05:00  00:11:00
7.S3i-4h     00:06:00  00:11:00
8.P9c-9d     00:06:00  00:12:00
9.G4i-5h     00:10:00  00:12:00
10.P9d-9e    00:10:00  00:13:00
11.K5i-6h    00:11:00  00:13:00
12.S3a-3b    00:11:00  00:13:00
13.K6h-7h    00:13:00  00:13:00
14.R8b-4b    00:13:00  00:15:00

Moriuchi is a static rook player who also plays ranging rook, but
in this match this is the fourth time he plays Furibisha. Game 1
and 3 were Ai-Furibisha games, Game 2 was a Sankenbisha opening
and in this game Moriuchi chooses the Shikenbisha. Moriuchi is
known for mixing in Furibisha openings at strategic times in matches,
but playing only Furibisha is very rare. His intention might have
been to change the pattern of losing title matches (Moriuchi had
lost three in a row coming into this match), but if so, it did not
pay off.

15.P5g-5f    00:25:00  00:15:00
16.K5a-6b    00:25:00  00:16:00
17.B8h-7g    00:30:00  00:16:00
18.S3b-4c    00:30:00  00:18:00
19.K7h-8h    00:45:00  00:18:00
20.K6b-7b    00:45:00  00:20:00
21.L9i-9h    00:54:00  00:20:00
22.S4c-5d    00:54:00  01:08:00
23.P6g-6f    01:10:00  01:08:00
24.K7b-8b    01:10:00  01:11:00
25.S4h-5g    01:12:00  01:11:00
26.G4a-5b    01:12:00  01:27:00
27.K8h-9i    01:19:00  01:27:00
28.L9a-9b    01:19:00  01:37:00
29.S7i-8h    01:19:00  01:37:00
30.K8b-9a    01:19:00  01:37:00
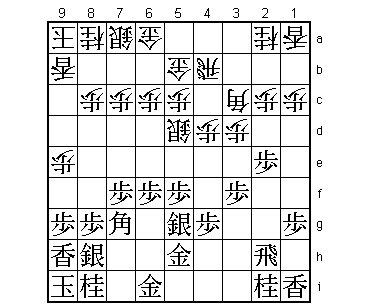
31.P3g-3f!   01:20:00  01:37:00

A nice strategic subtlety. White wants to play 32.S8b, but then black
can get the advantage by attacking the head of the bishop with 33.P3e
Px3e S4f or 33.R3h followed by P3e. To avoid this, the next white move
is almost forced...

32.P4d-4e    01:20:00  01:45:00

This defends against S4f and 33.R3h can now be answered by 34.B4d, but...

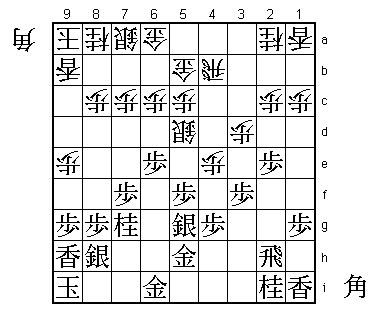
33.P6f-6e!   01:45:00  01:45:00

This forces an exchange of bishops which is what Habu was really aiming
for when he played 31.P3f.

34.B3cx7g+   01:45:00  01:56:00
35.N8ix7g    01:46:00  01:56:00

In similar positions, the anaguma side takes with the silver. In general,
taking with the knight exposes the king too much. However, Habu has no
intention to stay in the anaguma, he wants to attack the white anaguma
from a Silver Crown position. In the press room he was admired for his
skillful strategic play, but this actually was actually already explained
in the Shima Akira book "Shima notes". Both players of course were fully
aware of that. Moriuchi even pointed this out to one of the journalists
after the end of the first day of play. Habu even seemed a bit embarrassed
about borrowing this idea straight from a book. Still, he did add some
important spice...

36.R4b-2b    01:46:00  02:00:00
37.B*6f      01:56:00  02:00:00
38.B*3c      01:56:00  02:00:00
39.B6fx3c+   01:57:00  02:00:00
40.N2ax3c    01:57:00  02:00:00
41.B*6f      01:57:00  02:00:00
42.G5b-4b    01:57:00  02:06:00
43.P5f-5e    02:01:00  02:06:00
44.S5d-4c    02:01:00  02:06:00
45.S5g-5f    02:01:00  02:06:00
46.S7a-8b    02:01:00  02:36:00
47.G5h-6g    02:12:00  02:36:00
48.R2b-2a    02:12:00  02:46:00
49.P8g-8f    02:19:00  02:46:00
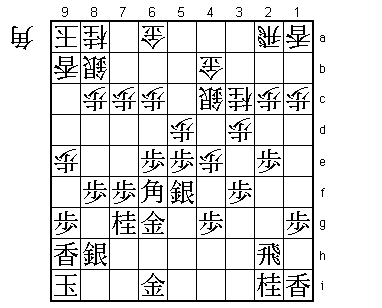
50.P5c-5d?!  02:19:00  03:09:00

Moriuchi regretted this move. After the game, he pointed out that 50.B*4d
would have been better, aiming at P5d and R5a next (white can not take the
pawn on 5d because of Bx6f Gx6f B*3i). However, in this position the bishop
on 6f is much better than the bishop on 4d and P5d is the only idea behind
it, making it hard to play at the professional level. If there is a way for
black to counter this single idea, the white position will become very bad
very quickly. In the post-mortem analysis the variations after 50.B*4d
weren't analyzed very deeply, but Habu clearly wasn't convinced.

51.P5ex5d    02:35:00  03:09:00
52.S4cx5d    02:35:00  03:15:00
53.P*5e      02:35:00  03:15:00
54.S5d-4c    02:35:00  03:15:00
55.S8h-8g    02:35:00  03:15:00
56.G6a-7b    02:35:00  04:17:00
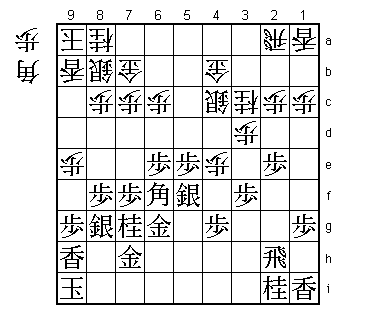
57.G6i-7h!   03:18:00  04:17:00

This is Habu's new idea. It looks very simple (just completing the Silver
Crown castle), but it is very tempting here to attack with 57.P9f, but
then after 58.Px9f Sx9f P*9c both players agreed that the position wasn't
very interesting for black. However, the real importance of 57.G7h is
psychological. By not attacking here, black seems to admit that there is
no good way to continue from here, giving Moriuchi the impression that he
can go for it. This invites the next overplay...

58.P*5h?     03:18:00  04:40:00

A big mistake. Moriuchi even called it the losing move. Still, there was
a hidden way of playing for white that Habu was worried about here: 58.P4f
59.Px4f 60.B*6i!. This looks bad because after 61.R3h the bishop has no
place to go. However, then 62.P2d G6g-6h Bx7h+ Gx7h Px2e is far from easy.
If white can manage to promote his rook, then the black king will be very
vulnerable. Habu looked at this variation very deeply and decided that he
had no choice but to take his chances. On the other hand, Moriuchi almost
immediately discarded it because the bishop would be lost. The difference
between the man in form and the man struggling to find the form that made
him the top player in 2004?

59.R2hx5h    03:45:00  04:40:00
60.B*2g      03:45:00  04:42:00
61.R5h-5i    03:50:00  04:42:00

Now it is clear that white has made a mistake. He has made a promoted bishop,
but black can switch the rook to the other side and build an unstoppable
edge attack.

62.B2gx3f+   03:50:00  04:44:00
63.K9i-8h    03:52:00  04:44:00
64.P4e-4f    03:52:00  04:45:00
65.P4gx4f    03:56:00  04:45:00
66.+B3fx4f   03:56:00  05:00:00
67.P9g-9f    04:05:00  05:00:00
68.+B4fx1i   04:05:00  05:00:00
69.P9fx9e    04:05:00  05:00:00
70.P*9c      04:05:00  05:00:00
71.R5i-9i    04:08:00  05:00:00
72.+B1i-1h   04:08:00  05:07:00
73.N7g-8e    04:29:00  05:07:00
74.+B1h-3f   04:29:00  05:08:00
75.P9e-9d    05:05:00  05:08:00
76.P9cx9d    05:05:00  05:08:00
77.P*9e!     05:05:00  05:08:00

Black already has a winning advantage, but he has to be careful. 77.P*9c
is tempting, but after 78.Sx9c Nx9c+ Lx9c P*9b K8b white can still fight.

78.P9dx9e    05:05:00  05:19:00
79.P*9d      05:05:00  05:19:00
80.L9bx9d    05:05:00  05:19:00
81.P*9b      05:08:00  05:19:00
82.K9ax9b    05:08:00  05:19:00
83.L9hx9e    05:08:00  05:19:00
84.L9dx9e    05:08:00  05:20:00
85.P*9c      05:08:00  05:20:00
Resigns      05:08:00  05:20:00

After both 86.N*9c Rx9e or 86.Sx9c Nx9c+ Nx9c Rx9e there is no way to
defend 9c and the white anaguma collapses. Moriuchi resigned at 12:13
in the afternoon, which was even 17 minutes before the scheduled lunch
break. It is very rare for a two-day title match game to finish so early
and a clear indication of Habu's domination. Despite nursing a cold, he
again overwhelmed Moriuchi, winning back the Osho title he lost last year.
This is becoming a pattern in the Osho. Habu has been in this title match
for eleven years in a row. During that stretch, he lost the Osho title three
times, but every time he came back the next year to take the title with a
4-0 score. A disappointing finish to a much anticipated clash between the
two double crown title holders. Habu is back at the top of the shogi world
again.
