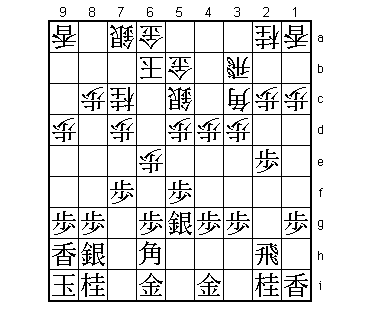
54th Osho Match Game 2
[Black "Habu Yoshiharu, Challenger"]
[White "Moriuchi Toshiyuki, Osho"]
[Event "54th Osho-sen, Game 2"]
[Date "January 18th and 19th 2005"]
1.P7g-7f 00:00:00 00:00:00
2.P3c-3d 00:00:00 00:04:00
3.P2g-2f 00:02:00 00:04:00
4.P4c-4d 00:02:00 00:04:00
5.P2f-2e 00:04:00 00:04:00
6.B2b-3c 00:04:00 00:05:00
7.S3i-4h 00:06:00 00:05:00
8.R8b-3b 00:06:00 00:05:00
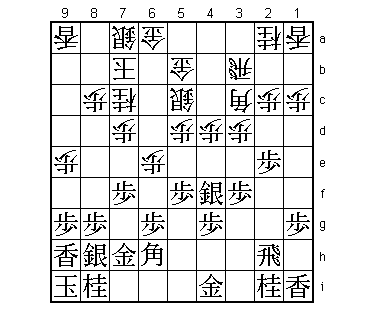
A big surprise. It is not the first time Moriuchi plays the
Sankenbisha, but it is very rare. In the Ryu-O match against
Watanabe, Moriuchi played the straight R8e Yokofudori and Yagura,
but in this match with Habu he is using different tactics.
9.K5i-6h 00:13:00 00:05:00
10.S3a-4b 00:13:00 00:09:00
11.K6h-7h 00:15:00 00:09:00
12.K5a-6b 00:15:00 00:20:00
13.P5g-5f 00:22:00 00:20:00
14.P5c-5d 00:22:00 00:28:00
15.B8h-7g 00:36:00 00:28:00
16.S4b-5c 00:36:00 00:34:00
17.S4h-5g 00:41:00 00:34:00
18.G4a-5b 00:41:00 00:37:00
19.K7h-8h 00:47:00 00:37:00
20.P6c-6d 00:47:00 01:04:00
21.L9i-9h 00:55:00 01:04:00
22.P7c-7d 00:55:00 01:05:00
23.K8h-9i 00:57:00 01:05:00
24.N8a-7c 00:57:00 01:08:00
25.S7i-8h 01:11:00 01:08:00
26.P9c-9d 01:11:00 01:10:00
27.B7g-6h 01:28:00 01:10:00
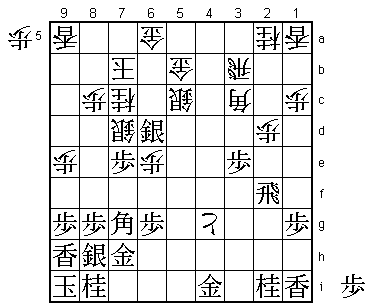
28.P6d-6e? 01:28:00 01:14:00
This was Moriuchi's preparation, but it turns out to be an
overplay. The normal way of playing here is 28.S7b S6f K7a G7h
G6c. White can then build a good shape with P6e and S6d, but
black has a very strong anaguma with S6f-7g. Moriuchi did not
like this for white and plays P6e instead, not allowing the silver
to go to 6f.
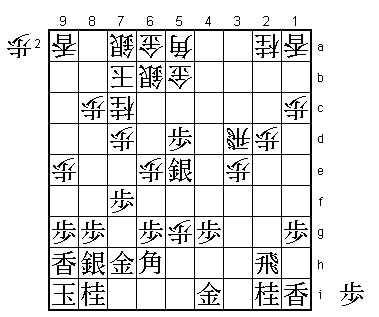
29.P3g-3f 02:06:00 01:14:00
The problem. Black now plays a quick attack instead and the
white king position becomes a liability.
30.P9d-9e 02:06:00 01:41:00
31.G6i-7h 02:22:00 01:41:00
32.K6b-7b 02:22:00 01:58:00
White can no longer stop the black quick attack: 32.P4e N3g R4b P4f
Px4f Sx4f is good for black.
33.S5g-4f! 02:37:00 01:58:00
This still requires very good judgment. 33.G5i K8b G6i S7b G6i-7i
G6c completes the anaguma, but also allows white to complete his
castle. Attacking while leaving the gold on 4i is worrying, but
Habu has correctly judged that it is now or never.
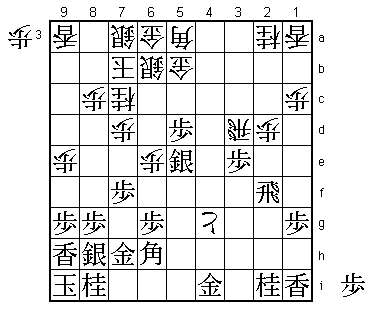
34.B3c-5a 02:37:00 04:06:00
Moriuchi took more than two hours for this move. He realizes his
opening plan has failed.
35.P3f-3e 03:04:00 04:06:00
36.P4d-4e 03:04:00 04:57:00
37.S4fx4e 04:25:00 04:57:00
38.P3dx3e 04:25:00 04:57:00
39.P2e-2d 04:25:00 04:57:00
40.P2cx2d 04:25:00 04:58:00
41.P5f-5e 04:26:00 04:58:00
42.P5dx5e 04:26:00 05:07:00
The black silver looks to be in trouble, but white can never really
threaten it.
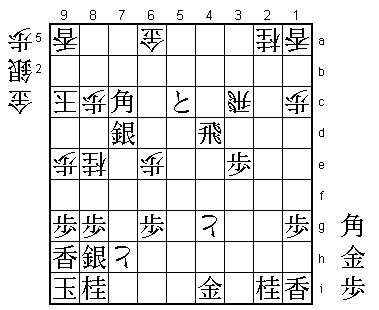
43.P*5d 04:27:00 05:07:00
44.S5c-6b 04:27:00 05:12:00
Passive, but white has no choice. 44.S6d fails to 45.B8f!. Then 46.G6c
Bx6d Gx6d P5c+ or 46.B4b Bx6d Bx6d Rx2d and black has a big advantage.
46.K6c would be an option if this was a handicap game, but in a game
at the highest level, it is clear that such a king can not win against
the anaguma.
45.S4e-4d 05:20:00 05:12:00
46.R3b-3d 05:20:00 06:14:00
47.S4dx5e 05:21:00 06:14:00
48.P*5g 05:21:00 06:14:00
Good move. Moriuchi is trying to get back in the game. 49.Bx5g fails
to 50.B3c and because black can no longer play R5h to defend the silver,
he is in trouble. For example, 51.S4f Rx5d or 51.B4f P4e and the white
pieces come back to life.

49.R2h-2f!   06:06:00  06:14:00

The perfect counter. This gives white a tokin, but Habu has judged correctly
that this is not important.

50.P3e-3f    06:06:00  06:17:00
51.B6hx5g    06:06:00  06:17:00
52.P3f-3g+   06:06:00  06:18:00
53.P*3e      06:14:00  06:18:00
54.+P3gx4g   06:14:00  06:19:00
55.B5g-6h!   06:14:00  06:19:00
The important move. The tokin never gets another move and the black attack
on the head of the knight is devastating.

56.R3d-3b?   06:14:00  06:28:00

Now the game is over quickly. The only chance was 56.R3a. Then 57.P7e R4a
P*4d Px7e B8f B4b and white can still hope to use the tokin on 4g.

57.P7f-7e    06:15:00  06:28:00
58.S6b-6c    06:15:00  06:49:00

The difference with 56.R3a is that white can not play 58.R4b here because
of 59.Rx2d.

59.P7ex7d    06:30:00  06:49:00
60.S6cx7d    06:30:00  06:54:00
61.S5e-6d    06:31:00  06:54:00
62.S7a-6b    06:31:00  06:57:00
63.B6h-7g    06:34:00  06:57:00
64.B5a-3c    06:34:00  07:00:00
65.P5d-5c+   07:04:00  07:00:00
66.S6bx5c    07:04:00  07:01:00
67.P*7e!     07:04:00  07:01:00
In the press room 67.Sx6c+ Gx6c Bx3c+ Rx3c Rx2d was analyzed, but Habu's
move is stronger.

68.S7d-6c    07:04:00  07:05:00
69.B7gx3c+   07:05:00  07:05:00
70.R3bx3c    07:05:00  07:06:00
71.S6dx6c+   07:11:00  07:06:00
72.G5bx6c    07:11:00  07:06:00
73.P7e-7d    07:11:00  07:06:00
74.N7c-8e    07:11:00  07:06:00
75.S*7c      07:13:00  07:06:00
76.G6cx7c    07:13:00  07:06:00
77.P7dx7c+   07:13:00  07:06:00
78.K7bx7c    07:13:00  07:06:00
79.R2fx2d    07:13:00  07:06:00
80.B*4d      07:13:00  07:08:00
81.P*5d      07:23:00  07:08:00
82.P*7g      07:23:00  07:15:00
83.P5dx5c+   07:32:00  07:15:00
84.P7gx7h+   07:32:00  07:15:00
85.S*7d      07:32:00  07:15:00
86.K7c-8b    07:32:00  07:21:00
87.B*7c      07:33:00  07:21:00
88.K8b-9c    07:33:00  07:21:00
89.R2dx4d    07:33:00  07:21:00
Resigns      07:33:00  07:24:00
White has no defense and there is no mate after 90.+Px8h Kx8h S*7i Kx7i
S*6h Kx6h S*5g K7h. A disappointing game for Moriuchi, whose opening strategy
turned out to be a failure. The useless attacking pieces on 8e and 9e tell
the tale of strategic defeat. Moriuchi is 2-0 down and desperately needs to
win the next game to get back in this match.