54th Osho Match Game 1
[Black "Moriuchi Toshiyuki, Osho"]
[White "Habu Yoshiharu, Challenger"]
[Event "54th Osho-sen, Game 1"]
[Date "January 11th and 12th 2005"]
1.P7g-7f     00:00:00  00:00:00
2.P3c-3d     00:00:00  00:04:00
3.P6g-6f     00:00:00  00:04:00
4.R8b-3b     00:00:00  00:14:00
5.S7i-7h     00:02:00  00:14:00
6.K5a-6b     00:02:00  00:16:00
7.S7h-6g     00:02:00  00:16:00
8.P3d-3e     00:02:00  00:19:00
9.B8h-7g     00:03:00  00:19:00
10.G4a-5b    00:03:00  00:30:00
11.R2h-8h    00:12:00  00:30:00

The Ai-furibisha (Double Ranging Rook) is a surprise. It is not
the first time Moriuchi and Habu played this opening in a title
match game. In the 3rd game of last year's Oza match, Moriuchi
also played this strategy with the black pieces. However, the
situation was much different then. In the Oza match, Moriuchi
was 2-0 down and needed something special to change the flow
of the match. This time he plays the Ai-furibisha, in which he
has not much experience as a Ibisha player, in the important
opening game. It shows an eagerness to drag Habu in a struggle
of shogi strength, rather than opening preparation.

12.S7a-7b    00:12:00  00:41:00
13.P8g-8f    00:34:00  00:41:00
14.P7c-7d    00:34:00  00:53:00
15.S3i-3h    00:40:00  00:53:00
16.P2c-2d    00:40:00  01:12:00
17.P4g-4f    01:12:00  01:12:00
18.P2d-2e    01:12:00  01:18:00
19.G6i-5h    01:27:00  01:18:00
20.S7b-7c    01:27:00  01:55:00
21.K5i-4h    01:38:00  01:55:00
22.G6a-7b    01:38:00  01:56:00
23.K4h-3i    01:41:00  01:56:00
24.S3a-4b    01:41:00  01:57:00
25.P9g-9f    01:46:00  01:57:00
26.P4c-4d    01:46:00  02:03:00
27.G5h-4g    02:48:00  02:03:00
28.S4b-4c    02:48:00  02:08:00
29.P9f-9e    02:56:00  02:08:00
30.P1c-1d    02:56:00  03:03:00
31.P6f-6e    03:04:00  03:03:00
32.B2b-3c    03:04:00  03:16:00
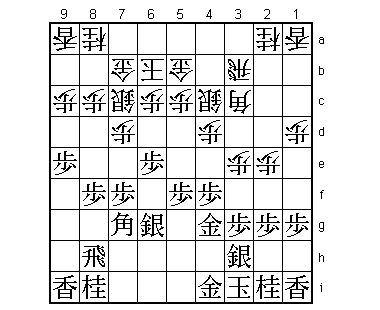
33.P5g-5f!   04:12:00  03:16:00

Not a very impressive looking move, but Furibisha specialist Suzuki
Daisuke was full of praise, saying this move was the reason for the
black advantage in this game. In this type of position, the usual
move is 33.S5f, and then after 34.R2b K2h P2f Px2f Rx2f P*2g R2d R6h
the position is unclear. 33.P5f is aiming for more, hoping to extend
the pawn to 5e and only then moving the silver to 5f. White can try
to stop that plan by 34.P5d, but then 35.P8e is good for black after
both 36.R2b B8f or 36.K7a S6f followed by P5e. Therefore, white can
not stop the pawn from moving up to 5e and this makes it very hard
for white to activate his bishop. Also, without the pawn on 5g, the
black king will have an escape route to 5g, where it is relatively safe.
Both themes become clear in this game.

34.R3b-2b    04:12:00  03:29:00
35.P5f-5e    04:15:00  03:29:00
36.P2e-2f    04:15:00  03:32:00
37.P2gx2f    04:15:00  03:32:00
38.R2bx2f    04:15:00  03:32:00
39.P*2g      04:15:00  03:32:00
40.R2f-2d    04:15:00  03:32:00
41.S6g-5f    04:25:00  03:32:00
42.K6b-7a    04:25:00  03:51:00
43.K3i-2h    04:50:00  03:51:00
44.S4c-3d    04:50:00  04:12:00
45.R8h-6h    04:58:00  04:12:00
46.P1d-1e    04:58:00  04:20:00
47.N8i-9g    05:03:00  04:20:00
48.S3d-2e    05:03:00  04:35:00
49.N9g-8e    05:28:00  04:35:00
50.S7c-8d    05:28:00  04:38:00
51.B7g-6f    05:32:00  04:38:00
52.G5b-6b    05:32:00  04:52:00
53.L9i-9g    05:46:00  04:52:00
54.P1e-1f    05:46:00  05:43:00
55.P1gx1f    05:46:00  05:43:00
56.S2ex1f    05:46:00  05:43:00
57.L1ix1f    06:23:00  05:43:00
58.L1ax1f    06:23:00  05:43:00
59.P*1g      06:23:00  05:43:00
60.L1fx1g+   06:23:00  05:44:00
61.K2hx1g    06:24:00  05:44:00
62.L*1e      06:24:00  05:49:00
63.K1g-2h    06:24:00  05:49:00
64.R2d-1d    06:24:00  05:49:00
65.P6e-6d    06:29:00  05:49:00
66.P6cx6d    06:29:00  06:28:00
67.P7f-7e    06:29:00  06:28:00
68.L1e-1h+   06:29:00  06:31:00
69.K2h-3i    06:29:00  06:31:00
70.P*2h      06:29:00  06:32:00
71.P7ex7d    06:31:00  06:32:00
72.P2hx2i+   06:31:00  06:32:00
73.K3i-4h    06:32:00  06:32:00
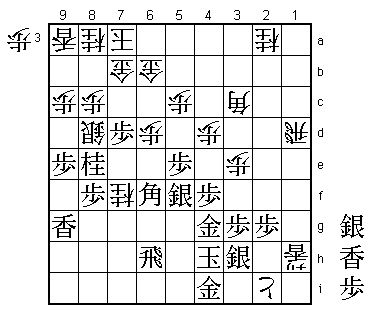
74.N*7f!     06:32:00  06:50:00

The white position is not good, but Habu is starting to use his magic
powers to try to get back in this game. In the press room, 74.+L2h was
analyzed, followed by +Lx3h and R1h+. However, after R1h+, black has
the escape K5g because of the sideways working of the black rook. 74.N*7f
aims at disrupting the balance in the black camp by luring away the rook
from its perfect spot. For example, after 75.R6g, the black king can no
longer escape to 5g, because it leaves the gold on 3h hanging (after +L2h,
+Lx3h, R1h+). 74.N*7f is very difficult to spot, since white has been
concentrating on the edge attack.

75.R6h-7h    07:05:00  06:50:00
76.P*7g      07:05:00  06:57:00
77.R7hx7g    07:06:00  06:57:00
78.P*7e      07:06:00  06:58:00
79.L*7c      07:16:00  06:58:00
80.N8ax7c    07:16:00  07:06:00
81.P7dx7c+   07:17:00  07:06:00
82.S8dx7c    07:17:00  07:06:00
83.N8ex7c+   07:17:00  07:06:00
84.G7bx7c    07:17:00  07:06:00
85.N*8e      07:27:00  07:06:00
86.G7c-6c    07:27:00  07:09:00
87.P*7c      07:42:00  07:09:00
88.K7a-6a    07:42:00  07:16:00
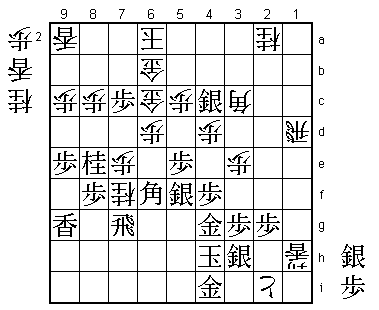
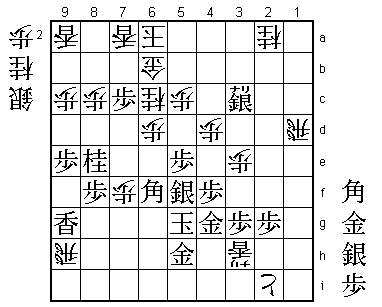
89.S*4c?!    07:42:00  07:16:00

It is hard to see what is coming, but the straightforward 89.S*7b was better.
Then 90.K5b Sx6c+ Gx6c P7b+ +L2h +P7c Gx7c Nx7c+ +P3i S*3b N*5a G*4a L*6a
P*6c wins for black.

90.L*7a      07:42:00  07:25:00
91.R7gx7f    07:52:00  07:25:00

And black wins after 92.Px7f N*7e everyone including Moriuchi thought...

92.N*5a!!    07:52:00  07:33:00

More Habu magic. If the rook moves, white takes the important silver on 4c.
If the silver moves, white can take the rook and then N*7e is suddenly a
powerless move since the knight on 5a defends 6c. Finally, 93.Rx7e P*7d
R7h Nx4c is also good for white.

93.S4c-3b+   07:59:00  07:33:00

Moriuchi uses all his remaining time looking for a way out, but he doesn't
find one. Objectively, black still is slightly better, but it is very
difficult to make the psychological adjustment from having an overwhelming
position to fighting a close one.

94.P7ex7f    07:59:00  07:36:00
95.N*7e      07:59:00  07:36:00
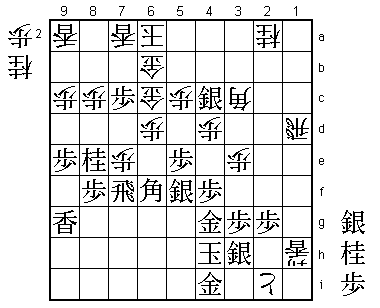
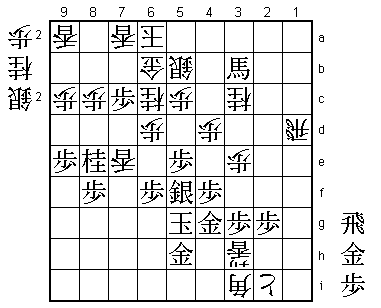
96.R*9h!     07:59:00  07:57:00

Important to drop this rook here instead of on 7h, which is the natural
square. Why 9h is better will become clear soon.

97.G4i-5h    07:59:00  07:57:00
98.+L1h-2h   07:59:00  07:57:00
99.N7ex6c+   07:59:00  07:57:00
100.+L2hx3h  07:59:00  07:57:00
101.K4h-5g   07:59:00  07:57:00
102.N5ax6c   07:59:00  07:57:00
103.+S3bx3c? 07:59:00  07:57:00

This was Moriuchi's last chance. After 103.S*4b, black still has a difficult
win. For example, 104.Bx4b +Sx4b or 104.Lx7c Nx7c+ Gx7c Sx5c+. By the way,
if Habu would have played 96.R*7h instead of 96.R*9h, the white rook would
suddenly die after 103.G*8i here.

104.N2ax3c   07:59:00  07:57:00
105.B*4c     07:59:00  07:57:00
106.S*5b     07:59:00  07:57:00
107.B4cx7f+  07:59:00  07:57:00
108.R9hx9g+  07:59:00  07:57:00
109.P*6g     07:59:00  07:57:00
110.L*7d     07:59:00  07:57:00
111.+B7f-3b  07:59:00  07:57:00
112.S*7g     07:59:00  07:57:00
113.B6fx7g   07:59:00  07:57:00
114.+R9gx7g  07:59:00  07:57:00
115.S*6f     07:59:00  07:57:00
116.B*8d     07:59:00  07:58:00
117.S*7e     07:59:00  07:58:00
118.B8dx7e   07:59:00  07:58:00
119.S6fx7e   07:59:00  07:58:00
120.L7dx7e   07:59:00  07:58:00
121.B*6f     07:59:00  07:58:00
122.+R7gx6f  07:59:00  07:58:00
123.P6gx6f   07:59:00  07:58:00
124.B*3i     07:59:00  07:58:00
Resigns      07:59:00  07:58:00

Mate after 125.K6g Bx6f+ or 125.K6h S*7g and no defense after 125.G*4h
+Lx4h G5gx4h R1h+. Moriuchi won the opening in this game, but one has
to admire the flawless endgame that Habu played under time pressure.
Tanaka Torahiko said during the opening of this game that Habu didn't
play many magical moves these days, but in this game we got no less
than two magical moves. A good start for Habu to try and win back the
Osho title.
