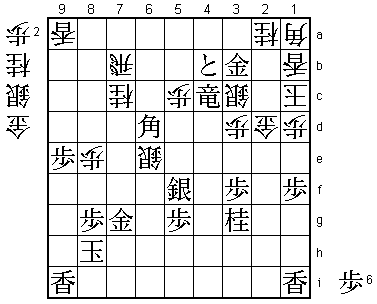
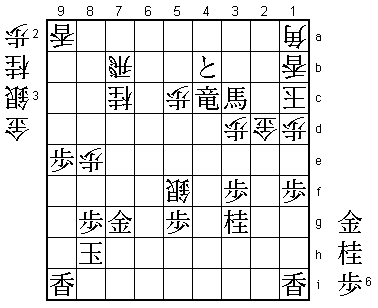
54th Oi Match Game 1
[Black "Habu Yoshiharu, Oi"]
[White "Namekata Hisashi, Challenger"]
[Event "54th Oi-sen, Game 1"]
[Date "July 10th and 11th 2013"]
1.P7g-7f     00:00:00  00:00:00

The furigoma resulted in 4 pawns, giving Namekata the white pieces in his
first title match appearance. A slight disadvantage, but also a little less
pressure.

2.P8c-8d     00:00:00  00:00:00
3.P2g-2f     00:03:00  00:00:00
4.G4a-3b     00:03:00  00:09:00
5.G6i-7h     00:08:00  00:09:00
6.P8d-8e     00:08:00  00:10:00
7.B8h-7g     00:09:00  00:10:00
8.P3c-3d     00:09:00  00:10:00
9.S7i-8h     00:10:00  00:10:00
10.B2bx7g+   00:10:00  00:11:00
11.S8hx7g    00:10:00  00:11:00
12.S3a-4b    00:10:00  00:11:00
13.P9g-9f    00:15:00  00:11:00
14.P9c-9d    00:15:00  00:16:00
15.S3i-3h    00:18:00  00:16:00
16.S7a-7b    00:18:00  00:25:00
17.P4g-4f    00:24:00  00:25:00
18.P6c-6d    00:24:00  00:26:00
19.S3h-4g    00:25:00  00:26:00
20.S7b-6c    00:25:00  00:29:00
21.K5i-6h    00:29:00  00:29:00
22.S6c-5d    00:29:00  00:43:00
23.S4g-5f    00:53:00  00:43:00
24.P4c-4d    00:53:00  00:47:00
25.G4i-5h    01:05:00  00:47:00
26.G6a-5b    01:05:00  00:55:00
27.P3g-3f    01:09:00  00:55:00
28.K5a-4a    01:09:00  00:58:00
29.K6h-7i    01:10:00  00:58:00
30.K4a-3a    01:10:00  00:59:00
31.P1g-1f    01:10:00  00:59:00
32.P1c-1d    01:10:00  00:59:00
33.N2i-3g    01:19:00  00:59:00
34.P7c-7d    01:19:00  02:19:00
35.P6g-6f    01:35:00  02:19:00
36.S4b-3c    01:35:00  02:20:00
37.R2h-4h    01:55:00  02:20:00
38.G5b-4b    01:55:00  02:22:00
39.K7i-8h    02:02:00  02:22:00
40.K3a-2b    02:02:00  02:24:00
41.G5h-6h    03:31:00  02:24:00
42.L1a-1b    03:31:00  04:12:00

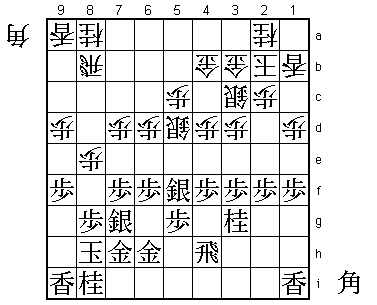
The Kakugawari opening, where both players are careful about where and how to push
their pawns. This position has been played before, but we are already at the end of
the first day of play. Namekata seals the move for the first time in his career and
it is the preparation move for the Anaguma 42.L1b.

43.P2f-2e    04:04:00  04:12:00

Again the theoretical reply. This pawn push makes it hard for white to actually move
into the Anaguma: 44.K1a P4e Px4e P1e Px1e Nx4e S4d P2d Px2d B*7a and black has a
strong attack where a pawn drop on 2c is especially effective.

44.P6d-6e    04:04:00  04:25:00
45.P6fx6e    04:31:00  04:25:00
46.N8a-7c    04:31:00  04:30:00

The proper order. If white plays this knight before pushing the pawn to 6e, the attack
on the top of the knight is dangerous because the knight has no place to go. White is
aiming to attack first here.

47.B*6d      04:34:00  04:30:00
48.R8b-7b    04:34:00  04:39:00
49.P4f-4e    04:42:00  04:39:00
50.P9d-9e    04:42:00  04:47:00
51.P9fx9e    04:45:00  04:47:00
52.S5dx6e    04:45:00  04:51:00

Interestingly enough, both players have experience with this position, both against
Maruyama. In the game Maruyama-Namekata (which Maruyama won), Namakata played 52.P7e
here, but after Px7e Sx6e this gave black the the pawn push to 7d, which became a
problem.

53.P2e-2d    05:26:00  04:51:00

Black can win material with 53.Sx6e Nx6e Bx9a+ but Nx7g+ G6hx7g P7e Px7e S*6e is a
strong attack so Habu decided against it.

54.P7d-7e    05:26:00  05:02:00
55.P2dx2c+   06:01:00  05:02:00
56.G3bx2c    06:01:00  05:12:00

Habu planned to play 56.Bx7e here, but he judged 57.B*5i R4g P8f Bx8f P*6g G5h Bx7g+
Gx7g S*8e too risky.

57.P*2d      06:02:00  05:12:00
58.G2cx2d    06:02:00  05:39:00
59.P4ex4d    06:03:00  05:39:00

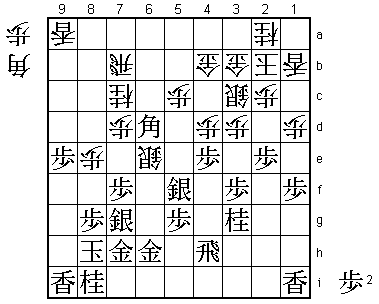
In the game between Maruyama and Habu, Maruyama played 59.Bx7e here, but Habu thought
that Bx7e was better without sacrificing the pawn on 2d (hence the variation above that
he wanted to try).

60.P7ex7f    06:03:00  07:06:00

Here 60.P*4g is tempting, because after 60.Rx4g the sideways defense of the rook is
blocked. On the other hand, the drop S*5i is no longer possible then, so it is hard
to judge if P*4g has merit or not. With 60.Px7f Namekata goes for a straight endgame
battle. Not because he was sure he would win it, but it was the only way to move
forward.

61.P4d-4c+   06:45:00  07:06:00
62.P7fx7g+   06:45:00  07:06:00
63.N8ix7g    06:45:00  07:06:00
64.P*7f      06:45:00  07:08:00
65.+P4cx4b   07:03:00  07:08:00
66.P7fx7g+   07:03:00  07:12:00
67.G6hx7g    07:03:00  07:12:00
68.P*7f      07:03:00  07:14:00
69.G*3b      07:10:00  07:14:00
70.K2b-1c    07:10:00  07:15:00
71.R4h-4c+   07:14:00  07:15:00

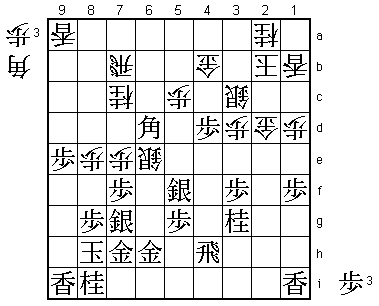
This is a mating threat: +Rx3c Nx3c S*2b K2c G3c. Because there is no mate against
the black king, white has to defend, but this is not straightforward. For example,
72.Px7g+ Gx7g G*2c is answered by B4f P3e Gx2a which is another mating threat (after
N*2e). However, Namekata thinks he has found a way to get out of trouble.

72.P7fx7g+   07:14:00  07:17:00
73.G7hx7g    07:14:00  07:17:00
74.B*1a      07:14:00  07:18:00

This is the move that Namekata had put his hopes on. It defends against the mating
threat, indirectly attacking the black king at the same time. In some variations,
it might even lead to a discovered check. For example, 75.B4f P3e Gx2a fails to
Rx4b. Unfortunately for Namekata, there is a hole in his defensive plans.

75.G3bx3c    07:40:00  07:18:00
76.N2ax3c    07:40:00  07:42:00

Here Namekata had planned to play 76.Bx3c, but here he saw that this fails to
77.B5e! which is a mating threat that defends against the mating threat and white
loses. However, 76.Nx3c is not good enough.

77.S*2e      07:41:00  07:42:00
78.G*2c      07:41:00  07:54:00
79.S2ex2d    07:44:00  07:54:00
80.G2cx2d    07:44:00  07:54:00
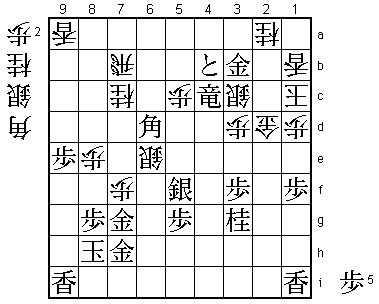
81.B6d-5e    07:53:00  07:54:00

The decisive move.

82.S6ex5f    07:53:00  07:58:00
83.B5ex3c+   07:55:00  07:58:00
Resigns      07:55:00  07:59:00

And 84.Bx3c +Rx3c is a simple mate. On the other hand, 84.N*7f Gx7f G*7h is not
leading to mate, so Namekata resigned here. Not the start that he was hoping for,
but he probably got used to playing on the big stage and can give it his all with
the black pieces in the second game.
