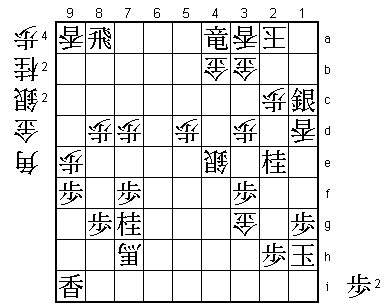
53rd Oza Match Game 3
[Black "Sato Yasumitsu, Challenger"]
[White "Habu Yoshiharu, Oza"]
[Event "53rd Oza-sen, Game 3"]
[Date "October 1st 2005"]
1.P7g-7f     00:00:00  00:00:00
2.P3c-3d     00:00:00  00:00:00
3.P2g-2f     00:00:00  00:00:00
4.P4c-4d     00:00:00  00:02:00
5.S3i-4h     00:01:00  00:02:00
6.S3a-4b     00:01:00  00:03:00
7.P5g-5f     00:01:00  00:03:00
8.G6a-5b     00:01:00  00:04:00
9.P5f-5e     00:11:00  00:04:00

This looked like a normal Ibisha game, but again Sato has prepared
something to put Habu off balance early. It has been the story of
the three matches they have played this year. Sato is the one with
the new ideas early, but they do not always pay off.

10.S7a-6b    00:11:00  00:19:00
11.S4h-5g    00:35:00  00:19:00
12.G4a-3b    00:35:00  00:21:00
13.S5g-5f    00:39:00  00:21:00
14.P6c-6d    00:39:00  00:24:00
15.S7i-6h    00:52:00  00:24:00
16.S6b-6c    00:52:00  00:31:00
17.P2f-2e    01:16:00  00:31:00
18.S4b-3c    01:16:00  00:37:00
19.S6h-5g    01:16:00  00:37:00
20.K5a-4a    01:16:00  00:39:00
21.P6g-6f    01:16:00  00:39:00
22.B2b-3a    01:16:00  00:44:00
23.R2h-6h    01:19:00  00:44:00
24.R8b-6b    01:19:00  00:44:00
25.P6f-6e    01:19:00  00:44:00
26.P6dx6e    01:19:00  00:45:00
27.S5fx6e    01:19:00  00:45:00
28.P*6d      01:19:00  00:45:00
29.S6e-5f    01:19:00  00:45:00
30.B3a-4b    01:19:00  00:48:00
31.G6i-5h    01:43:00  00:48:00
32.K4a-3a    01:43:00  00:49:00
33.P3g-3f    01:45:00  00:49:00
34.P7c-7d    01:45:00  01:09:00
35.K5i-4h    01:45:00  01:09:00
36.P5c-5d    01:45:00  01:21:00
37.P5ex5d    01:53:00  01:21:00
38.S6cx5d    01:53:00  01:21:00
39.K4h-3h    01:53:00  01:21:00
40.K3a-2b    01:53:00  01:39:00
41.S5g-4f    02:08:00  01:39:00
42.G5b-4c    02:08:00  01:49:00
43.S5f-5e    02:31:00  01:49:00

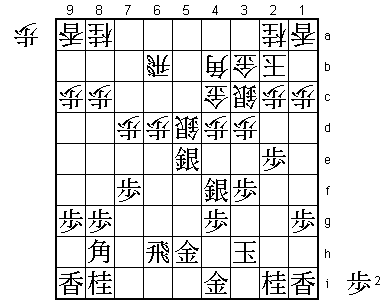
Sato is trying to attack the orthodox position Habu has built. 44.S6c
is not an option, because of 45.P3e Px3e Sx3e and with S5ex4d next,
the black bishop comes into play strongly. Therefore, Habu's next move
is forced.

44.S5dx5e    02:31:00  02:05:00
45.S4fx5e    02:31:00  02:05:00
46.P*5d      02:31:00  02:05:00
47.S5e-4f    02:31:00  02:05:00

Black has succeeded in exchanging silvers and forcing white to drop
back the pawn on 5d. However, this doesn't mean that black has the
better position here. The difference in king position is too big to
draw any conclusions yet.

48.P8c-8d    02:31:00  02:07:00
49.P9g-9f    02:44:00  02:07:00
50.P9c-9d    02:44:00  02:32:00
51.B8h-9g    02:51:00  02:32:00
52.P9d-9e    02:51:00  02:43:00
53.P*6c      03:31:00  02:43:00
54.R6bx6c    03:31:00  02:44:00
55.P*6e      03:31:00  02:44:00
56.P6dx6e    03:31:00  03:58:00
57.B9gx4b+   03:31:00  03:58:00
58.G4cx4b    03:31:00  03:58:00
59.B*7b      03:31:00  03:58:00
60.R6c-6d    03:31:00  03:58:00
61.B7bx8a+   03:31:00  03:58:00
62.P6e-6f    03:31:00  03:58:00
63.+B8a-8b   03:37:00  03:58:00
64.R6d-6e    03:37:00  04:03:00
65.N8i-7g    03:44:00  04:03:00
66.R6ex2e    03:44:00  04:03:00
67.S*1f!     03:59:00  04:03:00

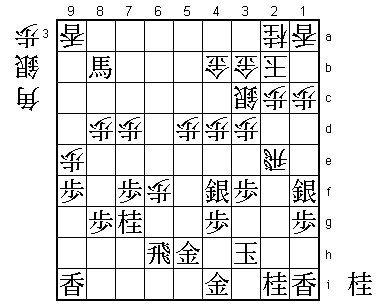
Only here one can say that Sato's strategy has been a success. The square
1f is not where one usually wants to drop a silver, but in this case it
puts so much pressure on the rook that Habu has to force his hand here.

68.S*6g      03:59:00  04:03:00

No choice. 68.R2f S3g or 68.R2d Rx6f followed by P*2e are good for black.

69.G5hx6g    04:11:00  04:03:00
70.P6fx6g+   04:11:00  04:03:00
71.R6hx6g    04:11:00  04:03:00
72.G*5f      04:11:00  04:15:00
73.R6g-6a+   04:14:00  04:15:00
74.G5fx4g    04:14:00  04:17:00
75.K3hx4g    04:14:00  04:17:00
76.R2ex2i+   04:14:00  04:17:00
77.G*3i      04:19:00  04:17:00
78.+R2ix1i   04:19:00  04:17:00
79.S*2h      04:20:00  04:17:00
80.P4d-4e    04:20:00  04:17:00
81.S4fx4e    04:25:00  04:17:00
82.+R1ix3i   04:25:00  04:17:00
83.G4ix3i    04:25:00  04:17:00

Habu has not been able to save the rook, but he has managed to weaken
the black king position even further. The general opinion was that the
white attack is not strong enough and that black is winning here. However,
a mistake is easily made in a position like this as we will see.

84.L*4c      04:25:00  04:17:00
85.P*4d      04:25:00  04:17:00
86.L4cx4d    04:25:00  04:25:00
87.S4ex4d    04:27:00  04:25:00
88.S3cx4d    04:27:00  04:25:00
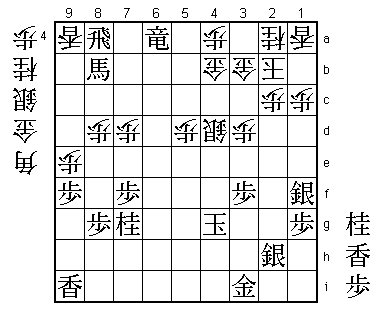
89.R*8a?!    04:35:00  04:25:00

Good or bad? The opinions were divided. Commentator Morishita didn't like
the move at all, but the reason for playing it is quite clear and suits
Sato's playing style. Furthermore, black is still winning after this move.
Still, Sato could have made it a lot easier for himself had he played 89.P*4c
G4bx4c and only then R*8a here. After P*4a Rx4a+ G*3a white has been forced
to drop a gold in defense, which makes attacking almost impossible.

90.P*4a      04:35:00  04:25:00

Now the two rooks are just in each other's way, but...

91.L*4h!?    04:37:00  04:25:00

This was the move Sato counted on. Because white has dropped a pawn on 4a,
this lance works both in attack and defense. Habu admitted that he was
completely surprised by this move and praised it.

92.S4d-4e    04:37:00  04:35:00
93.K4g-3g    04:44:00  04:35:00
94.N2a-3c    04:44:00  04:38:00
95.N*2f      04:53:00  04:38:00
96.S*2e      04:53:00  04:46:00
97.S1fx2e    04:54:00  04:46:00
98.N3cx2e    04:54:00  04:46:00
99.K3g-3h    04:54:00  04:46:00
100.B*5f     04:54:00  04:49:00
101.S*4g     04:54:00  04:49:00
102.B5f-7h+  04:54:00  04:51:00
103.K3h-2i   04:54:00  04:51:00

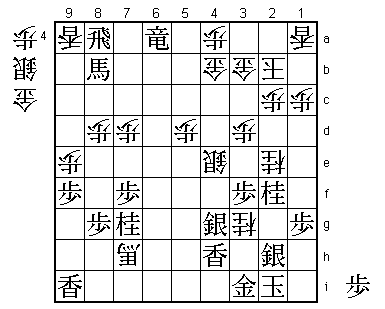
Black now threatens to close his defense with S3h, so the next move is
forced.

104.N*3g     04:54:00  04:52:00

105.+B8bx3g? 04:58:00  04:52:00

Sato has dictated the pace of the game again, but this mistake makes it
all go to waste. Correct was 105.K1i. Then white has nothing better than
to start an edge attack from a long way away with 106.P1d, but then 107.+B6d
P1e is not a mating threat yet, even if black hands over a pile of pieces.
Therefore, black will probably win after +Bx4b Gx4b +Rx4a.

106.N2ex3g+  04:58:00  04:52:00
107.S2hx3g   04:58:00  04:52:00
108.G*2g     04:58:00  04:56:00
109.G3i-2h   04:58:00  04:56:00
110.S*1h     04:58:00  04:56:00
111.G2hx1h   04:58:00  04:56:00
112.G2gx3g   04:58:00  04:56:00
113.S*3i     04:59:00  04:56:00
114.S*2g     04:59:00  04:56:00
115.P*2h     04:59:00  04:56:00
116.S2gx1h=  04:59:00  04:56:00
117.K2ix1h   04:59:00  04:56:00
118.G*4i     04:59:00  04:59:00
119.S3i-3h   04:59:00  04:59:00
120.G4ix4h   04:59:00  04:59:00
121.S3hx3g   04:59:00  04:59:00
122.G4hx4g   04:59:00  04:59:00
123.N*2e     04:59:00  04:59:00
124.G4gx3g   04:59:00  04:59:00
125.N*1d     04:59:00  04:59:00
126.P1cx1d   04:59:00  04:59:00
127.N2fx1d   04:59:00  04:59:00
128.L1ax1d   04:59:00  04:59:00
129.S*1c     04:59:00  04:59:00
130.K2b-3a   04:59:00  04:59:00
131.G*2a     04:59:00  04:59:00
132.K3ax2a   04:59:00  04:59:00
133.+R6ax4a  04:59:00  04:59:00
134.L*3a     04:59:00  04:59:00
Resigns      04:59:00  04:59:00

No mate after 135.+Rx3b Kx3b or 135.S1b+ Kx1b +Rx3b Gx3b and the black
king can not be defended. Despite showing some good shogi again, Sato
loses the game and the match in straight games, ending a long summer of
Habu-Sato matches (this was the 15th game they played since June 11th).
Habu has now won the Oza title for the 14th time in a row, breaking a
record set by Oyama's 13 consecutive Meijin titles in the period 1959-1971.
Habu might extend this record next year, but it seems very unlikely that
we will witness such total dominance in the near future by any other player.
A historic moment and from a personal point of view, I was happy that this
milestone was achieved in Huis Ten Bosch, the Dutch theme park in Sasebo,
Nagasaki Prefecture, which was the location of this third game.
