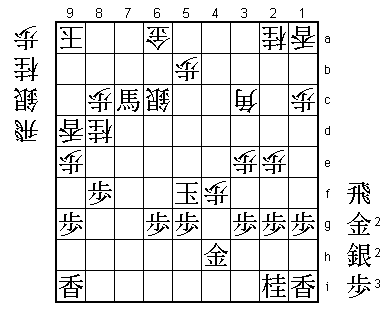
53rd Oza Match Game 2
[Black "Habu Yoshiharu, Oza"]
[White "Sato Yasumitsu, Challenger"]
[Event "53rd Oza-sen, September 16th 2005"]
1.P7g-7f     00:00:00  00:00:00
2.P3c-3d     00:00:00  00:00:00
3.P2g-2f     00:00:00  00:00:00
4.G4a-3b     00:00:00  00:00:00
5.G6i-7h     00:01:00  00:00:00
6.P4c-4d     00:01:00  00:00:00
7.P2f-2e     00:02:00  00:00:00
8.S3a-4b     00:02:00  00:01:00
9.P2e-2d     00:06:00  00:01:00
10.P2cx2d    00:06:00  00:01:00
11.R2hx2d    00:06:00  00:01:00
12.S4b-4c    00:06:00  00:01:00

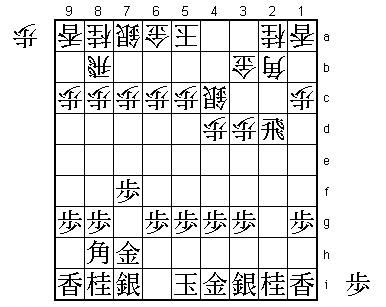
Already a very interesting moment in the game. Sato has allowed the exchange
of pawns on the 2nd file, which surprised everyone. There seems to be no merit
for white in this, but Sato has a devious plan...

13.R2d-2h?   00:09:00  00:01:00

And Habu falls for it. Had he seen what Sato intended, he would have played
13.S4h instead, because keeping the rook on 2d as long as possible is required
here.

14.P3d-3e!   00:09:00  00:03:00

The point. Sato doesn't want to drop the pawn back on 2c, but on 2e, putting
pressure on the black rook. For this, he needs to put the silver on 3d, which
is why black should have tried to keep his rook on 2d. After the game, Sato
jokingly referred to his strategy as "inchiki senpou", which means "fake strategy"
or "bogus strategy". We will probably never see it again, but it did what it was
supposed to do: Sato gets a very good position.

15.S3i-4h    00:43:00  00:03:00
16.R8b-4b    00:43:00  00:10:00
17.K5i-6i    00:59:00  00:10:00
18.S4c-3d    00:59:00  00:13:00
19.S7i-6h    01:00:00  00:13:00
20.K5a-6b    01:00:00  00:26:00
21.P5g-5f    01:05:00  00:26:00
22.R4b-4c    01:05:00  00:57:00
23.S4h-5g    01:14:00  00:57:00
24.P*2e      01:14:00  00:59:00
25.K6i-7i    01:18:00  00:59:00
26.R4c-2c    01:18:00  00:59:00
27.P*2g      01:18:00  00:59:00

The early pawn exchange has given black nothing. Worse, he has to drop the pawn back
on 2g where it started the game. White has won the opening.

28.S7a-7b    01:18:00  01:00:00
29.P7f-7e    01:45:00  01:00:00
30.P6c-6d    01:45:00  01:06:00
31.S6h-7g    01:47:00  01:06:00
32.S3d-4e    01:47:00  01:46:00
33.P4g-4f    02:02:00  01:46:00
34.S4e-5d    02:02:00  01:49:00
35.S7g-7f    02:02:00  01:49:00
36.K6b-7a    02:02:00  01:50:00
37.P5f-5e    02:05:00  01:50:00
38.S5d-6c    02:05:00  01:51:00
39.B8h-7g    02:05:00  01:51:00
40.K7a-8b    02:05:00  01:53:00
41.K7i-8h    02:05:00  01:53:00
42.G3b-4c    02:05:00  02:11:00
43.P8g-8f    02:11:00  02:11:00
44.P5c-5d    02:11:00  02:11:00
45.S5g-6f    02:15:00  02:11:00
46.P4d-4e    02:15:00  02:13:00
47.P4fx4e    02:20:00  02:13:00
48.G4c-3d    02:20:00  02:13:00
49.P5ex5d    02:36:00  02:13:00
50.S6cx5d    02:36:00  02:13:00
51.R2h-5h    02:37:00  02:13:00
52.S5d-6c    02:37:00  02:28:00
53.P7e-7d    03:11:00  02:28:00
54.P7cx7d    03:11:00  02:29:00
55.P*7e      03:11:00  02:29:00
56.P*4f      03:11:00  02:51:00
57.G4i-4h    03:11:00  02:51:00
58.G3dx4e    03:11:00  03:09:00
59.P7ex7d    03:11:00  03:09:00
60.S6cx7d    03:11:00  03:09:00
61.P*7c      03:43:00  03:09:00
62.N8ax7c    03:43:00  03:44:00
63.R5h-5d    03:50:00  03:44:00
64.G4e-4d    03:50:00  03:44:00
65.R5dx6d    03:50:00  03:44:00
66.S7d-6c    03:50:00  03:44:00
67.S6f-7e    03:50:00  03:44:00
68.P*7d      03:50:00  03:49:00
69.R6dx4d    03:52:00  03:49:00

70.P7dx7e?   03:52:00  03:49:00

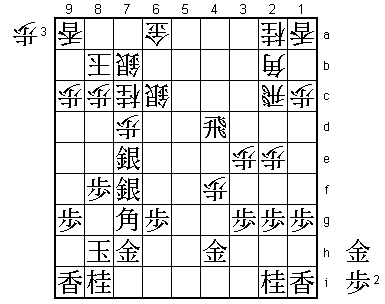
Sato is counting on a variation that is not as good for him as it seems. Had he
correctly judged that, he would have played 70.Bx4d instead. For example, 71.Bx4d
Px7e S8g P4g+ Gx4g R4c is good for white.

71.P*7d      04:00:00  03:49:00
72.S6cx7d    04:00:00  03:57:00
73.R4dx7d    04:09:00  03:57:00
74.B2bx7g+   04:09:00  03:57:00
75.N8ix7g    04:09:00  03:57:00
76.P7ex7f    04:09:00  03:57:00
77.R7dx7f    04:09:00  03:57:00
78.B*3b      04:09:00  04:20:00

Sato thought that this bishop drop was good, but it is not so simple.

79.P*5d      04:10:00  04:20:00
80.B3bx5d    04:10:00  04:20:00
81.R7f-5f    04:10:00  04:20:00
82.P*7f      04:10:00  04:20:00
83.R5fx5d    04:10:00  04:20:00
84.P7fx7g+   04:10:00  04:20:00
85.G7hx7g    04:10:00  04:20:00
86.S*6e      04:10:00  04:20:00
87.R5d-4d    04:15:00  04:20:00
88.P*7f      04:15:00  04:20:00
89.G7g-8g    04:15:00  04:20:00

90.N*7e?     04:15:00  04:33:00

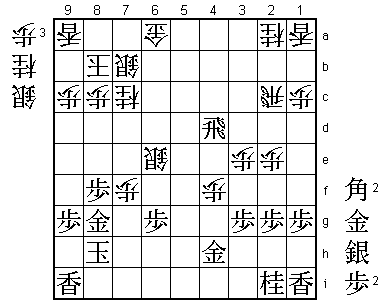
Sadly, this is the decisive mistake. The game stays very close until the end, but
black is one move quicker because of a very unusual mating threat. Correct was
90.S*7g. If black takes this silver, the king becomes too exposed, so the only
reply is 91.K9h but then 92.N*7e S*7i R5c P*5g R5d! is good for white. It is hard
to take this rook as Rx5d Sx5d Gx7f is answered by R*7h! Sx7h Sx7h= and hisshi.

91.P*7h      04:16:00  04:33:00
92.R2c-5c    04:16:00  04:43:00
93.P*5g      04:33:00  04:43:00
94.R5c-6c    04:33:00  04:52:00

Sato thought that 94.P*6f was good here, but after Px6f Sx6f S*7i there is no good
way to continue. The change of plan turns the game around.

95.B*9f      04:38:00  04:52:00
96.P9c-9d    04:38:00  04:58:00
97.B*5e      04:47:00  04:58:00
98.R6c-5c    04:47:00  04:59:00
99.B5e-6d    04:47:00  04:59:00
100.N7ex8g+  04:47:00  04:59:00
101.K8hx8g   04:47:00  04:59:00
102.G*5d     04:47:00  04:59:00
103.B6dx5c+  04:50:00  04:59:00
104.G5dx5c   04:50:00  04:59:00
105.R4d-4b+  04:51:00  04:59:00
106.P9d-9e   04:51:00  04:59:00
107.B9f-4a+  04:53:00  04:59:00
108.P*5b     04:53:00  04:59:00
109.+B4a-3b  04:53:00  04:59:00
110.G5c-6d   04:53:00  04:59:00
111.+R4b-4d  04:54:00  04:59:00
112.S*7e     04:54:00  04:59:00
113.+B3bx6e  04:54:00  04:59:00
114.N7cx6e   04:54:00  04:59:00
115.N*7d     04:55:00  04:59:00
116.G6dx7d   04:55:00  04:59:00
117.+R4dx7d  04:55:00  04:59:00

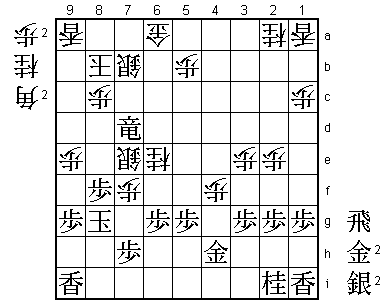
If this would not have been a mating threat, white could have played B*5i here
and win. However, 117.+Rx7d is a mating threat and in fact a very beautiful one:
S*9c Lx9c S*7c Sx7c G*8a Kx8a R*7a! (Kx7a +Rx7c or Gx7a +Rx8c).

118.P7f-7g+  04:55:00  04:59:00
119.P7hx7g   04:55:00  04:59:00
120.B*6i     04:55:00  04:59:00
121.S*7h     04:56:00  04:59:00
122.P*7f     04:56:00  04:59:00
123.+R7dx6e  04:57:00  04:59:00
124.B6ix7h+  04:57:00  04:59:00
125.K8gx7h   04:57:00  04:59:00
126.P7fx7g+  04:57:00  04:59:00
127.K7hx7g   04:57:00  04:59:00
128.S*7f     04:57:00  04:59:00
129.+R6ex7f  04:57:00  04:59:00
130.S7ex7f   04:57:00  04:59:00
131.K7gx7f   04:57:00  04:59:00
132.P*7c     04:57:00  04:59:00
133.B*6d     04:58:00  04:59:00
134.N*8d     04:58:00  04:59:00
135.K7f-6f   04:58:00  04:59:00
136.B*3c     04:58:00  04:59:00
137.K6f-5f   04:58:00  04:59:00
138.S7b-6c   04:58:00  04:59:00
139.N*9d     04:59:00  04:59:00
140.L9ax9d   04:59:00  04:59:00
141.S*9a?    04:59:00  04:59:00

It makes no difference for the final result, but as Sato pointed out, there is
a mate in this position: G*9c Kx9c R*9a G*9b S*8b Kx8b G*8a etc. "Ah, that was
simple..." was Habu's reaction, smiling wryly.

142.K8bx9a   04:59:00  04:59:00
143.B6dx7c+  04:59:00  04:59:00
Resigns      04:59:00  04:59:00

No mate, but the hisshi 143.S*8b S*9c is good enough. Sato again dictated the
pace early, but unlike the games they played in the early summer, he is no longer
capable of taking this advantage over the finish line. Habu takes a 2-0 lead and
needs only one more win for a record 14th straight Oza title.
