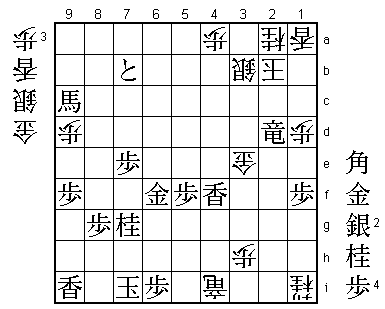
53rd Oza Match Game 1 (replay)
[Black "Habu Yoshiharu, Oza"]
[White "Sato Yasumitsu, Challenger"]
[Event "53rd Oza-sen, Replay Game 1"]
[Date "September 1st 2005"]
1.P7g-7f     03:33:00  00:00:00

After a 30 minute break, the replay starts with reversed colors. Both
players start with the remaining time on the clock, but with a minimum
of 1 hour. Because Sato ended the game with 52 minutes left, he starts
the game with 1 hour thinking time. The 8 minutes he receives are also
added to Habu's time.

2.P3c-3d     03:33:00  04:00:00
3.P2g-2f     03:33:00  04:00:00
4.G4a-3b     03:33:00  04:00:00
5.G6i-7h     03:33:00  04:00:00
6.P8c-8d     03:33:00  04:00:00
7.P2f-2e     03:33:00  04:00:00
8.B2bx8h+    03:33:00  04:00:00

Sato selects the Kakugawari with tempo loss.

9.S7ix8h     03:33:00  04:00:00
10.S3a-2b    03:33:00  04:00:00
11.S3i-3h    03:33:00  04:00:00
12.S2b-3c    03:33:00  04:00:00
13.K5i-6h    03:33:00  04:00:00
14.S7a-7b    03:33:00  04:00:00
15.S8h-7g    03:33:00  04:00:00
16.P6c-6d    03:33:00  04:00:00
17.S3h-2g    03:33:00  04:00:00
18.S7b-6c    03:33:00  04:00:00
19.S2g-2f    03:33:00  04:00:00
20.P1c-1d    03:33:00  04:00:00
21.P3g-3f    03:33:00  04:00:00
22.S6c-5d    03:33:00  04:02:00
23.P3f-3e    03:33:00  04:02:00
24.P4c-4d    03:33:00  04:05:00
25.P3ex3d    03:33:00  04:05:00
26.S3cx3d    03:33:00  04:05:00
27.K6h-7i    03:33:00  04:05:00
28.K5a-4a    03:33:00  04:06:00
29.P1g-1f    03:36:00  04:06:00
30.P9c-9d    03:36:00  04:11:00
31.S2f-3g    03:36:00  04:11:00
32.G3b-3c    03:36:00  04:11:00
33.P9g-9f    03:36:00  04:11:00
34.K4a-3b    03:36:00  04:14:00
35.G4i-5h    03:39:00  04:14:00
36.G6a-5b    03:39:00  04:14:00
37.P4g-4f    03:40:00  04:14:00
38.P*3e      03:40:00  04:14:00
39.P*3f      03:43:00  04:14:00
40.P3ex3f    03:43:00  04:14:00
41.S3gx3f    03:43:00  04:14:00
42.P*3e      03:43:00  04:14:00
43.S3f-4g    03:43:00  04:14:00
44.G5b-4b    03:43:00  04:18:00
45.P6g-6f    03:47:00  04:18:00
46.P7c-7d    03:47:00  04:19:00
47.G5h-6g    03:47:00  04:19:00
48.K3b-2b    03:47:00  04:24:00
49.K7i-8h    03:47:00  04:24:00
50.G4b-3b    03:47:00  04:24:00
51.P5g-5f    03:51:00  04:24:00
52.P4d-4e    03:51:00  04:28:00
53.P4fx4e    03:53:00  04:28:00
54.S5dx4e    03:53:00  04:28:00
55.P*4f      03:59:00  04:28:00
56.S4e-5d    03:59:00  04:28:00
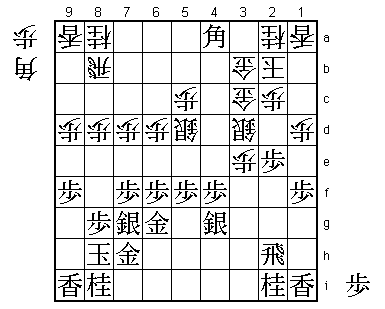
57.B*4a!     04:02:00  04:28:00

The lack of time is showing, because Sato completely overlooked this
move. The simple threat is 57.Bx7d+, but there is also P5e Sx5e B6c+.
The only move to deal with both threats is 57.B*6c, but then Bx6c+ Sx6c
P*3f Px3f Sx3f P*3e S4e and black has managed to start the attack with
the white silver in a terrible position on 6c.

58.P7d-7e    04:02:00  04:58:00

Sato uses almost all of his remaining time to start a desperate attack.

59.B4a-7d+   04:17:00  04:58:00
60.P7ex7f    04:17:00  04:58:00
61.S7gx7f    04:17:00  04:58:00
62.P6d-6e    04:17:00  04:58:00
63.+B7d-7e   04:17:00  04:58:00
64.P6ex6f    04:17:00  04:58:00
65.+B7ex6f   04:17:00  04:58:00
66.R8b-7b    04:17:00  04:58:00
67.P*7d      04:22:00  04:58:00
68.B*4d      04:22:00  04:58:00
69.+B6fx4d   04:22:00  04:58:00
70.G3cx4d    04:22:00  04:58:00
71.P2e-2d    04:35:00  04:58:00
72.P2cx2d    04:35:00  04:58:00
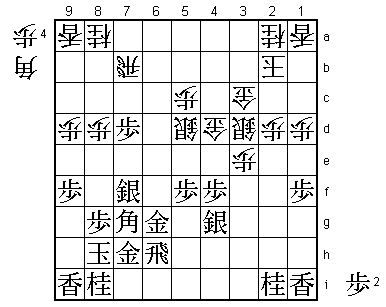
73.B*7g!     04:37:00  04:58:00

The threat is P*7e Sx7e B*3i and the obvious move is to defend against
this with 73.B*6f. What Habu has in mind with 73.B*7g is a very high
level technique, even for professionals. The reason will become clear
soon.

74.G3b-3c?!  04:37:00  04:58:00

Better was 74.B*3c, which keeps the white position safe, but then white
voluntarily gives up the threat P*7e Sx7e B*3i, so only very few professionals
will play 74.B*3c. Play may continue 75.P*2e Px2e N3g G4d-4c and the position
is unclear.

75.R2h-6h!   04:37:00  04:58:00

Defends against the white threat and makes a threat of his own by G5g followed
by R6a+. Because white has played 74.G3b-3c, allowing a rook promotion is out
of the question. The white king is just too weakly defended from the side.

76.R7b-6b    04:37:00  04:58:00
77.B7g-6f!   04:37:00  04:58:00

This is really the brilliant part of Habu's play. First not dropping the bishop
on 6f but on 7g and then moving it up to 6f here. This looks like losing a move,
but the big difference is the white rook on 6b. Black is now threatening Bx8d.
Sato can't really be blamed for overlooking this subtle play because of the time
trouble he is in, but Habu probably used only 13 minutes to find it (the time he
used for 71.P2d).

78.G4d-4c    04:37:00  04:59:00
79.G6g-7g    04:41:00  04:59:00
80.P*6e      04:41:00  04:59:00
81.B6fx8d    04:41:00  04:59:00
82.R6b-6a    04:41:00  04:59:00
83.P7d-7c+   04:41:00  04:59:00
84.B*9c      04:41:00  04:59:00
85.B8dx9c+   04:41:00  04:59:00
86.N8ax9c    04:41:00  04:59:00
87.B*8c      04:42:00  04:59:00
88.R6a-7a    04:42:00  04:59:00
89.B8c-7d+   04:42:00  04:59:00
90.B*5g      04:42:00  04:59:00
91.R6h-3h    04:42:00  04:59:00
92.P*7e      04:42:00  04:59:00
93.S7f-6g    04:42:00  04:59:00
94.P*4e      04:42:00  04:59:00
95.P*6d      04:42:00  04:59:00
96.P4ex4f    04:42:00  04:59:00
97.S4g-5h    04:42:00  04:59:00
98.P4f-4g+   04:42:00  04:59:00
99.S5hx4g    04:42:00  04:59:00
100.P3e-3f   04:42:00  04:59:00
101.P6d-6c+  04:42:00  04:59:00
102.P3f-3g+  04:42:00  04:59:00
103.N2ix3g   04:43:00  04:59:00
104.P*3f     04:43:00  04:59:00
105.S4gx3f   04:43:00  04:59:00
106.B5g-4f+  04:43:00  04:59:00
107.P*3e     04:43:00  04:59:00
108.S3d-2c   04:43:00  04:59:00
109.P*4d     04:43:00  04:59:00
110.G4cx4d   04:43:00  04:59:00
111.+P7c-7b  04:43:00  04:59:00
112.R7a-3a   04:43:00  04:59:00
113.+P6cx5c  04:43:00  04:59:00
114.+B4fx3f  04:43:00  04:59:00
115.+P5c-4b  04:43:00  04:59:00

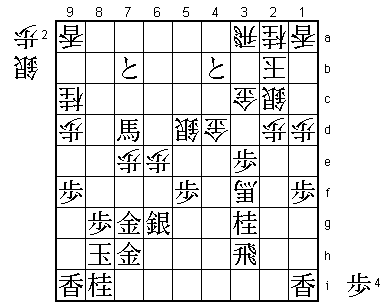
This seems to end the game, but Sato is not ready to resign yet.

116.R3a-3b!  04:43:00  04:59:00

A full rook sacrifice, but with this the white position gets back into order
and the black attack is delayed. Unfortunately for Sato, the material loss is
too great to have a real chance to get back in the game.

117.+P4bx3b  04:43:00  04:59:00
118.S2cx3b   04:43:00  04:59:00
119.+B7dx7e  04:43:00  04:59:00
120.P*4f     04:43:00  04:59:00
121.P*4h     04:43:00  04:59:00
122.P4f-4g+  04:43:00  04:59:00
123.P4hx4g   04:43:00  04:59:00
124.+B3f-2g  04:43:00  04:59:00
125.R3h-3i   04:43:00  04:59:00
126.P*3h     04:43:00  04:59:00
127.R3i-2i   04:43:00  04:59:00
128.+B2gx3g  04:43:00  04:59:00
129.R*8a     04:43:00  04:59:00
130.P*4a     04:43:00  04:59:00
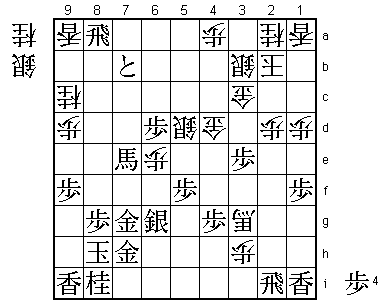
131.P*6d!    04:43:00  04:59:00

The decisive move. Black now just picks up the lance and knight on the right
side of the board, allowing the king to escape up the board at any time. Even
if black makes a mistake, the safety of the king is assured and it is almost
impossible to lose.

132.N*2g     04:43:00  04:59:00

Threatens P3i+, but of course Habu doesn't fall for it.

133.R2i-7i   04:43:00  04:59:00
134.N2gx1i+  04:43:00  04:59:00
135.R8ax9a+  04:43:00  04:59:00
136.S5d-6c   04:43:00  04:59:00
137.L*4f     04:44:00  04:59:00
138.L*7d     04:44:00  04:59:00
139.+B7ex9c  04:44:00  04:59:00
140.L7dx7g+  04:44:00  04:59:00
141.N8ix7g   04:44:00  04:59:00
142.S6cx6d   04:44:00  04:59:00
143.L4fx4d   04:44:00  04:59:00
144.G3cx4d   04:44:00  04:59:00
145.L*4f     04:44:00  04:59:00
146.G4dx3e   04:44:00  04:59:00
147.+R9a-6a  04:44:00  04:59:00
148.S*7e     04:44:00  04:59:00
149.P*7f     04:44:00  04:59:00
150.L*6f     04:44:00  04:59:00
151.P7fx7e   04:44:00  04:59:00
152.L6fx6g+  04:44:00  04:59:00
153.G7hx6g   04:44:00  04:59:00
154.P6e-6f   04:44:00  04:59:00
155.G6gx6f   04:44:00  04:59:00
156.+B3gx4g  04:44:00  04:59:00
157.L*4i     04:45:00  04:59:00
158.+B4g-5g  04:45:00  04:59:00
159.+R6ax6d  04:45:00  04:59:00
160.+B5gx7i  04:45:00  04:59:00
161.K8hx7i   04:45:00  04:59:00
162.R*5i     04:45:00  04:59:00
163.P*6i     04:45:00  04:59:00
164.R5ix4i+  04:45:00  04:59:00
165.+R6dx2d  04:45:00  04:59:00
Resigns      04:45:00  04:59:00

The only move is 166.G*2c, but then simply picking up the gold with 167.+Rx3e
the material difference is just to big for white to have any chance to win.
Sato showed a lot of fighting spirit again, but Habu dictated the replay from
the start. The fact that there was a replay in this game has no relation to
the second game, which means that Habu can play with the black pieces again
in game 2. A good opportunity to take a 2-0 lead and a big step forward to
winning his 14th consecutive Oza title.
