53rd Osho Match Game 5
[Black "Habu Yoshiharu, Osho"]

[White "Moriuchi Toshiyuki, Challenger"]

[Event "53rd Osho-sen, Game 5"]

[Date "March 8th and 9th 2004"]

1.P7g-7f     00:00:00  00:00:00

2.P8c-8d     00:00:00  00:01:00

3.S7i-6h     00:04:00  00:01:00

4.P3c-3d     00:04:00  00:01:00

5.P6g-6f     00:05:00  00:01:00

6.S7a-6b     00:05:00  00:01:00

7.P5g-5f     00:07:00  00:01:00

8.P5c-5d     00:07:00  00:01:00

9.S3i-4h     00:08:00  00:01:00

10.S3a-4b    00:08:00  00:02:00

11.G4i-5h    00:11:00  00:02:00

12.G4a-3b    00:11:00  00:02:00

13.G6i-7h    00:13:00  00:02:00

14.K5a-4a    00:13:00  00:02:00

15.K5i-6i    00:15:00  00:02:00

16.G6a-5b    00:15:00  00:02:00

17.S6h-7g    00:19:00  00:02:00


A double Yagura like in the previous game. Habu really likes this

opening and is almost unbeatable with it when he plays black. When

he lost with black in the 3rd game of last year's Ryu-O match, it was

really for the first time in a very long time. He wins about 17 games

in every 20 he plays with black. Of course, Moriuchi also has very

good results in this opening...


18.S4b-3c    00:19:00  00:03:00

19.B8h-7i    00:23:00  00:03:00

20.B2b-3a    00:23:00  00:04:00

21.P3g-3f    00:25:00  00:04:00

22.P4c-4d    00:25:00  00:04:00

23.G5h-6g    00:27:00  00:04:00

24.P7c-7d    00:27:00  00:06:00

25.S4h-3g    00:50:00  00:06:00

26.B3a-6d    00:50:00  00:07:00

27.B7i-6h    00:51:00  00:07:00

28.G5b-4c    00:51:00  00:07:00

29.K6i-7i    00:53:00  00:07:00

30.K4a-3a    00:53:00  00:08:00

31.K7i-8h    00:54:00  00:08:00

32.K3a-2b    00:54:00  00:09:00

33.S3g-4f    01:01:00  00:09:00

34.S6b-5c    01:01:00  00:24:00

35.N2i-3g    01:03:00  00:24:00

36.P9c-9d    01:03:00  00:24:00

37.P2g-2f    01:08:00  00:24:00

38.S3c-2d    01:08:00  00:24:00

39.P1g-1f    01:08:00  00:24:00

40.P1c-1d    01:08:00  00:24:00

41.R2h-3h    01:15:00  00:24:00

42.B6d-7c    01:15:00  00:25:00

43.L1i-1h    01:21:00  00:25:00

44.P9d-9e    01:21:00  00:25:00

45.P6f-6e    02:10:00  00:25:00

46.P8d-8e    02:10:00  00:31:00

47.N3g-2e    02:21:00  00:31:00

48.S5c-4b    02:21:00  00:36:00

49.P5f-5e    02:40:00  00:36:00

50.P4d-4e    02:40:00  00:51:00

51.S4fx4e    02:41:00  00:51:00

52.B7cx5e    02:41:00  00:51:00

53.P4g-4f    02:41:00  00:51:00

54.P8e-8f    02:41:00  00:54:00

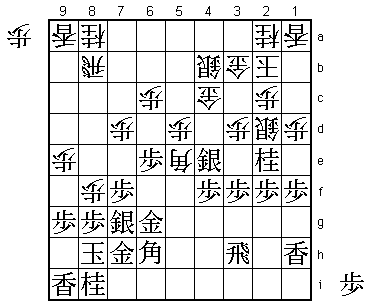
Up until this move, the position was identical to the 6th game of the

2002 Ryu-O match between Abe and Habu. Habu won that game, but played

54.B7c here. He won that game, but even at that time everybody wondered

why he did not play 54.P8f here. Moriuchi decides that he is going to

try and find out.


55.P8gx8f    02:41:00  00:54:00

56.R8bx8f    02:41:00  00:54:00

57.P*8g      02:41:00  00:54:00

58.R8f-8b    02:41:00  00:54:00

59.B6h-5g    03:33:00  00:54:00

60.K2b-3a    03:33:00  02:16:00

61.S4e-5f    04:07:00  02:16:00

62.B5e-2b    04:07:00  02:18:00

63.S7g-6f    04:10:00  02:18:00

64.P5d-5e!   04:10:00  03:16:00

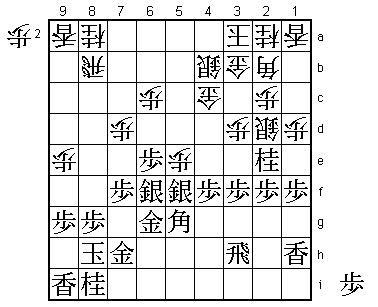
The sealed move and even more sharp than the expected 64.N7c or 64.R5b.


65.S6fx5e    05:02:00  03:16:00


Not much choice here. If black shows a weak heart here and retreats

with 65.S4g, white gets an overwhelming position after S5c, S5d followed

by N7c.


66.R8b-5b    05:02:00  03:16:00


The point. The silver on 5e can not be saved. 67.P*5d Gx5d or 67.S6f Rx5f

Gx5f S*4g and the black position crumbles. White can afford to sacrifice

some material for attack, because he always has the safeguard of a pawn

drop on 5a to defend against a rook drop.


67.N8i-7g    05:09:00  03:16:00


Habu decides to give Moriuchi the two silver and wait for a chance.


68.B2bx5e    05:09:00  04:14:00

69.S5fx5e    05:09:00  04:14:00

70.R5bx5e    05:09:00  04:15:00

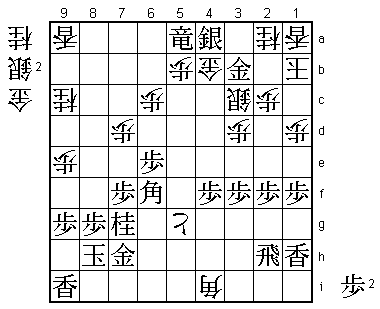
71.B*6f!     05:09:00  04:15:00

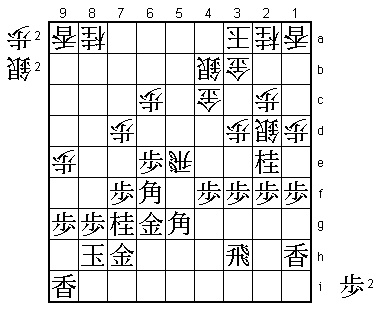
The best counter. Most people in the press room thought that Moriuchi had

taken Habu by surprise again, like in the first game where Habu just lost

a silver. However, the position is actually very close.


72.R5ex5g+   05:09:00  05:51:00

73.G6gx5g    05:09:00  05:51:00

74.B*9c      05:09:00  05:52:00

75.R*6a      05:41:00  05:52:00


74.B*9c seems to defend indirectly against Bx1a+, but it still seems that

black might win after 75.Bx1a+ Bx5g+ L*5i +B4g P*5b. However, after S*2b

+B1b P*5g white still has the upper hand. 75.R*6a was therefore the correct

decision.


76.P*5a      05:41:00  05:54:00

77.B6fx9c+   06:47:00  05:54:00

78.N8ax9c    06:47:00  05:59:00

79.P*5b      06:47:00  05:59:00

80.B*4i      06:47:00  06:52:00

81.R3h-2h    07:05:00  06:52:00

82.K3a-2b    07:05:00  06:52:00

83.P5bx5a+   07:15:00  06:52:00

84.P*5f      07:15:00  06:55:00


It seems that with the early escape 82.K2b, the white king has gotten far

enough from the enemy pieces to have time for a winning attack. However,

Habu has found a way to bring his attack to life.


85.B*6f!     07:20:00  06:55:00

86.S4b-3c    07:20:00  07:04:00

87.N2ex3c+   07:25:00  07:04:00

88.S2dx3c    07:25:00  07:50:00

89.S*4a!     07:25:00  07:50:00

Suddenly, the white position does not look very good anymore. Even after

Px5g+ it is impossible to create a mating threat because the black rook

is working perfectly in defense. Here Habu felt that things were starting

to get better for him. Still, Moriuchi has one more trick up his sleeve.


90.G4c-4b    07:25:00  07:50:00

91.+P5a-5b   07:40:00  07:50:00

92.P5fx5g+   07:40:00  07:50:00

93.+P5bx4b   07:47:00  07:50:00

94.G3bx4b    07:47:00  07:50:00

95.R6a-6b+   07:48:00  07:50:00

96.P*5b      07:48:00  07:53:00

97.G*3b      07:52:00  07:53:00

98.K2b-1b    07:52:00  07:53:00

99.+R6b-5a   07:55:00  07:53:00

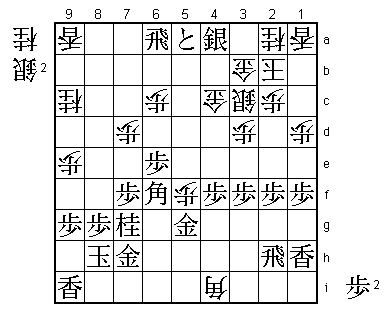
This is not a mating threat, but after +Rx4b next, there is no defense for

white. S*6h, S*6i or N*8d are clearly no mating threats, so it was felt that

the game was over here.


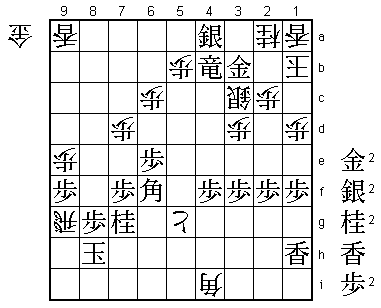
100.N9c-8e!  07:55:00  07:54:00


Moriuchi has prepared a last prayer. 101.Nx8e fails to Bx7f+ +Rx4b +Bx6f.


101.+R5ax4b  07:57:00  07:54:00


No choice. It is unclear whether Habu had seen the next rush of checks until

the end, but his shaking hand after the game showed that he might have been a

little bit rattled by Moriuchi's final attempt.


102.N*9f     07:57:00  07:54:00

103.P9gx9f   07:58:00  07:54:00


103.K9h leads to mate after 104.G*8h. Suddenly, the black king looks in a lot

of danger.


104.S*9g     07:58:00  07:55:00

105.K8h-7i   07:58:00  07:55:00

106.S*8h     07:58:00  07:57:00

107.G7hx8h   07:58:00  07:57:00

108.S9gx8h+  07:58:00  07:57:00

109.K7ix8h   07:58:00  07:57:00

110.G*9g     07:58:00  07:57:00

111.L9ix9g   07:58:00  07:57:00

112.N8ex9g+  07:58:00  07:57:00

113.K8h-9i   07:58:00  07:57:00


The right answer. 113.Kx9g Px9f is mate.


114.L*9h     07:58:00  07:59:00

115.R2hx9h   07:58:00  07:59:00

116.+N9gx9h  07:58:00  07:59:00

117.K9ix9h   07:58:00  07:59:00

118.R*9g     07:58:00  07:59:00

119.K9h-8h   07:58:00  07:59:00

Resigns      07:58:00  07:59:00

Still close, but no mate after 120.G*9h K7i G8i Kx8i +Rx8g+ K9i. Black has

an easy mate with Gx3c, so Moriuchi resigned here. Habu pulls one back to get

to 3-2 in the match, but is still very much in danger of losing his Osho title.
