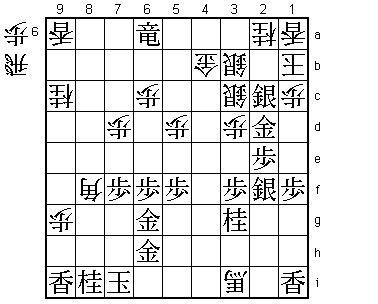
53rd Osho Match Game 4
[Black "Moriuchi Toshiyuki, Challenger"]
[White "Habu Yoshiharu, Osho"]
[Event "53rd Osho-sen, Game 4"]
[Date "February 25th and 26th 2004"]
1.P7g-7f     00:00:00  00:00:00
2.P8c-8d     00:00:00  00:01:00
3.S7i-6h     00:03:00  00:01:00
4.P3c-3d     00:03:00  00:06:00
5.P6g-6f     00:03:00  00:06:00
6.S7a-6b     00:03:00  00:08:00
7.P5g-5f     00:03:00  00:08:00
8.P5c-5d     00:03:00  00:14:00
9.S3i-4h     00:04:00  00:14:00
10.S3a-4b    00:04:00  00:20:00
11.G4i-5h    00:04:00  00:20:00
12.G4a-3b    00:04:00  00:25:00
13.G6i-7h    00:05:00  00:25:00
14.K5a-4a    00:05:00  00:27:00
15.K5i-6i    00:07:00  00:27:00
16.G6a-5b    00:07:00  00:35:00
17.S6h-7g    00:08:00  00:35:00
18.S4b-3c    00:08:00  00:37:00

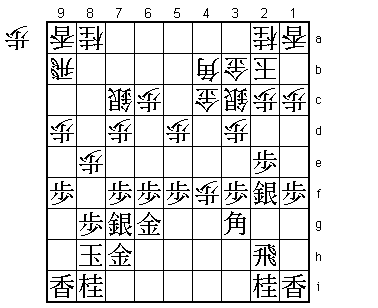
After an irregular Ibisha, Nakabisha and Yokofudori, the first
Yagura of this match.

19.B8h-7i    00:08:00  00:37:00
20.B2b-3a    00:08:00  00:38:00
21.P3g-3f    00:08:00  00:38:00
22.P4c-4d    00:08:00  00:40:00
23.G5h-6g    00:08:00  00:40:00
24.P7c-7d    00:08:00  00:49:00
25.S4h-3g    00:12:00  00:49:00
26.B3a-6d    00:12:00  00:55:00
27.P2g-2f    00:16:00  00:55:00
28.G5b-4c    00:16:00  01:08:00
29.B7i-4f    00:16:00  01:08:00
30.S6b-7c    00:16:00  02:06:00
31.K6i-7i    00:17:00  02:06:00
32.K4a-3a    00:17:00  02:07:00
33.P2f-2e    00:17:00  02:07:00
34.P8d-8e    00:17:00  02:09:00
35.K7i-8h    00:21:00  02:09:00
36.K3a-2b    00:21:00  02:10:00
37.P1g-1f    00:21:00  02:10:00
38.P9c-9d    00:21:00  02:45:00
39.P9g-9f    00:28:00  02:45:00
40.B6d-4b    00:28:00  02:46:00

Subtle opening play. 40.P1d leads to the basic Waki system after
41.Bx6d Sx6d S2f. If white does not want to play that, 40.B4b is
the alternative. This is losing tempo, but white can play the strong
bogin attack because black has pushed the edge pawn to 9f.

41.S3g-2f    00:38:00  02:46:00
42.P4d-4e    00:38:00  02:51:00
43.B4f-3g    00:42:00  02:51:00
44.R8b-9b    00:42:00  02:53:00
45.P4g-4f    00:55:00  02:53:00
46.P4ex4f    00:55:00  02:56:00

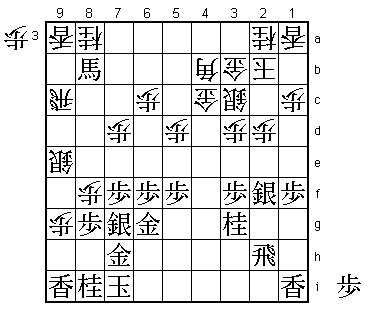
So far, the position was identical to last December's Asahi Open
game between Sato Yasumitsu and Kitahama. Kitahama played 46.S8d,
but lost without a chance after 47.Px4e. 46.Px4f is Habu's simple
improvement.

47.B3gx4f    00:59:00  02:56:00
48.S7c-8d    00:59:00  02:57:00
49.K8h-7i    02:12:00  02:57:00
50.P9d-9e    02:12:00  03:10:00
51.P9fx9e    02:14:00  03:10:00
52.S8dx9e    02:14:00  03:10:00
53.N2i-3g    02:43:00  03:10:00
54.P*9g      02:43:00  04:44:00

The sealed move. Here 54.P*4e is an alternative. After 55.Lx9e
Rx9e B8b+ P*9g P*9i L*9h white seems to be getting a reasonable
attack, but Habu dismissed this variation because the final move
L*9h was too heavy.

55.P*9c      03:30:00  04:44:00
56.R9bx9c    03:30:00  04:45:00
57.B4f-8b+   03:30:00  04:45:00
58.P8e-8f    03:30:00  04:46:00
59.P2e-2d    03:31:00  04:46:00
60.P2cx2d    03:31:00  05:06:00

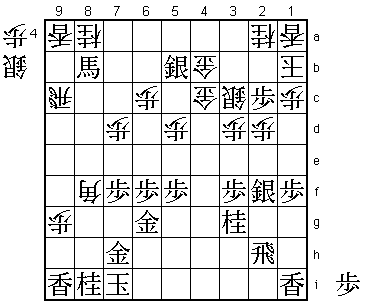
A change of plan. The natural move is 60.Sx2d and that is what
Habu intended. However, after 61.P*4d Gx4d +Bx8a black gets a
big advantage. For example, Px8g+ Gx8g R8c can be answered by
+B7a with attack on the gold on 4d (this is the point of sacrificing
a pawn on 4d). Because of having to play Px2d, Habu thought his
position was worse here. However, actually it is too close to call.

61.P*2c      04:29:00  05:06:00
62.K2b-1b    04:29:00  05:08:00
63.P8gx8f    04:44:00  05:08:00
64.S9ex8f    04:44:00  05:17:00
65.S7gx8f    05:31:00  05:17:00
66.B4bx8f    05:31:00  05:17:00
67.S*4a      05:32:00  05:17:00
68.G3b-4b    05:32:00  05:49:00
69.S4a-5b=   06:08:00  05:49:00

This time a change of plan by Moriuchi. He intended to play 69.+Bx9c
70.Lx9c 71.R*3a and S3b= next seems to be very difficult to defend.
However, Moriuchi saw just in time that after R*3a, white has the
devilish move 72.B*2b!!. Then 73.Px2b+ Sx2b S1e Sx3a Sx2d P*2g Rx2g
R*3i K8h P9h+ Lx9h P*8g Kx8g Rx8i+ is mate because black does not
have any good pieces in hand to interpose. By the way 72.S*2b
instead of B*2b does not work: 73.Px2b+ Sx2b and now S3b=!. Then
Sx3a S*2c is mate (with a bishop instead of a silver, white has
2b to escape after B*2c).

70.G4bx5b    06:08:00  06:50:00
71.+B8bx9c!  06:08:00  06:50:00

Giving an exclamation mark to such a simple looking move might be
surprising, but the move order is extremely important in this
position. For example, after 69.+Bx9c Lx9c (Nx9c is bad because
of R*3a and because the knight blocks the lance, the mate given
earlier is no longer possible) S5b=, white can play G4c-5c!. Then
N4e Kx2c threatens B*4f next and white has the upper hand.
Furthermore, because black has not exchanged the bishop for
the rook yet, 70.G4c-5c (instead of 70.Gx5b) can now be answered
by N4e (white has no bishop to drop on 4f). In this endgame there
is a lot going on below the surface.

72.N8ax9c    06:08:00  06:51:00

If 72.Lx9c, black will pick up the knight on 8a when the same
variation is played as in the game.

73.R*3b      06:08:00  06:51:00
74.K1bx2c    06:08:00  06:51:00
75.R3bx5b+   06:08:00  06:51:00
76.G4c-4b    06:08:00  06:51:00
77.+R5b-6a   06:40:00  06:51:00
78.S*3b      06:40:00  06:52:00
79.G7h-6h!   06:47:00  06:52:00

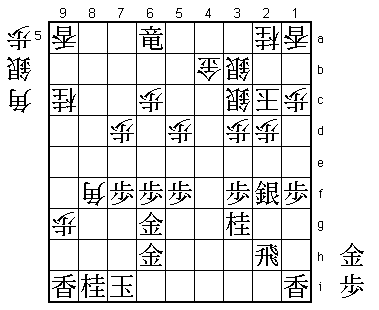
Great move. 79.+Rx9a or 79.N4e fails to B*4f. 79.G7h-6h takes
this fork out of the position and also defends against B5i+.
Still, 79.G7h-7g or 79.N7g look more natural. Moriuchi has seen
that 79.G7h-7g fails to B6d and P2e next is difficult to defend
against. Also, 79.N7g P9h+ Lx9h P*9g looks good for white.

80.B*4i?     06:47:00  07:16:00

The decisive mistake. Things are still very complicated after
80.P*8h Kx8h Bx6h+ Gx6h B*3i. For example, R3h Bx6f+ or P*2b
Bx2h+ Px2a+ +Bx3g and white seems to be winning.

81.P*2e      06:52:00  07:16:00
82.S*3i      06:52:00  07:33:00
83.P2ex2d    07:30:00  07:33:00
84.S3cx2d    07:30:00  07:34:00
85.R2h-2i    07:30:00  07:34:00

Important. Black can now take the silver on 3i at any convenient
time.

86.B4i-3h+   07:30:00  07:35:00
87.P*2e      07:30:00  07:35:00
88.S2d-3c    07:30:00  07:37:00
89.G*2d      07:30:00  07:37:00
90.K2c-1b    07:30:00  07:54:00

Or 90.Sx2d Px2d K3c +Rx6c P*4c N4e K4d (or K3c S*2c etc.) P*4f and no
defense.

91.R2ix3i    07:30:00  07:54:00
92.+B3hx3i   07:30:00  07:54:00
93.S*2c      07:30:00  07:54:00
Resigns      07:30:00  07:54:00

Mate after 94.Sx2c Gx2c Kx2c +Rx2a and now S2b S*2d or N*1e followed
by S*2c after any interposing drop on 2b. A very interesting
endgame, mainly because of the variations that did not appear
on the board. Moriuchi takes a 3-1 lead and now is very close
to the first double crown of his career.
