53rd Osho Match Game 3
[Black "Habu Yoshiharu, Osho"]
[White "Moriuchi Toshiyuki, Challenger"]
[Event "53rd Osho-sen, Game 3"]
[Date "Februari 18th and 19th 2004"]
1.P2g-2f     00:00:00  00:00:00
2.P3c-3d     00:00:00  00:00:00
3.P7g-7f     00:02:00  00:00:00
4.P4c-4d     00:02:00  00:00:00
5.P2f-2e     00:03:00  00:00:00
6.B2b-3c     00:03:00  00:00:00
7.S3i-4h     00:04:00  00:00:00
8.P9c-9d     00:04:00  00:00:00
9.K5i-6h     00:08:00  00:00:00
10.R8b-4b    00:08:00  00:01:00
11.K6h-7h    00:12:00  00:01:00
12.P9d-9e    00:12:00  00:04:00
13.P5g-5f    00:22:00  00:04:00
14.K5a-6b    00:22:00  00:10:00
15.G4i-5h    00:30:00  00:10:00
16.G4a-5b    00:30:00  00:19:00
17.B8h-7g    00:33:00  00:19:00
18.S3a-3b    00:33:00  00:30:00
19.K7h-8h    00:37:00  00:30:00
20.K6b-7b    00:37:00  00:30:00
21.S4h-5g    00:49:00  00:30:00
22.K7b-8b    00:49:00  00:37:00
23.P6g-6f    00:59:00  00:37:00
24.P6c-6d    00:59:00  00:38:00
25.G5h-6g    01:05:00  00:38:00
26.P4d-4e    01:05:00  00:45:00
27.L9i-9h    01:26:00  00:45:00
28.L9a-9b    01:26:00  00:55:00

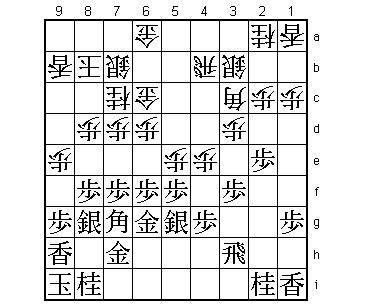
Both Habu and Moriuchi express their intentions to play the Anaguma
here. However, this is not how the game is developing...

29.S7i-7h    01:47:00  00:55:00

Habu gives up the idea of playing Anaguma, because he did not think a
double Anaguma would be interesting.

30.S7a-7b    01:47:00  01:04:00

Moriuchi also abandons the Anaguma, probably because the attack on the
edge is pretty strong. We now have a position where both players have
abandoned their plans of playing anaguma despite moving up the lance.
Unusual, but more or less the same thing happened in last year's
Ryu-O tournament game between Yamasaki and Sugimoto.

31.P8g-8f    02:11:00  01:04:00
32.P8c-8d    02:11:00  01:22:00
33.P3g-3f    02:16:00  01:22:00
34.G5b-6c    02:16:00  02:00:00
35.S7h-8g    02:52:00  02:00:00
36.P7c-7d    02:52:00  02:51:00
37.G6i-7h    02:55:00  02:51:00
38.N8a-7c    02:55:00  02:56:00
39.K8h-9i    03:38:00  02:56:00

Here Habu could have attacked with 39.P9f, but after 40.Px9f Sx9f S8c
P*9e G7b there is not much to fear for white. Instead, the extension
on the edge can easily become a liability for black.

40.P5c-5d    03:38:00  03:31:00
41.R2h-3h    03:42:00  03:31:00
42.P5d-5e!   03:42:00  04:02:00

Positive play by Moriuchi.

43.N2i-3g    04:14:00  04:02:00

Leads to the loss of a knight against a couple of pawns, but this
could not be helped. After 43.Px5e Bx5e N3g P3e G5f B2b Px3e P*5e
Gx4e P8e to get a pawn in hand an win the knight by P*3f is even
better for white.

44.P3d-3e    04:14:00  04:23:00
45.P3fx3e    04:16:00  04:23:00
46.P8d-8e    04:16:00  04:37:00
47.P5fx5e    04:32:00  04:37:00
48.P8ex8f    04:32:00  04:46:00
49.B7gx8f    04:32:00  04:46:00
50.P*3f      04:32:00  04:46:00
51.N3gx4e    04:34:00  04:46:00
52.R4bx4e    04:34:00  04:47:00
53.S5g-4f    04:34:00  04:47:00
54.R4e-4a    04:34:00  04:48:00
55.R3hx3f    04:36:00  04:48:00

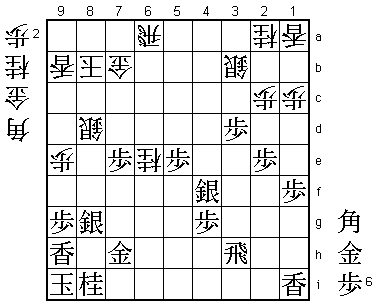
White has won a knight, but black has gotten four pawns for it, so
this position is still very much unclear. Moriuchi is the one who
has to move quickly, because less pieces in hand means less options.

56.S7b-8c    04:36:00  04:55:00
57.P3e-3d    04:57:00  04:55:00
58.B3c-1e    04:57:00  04:57:00
59.R3f-3h    04:58:00  04:57:00
60.G6a-7b    04:58:00  04:57:00
61.P1g-1f    05:01:00  04:57:00
62.B1e-4b    05:01:00  05:00:00
63.B8f-5i    05:01:00  05:00:00
64.P6d-6e?!  05:01:00  05:14:00

A small mistake. Immediately 64.P7e was correct.

65.P6fx6e    05:02:00  05:14:00
66.P7d-7e    05:02:00  05:14:00
67.B5i-4h    05:44:00  05:14:00

The difference. If white would not have played 64.P6e, this bishop
would not have come into play here.

68.G6c-7d    05:44:00  05:23:00
69.G6g-6f    05:44:00  05:23:00
70.R4a-6a    05:44:00  05:35:00
71.G6fx7e    05:56:00  05:35:00
72.G7dx7e    05:56:00  05:43:00
73.B4hx7e    05:56:00  05:43:00
74.B4bx7e    05:56:00  05:47:00
75.P7fx7e    05:56:00  05:47:00
76.N7cx6e    05:56:00  05:51:00
77.P*8d      06:16:00  05:51:00
78.S8cx8d    06:16:00  05:55:00

79.B*5b?     06:28:00  05:55:00

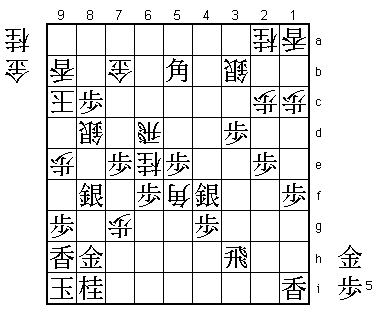
The turning point in this game. This was the position that Moriuchi
feared most. If there is a good attack for black, then white will
lose quickly. Habu could not find the correct move, which was the
simple 79.P*8c. Then, after 80.K9c the position is similar to the
game, but black still has the bishop in hand. Futhermore, 80.Kx8c
fails to G*7d, so white has to play 80.Gx8c. Then, after 81.G*7d,
82.Gx7d fails to B*5b R6d Bx7d+. It seems that white has nothing
but 82.G*7b after G*7d and then black seems to have nothing better
than sennichite: 83.Gx8c Gx8c G*7d G*7b etc.

80.R6a-6d    06:28:00  06:35:00
81.P*8c      07:09:00  06:35:00
82.K8b-9c    07:09:00  06:35:00
83.P*6f      07:09:00  06:35:00

Painful. Black wants to play something like 83.G*7d, but after B*6f
he has no pieces to interpose (P*8h is a double pawn drop!).

84.P*7g      07:09:00  06:53:00
85.G7h-8h    07:11:00  06:53:00
86.P*8f      07:11:00  07:00:00
87.S8gx8f    07:14:00  07:00:00
88.B*5f!     07:14:00  07:03:00

The winning move. Now 89.Px6e fails to the vulgar move 90.G*7i!
(Px6d N*8g and Bx8i+ or G*8g P7h+). It was tempting to attack with
89.N*7f instead of B*5f, but then 90.Px6e B*7i Sx7g is far from
clear. The black rook is working in defense and there is a high
probability that black can completely stop the white attack.

89.G*8g      07:17:00  07:03:00
90.G*7i      07:17:00  07:22:00
91.N8ix7g    07:19:00  07:22:00
92.N6ex7g+   07:19:00  07:24:00
93.S8fx7g    07:20:00  07:24:00
94.B5fx4g+   07:20:00  07:29:00
95.R3h-3i    07:27:00  07:29:00
96.+B4gx4f   07:27:00  07:29:00
97.N*8e      07:27:00  07:29:00
98.K9c-9d    07:27:00  07:37:00
99.P8c-8b+   07:27:00  07:37:00
100.G7bx8b   07:27:00  07:38:00
101.P9g-9f   07:27:00  07:38:00
102.S*7h     07:27:00  07:44:00
103.P*8i     07:29:00  07:44:00
104.S7hx8g+  07:29:00  07:45:00
105.G8hx8g   07:29:00  07:45:00
106.G*7h     07:29:00  07:45:00
107.P9fx9e   07:35:00  07:45:00
108.K9d-8c   07:35:00  07:45:00
109.L9h-9g   07:35:00  07:45:00
110.+B4f-5f  07:35:00  07:50:00
111.K9i-9h   07:37:00  07:50:00
112.N*6c     07:37:00  07:52:00
113.S*7d     07:42:00  07:52:00
114.R6dx7d   07:42:00  07:52:00
115.P7ex7d   07:42:00  07:52:00
116.G7hx7g   07:42:00  07:56:00
117.P7d-7c+  07:45:00  07:56:00
118.G8bx7c   07:45:00  07:57:00
119.N8ex7c+  07:45:00  07:57:00
120.S8dx7c   07:45:00  07:57:00
121.R*8f     07:46:00  07:57:00
122.P*8e     07:46:00  07:57:00
123.R8fx8e   07:46:00  07:57:00
124.S*8d     07:46:00  07:57:00
125.R3ix7i   07:46:00  07:57:00
126.S8dx8e   07:46:00  07:57:00
127.R7ix7g   07:46:00  07:57:00
128.R*4h     07:46:00  07:57:00
129.P*7h     07:48:00  07:57:00
130.N*7e     07:48:00  07:57:00

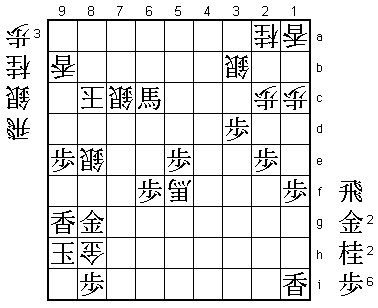
A nice finish. Black has no defense against this mating threat.

131.B5bx6c+  07:48:00  07:57:00
132.N7ex8g+  07:48:00  07:58:00
133.R7gx8g   07:48:00  07:58:00
134.R4hx7h+  07:48:00  07:58:00
135.G*8h     07:48:00  07:58:00
136.+R7hx8g  07:48:00  07:58:00
137.G8hx8g   07:48:00  07:58:00
138.G*8h     07:48:00  07:58:00
Resigns      07:48:00  07:58:00

A simple but nice mate to end another good game by Moriuchi:
139.Kx8h R*7h and S*9h, 139.Gx8h N*8f K9i P*9h or 139.Px8h S*8i
and R*9h. A win with white puts a lot of pressure on Habu in
the fourth game.
