53rd Oi Match Game 5
[Black "Habu Yoshiharu, Oi"]
[White "Fujii Takeshi, Challenger"]
[Event "53rd Oi-sen, Game 5"]
[Date "August 22nd and 23rd 2012"]
1.P7g-7f 00:00:00 00:00:00
2.P3c-3d 00:00:00 00:01:00
3.P2g-2f 00:03:00 00:01:00
4.P4c-4d 00:03:00 00:03:00
5.S3i-4h 00:08:00 00:03:00
6.R8b-4b 00:08:00 00:09:00
7.K5i-6h 00:11:00 00:09:00
8.P9c-9d 00:11:00 00:16:00
9.K6h-7h 00:14:00 00:16:00
10.S7a-7b 00:14:00 00:21:00
11.P5g-5f 00:26:00 00:21:00
12.B2b-3c 00:26:00 00:30:00
13.G4i-5h 00:32:00 00:30:00
14.P6c-6d 00:32:00 00:52:00
15.P2f-2e 00:57:00 00:52:00
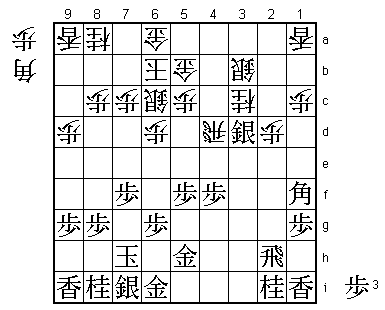
16.G4a-5b 00:57:00 01:14:00
With his back against the wall and playing with the white pieces, Fujii turns to
his own "Fujii System".
17.S4h-5g 01:10:00 01:14:00
18.S3a-3b 01:10:00 01:17:00
19.P3g-3f 01:27:00 01:17:00
20.K5a-6b 01:27:00 01:23:00
21.B8h-5e 01:30:00 01:23:00
22.S7b-6c 01:30:00 01:59:00
23.P3f-3e 02:29:00 01:59:00
24.P3dx3e 02:29:00 02:18:00
25.S5g-4f 02:31:00 02:18:00
Habu counters the Fujii System with a quick attack, pulling out the bishop in
combination with a reclining silver attack.
26.P4d-4e 02:31:00 02:41:00
27.B5ex3c+ 02:39:00 02:41:00
28.N2ax3c 02:39:00 02:41:00
29.S4fx3e 02:40:00 02:41:00
30.P*3d 02:40:00 02:42:00
31.P2e-2d 02:48:00 02:42:00
32.P2cx2d 02:48:00 02:44:00
33.S3ex3d 02:52:00 02:44:00
34.P4e-4f 02:52:00 03:03:00
35.P4gx4f 02:53:00 03:03:00
36.R4b-4d 02:53:00 03:06:00
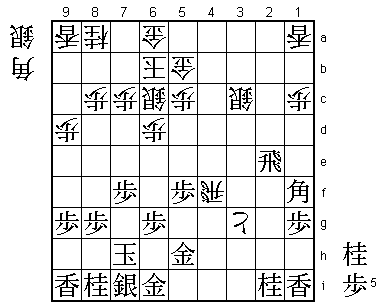
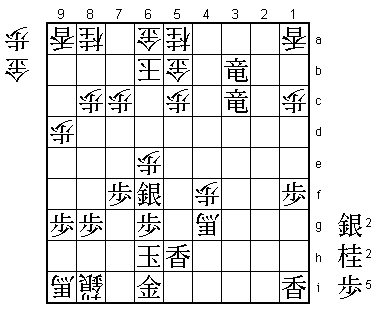
37.B*1f! 03:00:00 03:06:00
This a new move by Habu and an important improvement for black. Here 37.P*3e and
37.Sx3c+ had been tried, but Habu didn't like either of them. The bishop looks out
of place on 1f, but as will become clear, this bishop is pointing at the vital
squares of white's defensive formation and is also controlling important squares
in the black camp that make it much more difficult for the white rook to promote.
Fujii was clearly taken by surprise by this move and took a long time to answer.
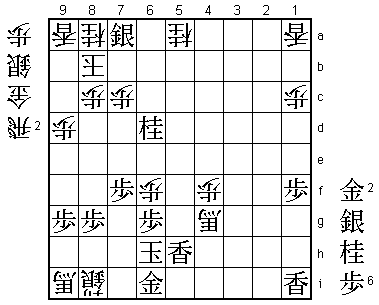
38.P2d-2e 03:00:00 04:44:00
Fujii takes 1 hour and 38 minutes before sealing this move. It is based on a
miscalculation as we will see later, giving Habu an overwhelming position. However,
it is hard to find a better move than 38.P2e, so this cannot really be labeled a
questionable move. As it stands now, 37.B*1f might be too strong for the white
position to handle and white may have to reconsider its whole strategy here.
39.R2h-3h 03:23:00 04:44:00
40.P*3g 03:23:00 05:37:00
When he sealed 38.P2e, Fujii thought that he could play 40.B*1e here, which
threatens P*3g next. If black defends with 41.R3f, then P*3e Rx3e Rx4f is good
for white. However, here Fujii realized that black can also play 41.P4e R5d P5e
Rx5e and because the silver is no longer attacked by the rook P*3g is no longer
a threat and black can play P*2c which is hard to defend and the white position
becomes very bad.
41.R3hx3g 03:30:00 05:37:00
42.R4dx4f 03:30:00 05:37:00
43.S3dx3c+ 03:59:00 05:37:00
44.P*3f 03:59:00 05:46:00
45.R3g-2g 04:00:00 05:46:00
46.S3bx3c 04:00:00 05:46:00
47.R2gx2e 04:00:00 05:46:00
48.P3f-3g+ 04:00:00 06:12:00
Played with regret, because this gives black an easy development of the inactive
knight on 2i. However, Fujii is forced to play this pawn sacrifice because otherwise
the rook gets into trouble if white plays the natural (and probably only) good
attacking plan of Rx5f followed by B*5e because 48.Rx5f can be answered by 49.G4g.

49.N2ix3g    04:12:00  06:12:00
50.R4fx5f    04:12:00  06:12:00
51.R2e-2a+   04:35:00  06:12:00
52.B*5e      04:35:00  06:14:00
53.P*5d!     05:00:00  06:14:00
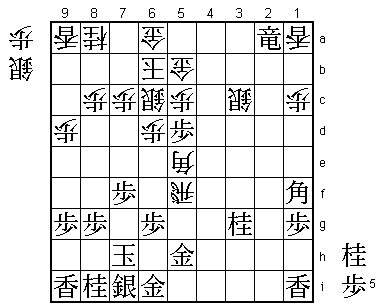
Very painful drop for white because this pawn cannot be taken: 54.Px5d is answered
by 55.P*5c and 54.Sx5d by 55.N*6f.

54.B5ex9i+   05:00:00  07:00:00

After the game Fujii suggested 54.S4b here, and after 55.P*4c Sx4c Px5c+ Gx5c N4e
G5c-5b P*5c G4b Bx4c+ Gx4c G4g B*4d is a mating threat after S*7g next and white
also has the move R2f now to exchange the rooks or promote himself, so this gives
white good chances. However, the post-mortem analysis revealed that if black plays
55.Px5c+ immediately, then after 56.Sx5c N4e S5c-5d P*5c G5b-5a Bx6a+ Kx6a G*5b
the white position collapses. Other variations were also investigated, but no way
for white to save the position were discovered. Again, the only conclusion seems
to be that 37.B*1f is the move that refutes the white opening strategy.

55.S7i-8h    05:25:00  07:00:00
56.L*7g      05:25:00  07:10:00
57.S8hx7g    05:31:00  07:10:00
58.S*9h      05:31:00  07:10:00
59.K7h-6h    05:48:00  07:10:00
60.S9hx8i+   05:48:00  07:17:00
61.S7g-6f    06:08:00  07:17:00
62.R5fx1f    06:08:00  07:24:00
63.P1gx1f    06:08:00  07:24:00
64.B*4f      06:08:00  07:24:00
65.G5h-5g    06:14:00  07:24:00
66.N*5f      06:14:00  07:26:00
67.K6h-5h    06:14:00  07:26:00
68.B4fx3g+   06:14:00  07:26:00
69.G5gx5f    06:23:00  07:26:00
70.P*4f      06:23:00  07:34:00
71.R*3a      06:38:00  07:34:00
72.N*5a      06:38:00  07:41:00
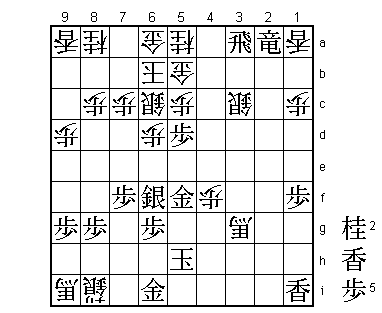
73.K5h-6h?!  06:50:00  07:41:00

The black king looks to be in quite a precarious situation, being attacked from
both sides. However, in the eyes of the professional the white attack doesn't have
enough power to be successful if black defends correctly. This opinion was shared
by both players and supported by the analysis in the press room. Fujii needs a
mistake by Habu to get back in the game, and for a moment he thought he was getting
his wish with 73.K6h. Here, 73.Px5c+ Gx5c first and only then K6h would have been
the right way to play. White has dropped a vital knight on 5a to defend against the
two rooks, but this leaves him without any attacking options. After 73.K6h, white
can move out the defending silver, taking the thorn in its side on 5d out of play
as well.

74.S6cx5d    06:50:00  07:49:00
75.R3ax3c+   07:02:00  07:49:00
76.+B3g-4g   07:02:00  07:51:00
77.L*5h!     07:04:00  07:51:00

Very important move as we will see in a moment.

78.S5d-6e    07:04:00  07:54:00
79.G5fx6e    07:06:00  07:54:00
80.P6dx6e    07:06:00  07:54:00
81.+R2a-3b!  07:14:00  07:54:00
White has managed to exchange the silver on 6c against the defending gold, making
the black king position even more dangerous. However, here Habu knew that he had
sealed the victory. The point of 77.L*5h is clear now. This lance not only works in
defense, but also attacks the vital point 5c, making 81.+R2a-3b a mating threat.
There is no proper defense against this, so black is one move earlier with his
attack. Despite Habu's slight mistake on move 73, the black position is still won.

82.P6ex6f    07:14:00  07:58:00

Throwing the towel, but there is nothing else.

83.+R3cx5c   07:19:00  07:58:00
84.K6b-7a    07:19:00  07:58:00
85.S*8b      07:19:00  07:58:00
86.K7ax8b    07:19:00  07:58:00
87.+R5cx5b   07:19:00  07:58:00
88.S*7b      07:19:00  07:58:00
89.+R5bx7b   07:19:00  07:58:00
90.G6ax7b    07:19:00  07:58:00
91.+R3bx7b   07:19:00  07:58:00
92.K8bx7b    07:19:00  07:58:00
93.N*6d      07:19:00  07:58:00
94.K7b-8b    07:19:00  07:58:00
95.S*7a      07:19:00  07:58:00
Resigns      07:19:00  07:58:00
Mate after 96.K9b G*8b K9c N*8e K8d G*7e K9e S*9f so Fujii resigned here. This ends
the match in a resounding 4-1 victory for Habu, defending his Oi title. Fujii tried
a number of things to shoot holes in Habu's armor, but the only conclusion after
the match can be that Fujii just doesn't know how to beat Habu. Much of this may be
psychological, as whatever happens in a game against Fujii, Habu always seems to
find a way to win.