53rd Oi Match Game 4
[Black "Fujii Takeshi, Challenger"]
[White "Habu Yoshiharu, Oi"]
[Event "53rd Oi-sen, Game 4"]
[Date "August 8th and 9th 2012"]
1.P7g-7f     00:01:00  00:00:00
2.P3c-3d     00:01:00  00:00:00
3.R2h-6h     00:06:00  00:00:00
4.S7a-6b     00:06:00  00:03:00
5.K5i-4h     00:12:00  00:03:00
6.K5a-4b     00:12:00  00:06:00
7.K4h-3h     00:26:00  00:06:00
8.K4b-3b     00:26:00  00:10:00
9.K3h-2h     00:27:00  00:10:00
10.P8c-8d    00:27:00  00:21:00
11.S3i-3h    00:34:00  00:21:00
12.P8d-8e    00:34:00  00:30:00
13.B8hx2b+   00:38:00  00:30:00
14.K3bx2b    00:38:00  00:40:00
15.S7i-8h    00:41:00  00:40:00
16.L1a-1b?!  00:41:00  01:22:00

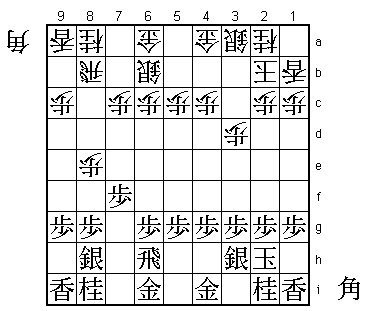
Objectively speaking, this is probably not a good idea. The black strategy is aimed
at making it unattractive for white to play the Anaguma, so playing this anyway
should be playing into black's hand. However, in the psychological context of a
title match, this is something worth trying. Fuji is 2-1 down and has the black
pieces, putting a lot of pressure on winning this game. Habu just added some
extra pressure by daring Fujii to show him why the Anaguma is not good here.

17.S8h-7g    00:58:00  01:22:00
18.K2b-1a    00:58:00  01:25:00
19.R6h-8h    01:01:00  01:25:00
20.S3a-2b    01:01:00  01:26:00
21.G6i-5h    02:01:00  01:26:00

If 21.P8f would work here, this would all have been very simple. Black just
takes control of the 8th file and white can only wait until his Anaguma is
smoked out. However, after 21.P8f Px8f Sx8f white has the bishop drop B*5d and
then S7g P*8g R6h and the black attack is not really taking off. Fujii has a
different plan.

22.P7c-7d    02:01:00  01:49:00
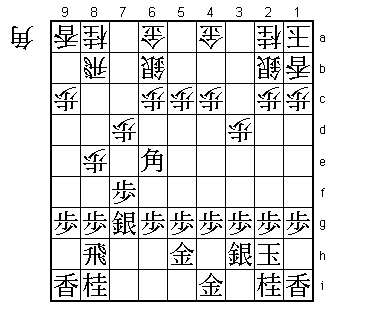
23.B*6e!     02:14:00  01:49:00

Habu admitted after the game that he had underestimated this bishop drop.
If black would only win a pawn with this bishop drop it might not have been good,
but the bishop is dropped on the "wrong diagonal" and will be perfectly placed
to assist a breakthrough on the 8th file.

24.G6a-5b    02:14:00  02:50:00
25.B6ex7d    02:15:00  02:50:00
26.R8b-8d    02:15:00  02:51:00
27.B7d-5f    02:19:00  02:51:00

The white golds are kind of half-way into the Anaguma, but there is no time
to complete the castle. From here on, Habu has to attack to avoid being overrun,
hoping that his Anaguma king is far enough from the black attack to win. On the
other hand, Fujii defends, confident that the white attack will fizzle out.

28.P5c-5d    02:19:00  02:52:00
29.P4g-4f    03:09:00  02:52:00
30.P5d-5e    03:09:00  03:12:00
31.B5f-4g    03:11:00  03:12:00
32.B*3c      03:11:00  03:37:00
33.S7g-6f    03:47:00  03:37:00
34.S6b-5c    03:47:00  03:55:00
35.N8i-7g    04:01:00  03:55:00
36.P5e-5f    04:01:00  04:00:00
37.B4gx5f    04:22:00  04:00:00
38.S5c-4d    04:22:00  04:04:00
39.P8g-8f    04:55:00  04:04:00
40.P8ex8f    04:55:00  04:15:00
41.P*8e      04:57:00  04:15:00
42.R8d-5d    04:57:00  04:17:00
43.B5f-8c+   05:18:00  04:17:00
44.S4d-5e    05:18:00  04:17:00
45.S6fx5e    05:21:00  04:17:00
46.B3cx5e    05:21:00  04:17:00
47.S*6f      05:22:00  04:17:00
48.B5ex4f    05:22:00  04:21:00
49.+B8c-4g   05:24:00  04:21:00
50.R5d-4d    05:24:00  04:50:00
51.+B4g-5f   06:09:00  04:50:00
52.S*4e      06:09:00  05:09:00
53.+B5fx4f   06:11:00  05:09:00
54.S4ex4f    06:11:00  05:10:00
55.P*4g      06:11:00  05:10:00
56.P8f-8g+   06:11:00  05:26:00
57.R8hx8g    06:11:00  05:26:00
58.S4fx4g+   06:11:00  05:26:00
59.S3hx4g    06:11:00  05:26:00
60.R4dx4g+   06:11:00  05:26:00
61.G5hx4g    06:11:00  05:26:00
62.B*6i      06:11:00  05:26:00
63.R*7a      06:15:00  05:26:00
64.P*5a      06:15:00  05:31:00
65.R8g-8h    06:15:00  05:31:00
66.B6ix4g+   06:15:00  05:31:00
67.R7ax8a+   06:15:00  05:31:00
68.P*8g      06:15:00  06:01:00
69.R8h-6h    06:17:00  06:01:00
70.S*7i      06:17:00  06:08:00
71.R6h-3h    06:23:00  06:08:00
72.+B4gx3h   06:23:00  06:22:00
73.G4ix3h    06:23:00  06:22:00
74.S7i-6h+   06:23:00  06:22:00

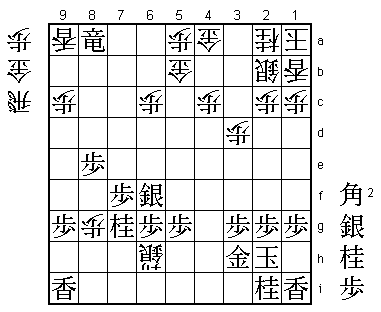
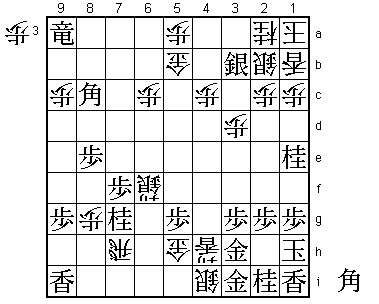
It seems like Fujii has judged the position best. He has a bishop and knight for a
gold and it looks like he can successfully defend against the white attack. However,
in reality, the position is still very complicated.

75.+R8ax9a   07:05:00  06:22:00

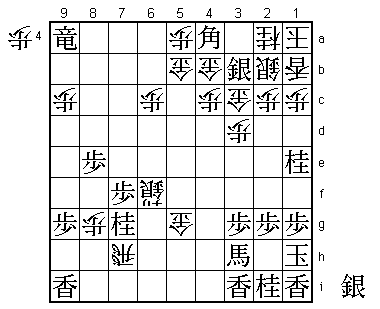
Fujii originally had counted on 75.B*5f here because after 76.+S5h K1h R*7h B*8c
the two bishops work very well in defense. However, here he realized that 75.B*5f
can be answered by 76.R*6i! which threatens both the lance on 9i and to play +Sx6g
next. This is especially nasty because after +Sx6f next, the bishop on 5f is also
attacked. Fujii was quite disappointed that he had to play 75.+Rx9a because now the
game becomes an attacking race, something he tried to avoid. Still, objectively the
black position is still good.

76.+S6hx6g   07:05:00  06:32:00
77.L*5d      07:22:00  06:32:00
78.+S6gx6f   07:22:00  06:48:00
79.L5dx5b+   07:22:00  06:48:00
80.S*4i      07:22:00  07:08:00
81.B*8c      07:31:00  07:08:00
82.G4ax5b    07:31:00  07:14:00
83.S*3b      07:39:00  07:14:00
84.R*7h      07:39:00  07:22:00
85.P*4h      07:44:00  07:22:00
86.L*4d      07:44:00  07:27:00
87.G*3i      07:50:00  07:27:00
88.G*5h      07:50:00  07:42:00

89.K2h-1h    07:59:00  07:42:00

Again a change of plan by Fujii. Here he originally intended to play 89.B*4a which
is not a mating threat, but if black gets two generals in hand, mate cannot be
avoided. However, after 90.Sx3h+ Bx3h+ G*4b is a stubborn defense. For example, S*3a
Gx4a Sx2b+ Kx2b Sx4a= S*3a the black attack is far from easy. Fujii thought that
this change of plan was what tipped the balance in this game, but black still has
a chance to win.

90.L4dx4h+   07:59:00  07:49:00
91.N*1e?     07:59:00  07:49:00

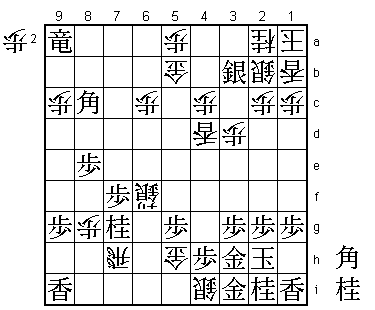
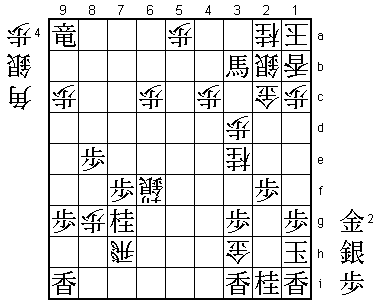
Only after this move the game gets beyond black's reach. Correct was 91.B*5e which
works both in attack and defense. For example, 92.+Lx3h Gx3h Sx3h+ Bx3h+ Gx5g L*4h
Rx4h+ +Bx4h Gx4h S*3i! (well-known defense tactic) Gx3i R*4a and the white king
cannot be defended. The question therefore is if there is a mate against the black
king and the answer and because of the bishop on 5e, the answer to this question is
no. For example, G*2h Kx2h and now either G3h K3h B*5f N*4g or Gx2i Kx2i B*5f N*3h
Bx3h+ Kx3h and if white could play N*4f the black king would be mated, but the
bishop on 5e prevents this.

92.+L4hx3h   07:59:00  07:50:00
93.G3ix3h    07:59:00  07:50:00
94.S4ix3h+   07:59:00  07:51:00
95.B8cx3h+   07:59:00  07:51:00
96.G5hx5g    07:59:00  07:51:00
97.L*3i      07:59:00  07:51:00
98.G*3c      07:59:00  07:55:00
99.B*4a      07:59:00  07:55:00
100.G*4b!    07:59:00  07:56:00

The decisive move. The white king is not easily mated now, giving white the time
to make his attack decisively strong.

101.N1ex2c=  07:59:00  07:56:00
102.G3cx2c   07:59:00  07:56:00
103.B4ax5b+  07:59:00  07:56:00
104.G4bx3b   07:59:00  07:56:00
105.+B5b-4a  07:59:00  07:56:00
106.P*2f     07:59:00  07:57:00
107.P2gx2f   07:59:00  07:57:00
108.N*3e     07:59:00  07:59:00
109.P*4h     07:59:00  07:59:00
110.G5gx4h   07:59:00  07:59:00
111.+B4ax3b  07:59:00  07:59:00
112.G4hx3h   07:59:00  07:59:00
Resigns      07:59:00  07:59:00

No mate against the white king and the black king cannot be defended, so Fujii
resigned here. Fujii must have been disappointed not to have been able to capitalize
on Habu's suspect opening experiment. He is now 3-1 down in the match and needs
to win the remaining three games to take the Oi title from Habu. Quite a steep
mountain to climb.
