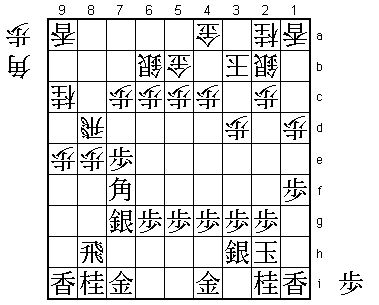
53rd Oi Match Game 2
[Black "Fujii Takeshi, Challenger"]
[White "Habu Yoshiharu, Oi"]
[Event "53rd Oi-sen, Game 2"]
[Date "July 24th and 25th 2012"]
1.P7g-7f 00:00:00 00:00:00
2.P3c-3d 00:00:00 00:00:00
3.R2h-6h 00:03:00 00:00:00
4.S7a-6b 00:03:00 00:05:00
5.K5i-4h 00:12:00 00:05:00
6.K5a-4b 00:12:00 00:10:00
7.K4h-3h 00:21:00 00:10:00
8.K4b-3b 00:21:00 00:13:00
9.K3h-2h 00:23:00 00:13:00
10.P8c-8d 00:23:00 00:26:00
11.S3i-3h 00:59:00 00:26:00
12.P8d-8e 00:59:00 00:48:00
13.P7f-7e 01:02:00 00:48:00
14.P1c-1d 01:02:00 00:53:00
15.P1g-1f 01:02:00 00:53:00
16.P9c-9d 01:02:00 01:01:00
17.P9g-9f 01:11:00 01:01:00
18.R8b-8d 01:11:00 01:19:00
19.B8hx2b+ 01:14:00 01:19:00
20.S3ax2b 01:14:00 01:20:00
21.S7i-8h 01:14:00 01:20:00
22.P8e-8f 01:14:00 02:16:00
23.P8gx8f 01:21:00 02:16:00
24.R8dx8f 01:21:00 02:16:00
25.G6i-7i 01:37:00 02:16:00
26.G6a-5b 01:37:00 02:22:00
27.S8h-7g 01:49:00 02:22:00
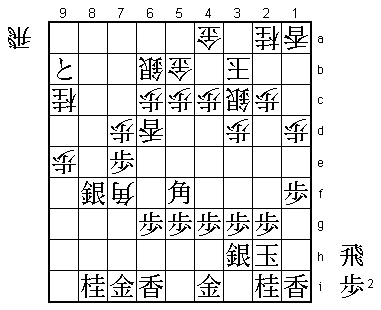
No Fujii System opening, but this is maybe even more positive. Exchanging the bishops,
allowing an exchange of pawns on the 8th file and using this to try to exchange rooks
which is good for the Furibisha side.
28.R8f-8d 01:49:00 02:35:00

Promoting the rook is dangerous here. After 28.R8g+ black can either force an exchange
of rooks with 29.R8h or try to win the promoted rook outright by cutting off the
retreat with 29.P*8f.
29.B*7f! 01:52:00 02:35:00
Strong move. The primary aim of this bishop is to put more pressure on the 8th file,
but it is also aiming indirectly at the white king. If black gets a knight in hand,
N*4d is a strong threat.
30.P*8e 01:52:00 02:56:00
31.R6h-8h 02:16:00 02:56:00
32.N8a-9c 02:16:00 02:56:00
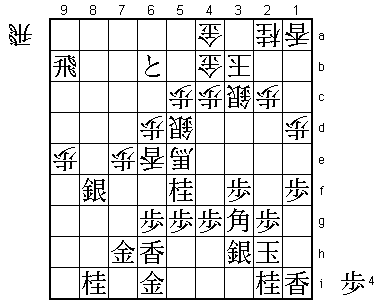
33.P9f-9e 03:36:00 02:56:00
Black could try to break down the 8th file here with 33.S6f S3c N7g, but then white
can defend with S5i and the white position is suddenly strong against a rook drop
and exchanging everything on the 8th file is no longer appealing for black.
34.P9dx9e 03:36:00 03:03:00
35.L9ix9e! 03:38:00 03:03:00
It is not easy to find the right way to attack here. For example, 35.P*9b Lx9b B6e
can be answered with B*8a! and if Lx9e then P6d is good for white. Fujii plays the
right order of attack here.
36.P*9d 03:38:00 03:43:00
37.P*9b 03:59:00 03:43:00
38.P9dx9e 03:59:00 04:45:00
Now 38.Lx9b B6e B*8a can be answered with P*8b (the extra pawn that black picked up
with 35.Lx9e) Rx8b Lx9d followed by R9b and the black attack is very strong. Actually,
Fujii expected Habu to answer 38.Lx9b B6e with P8f, after which P*8e R6d Bx9b+ Px9e
+Bx9c Rx6g+ is more or less a forced sequence. However, Habu didn't like this
variation and played 38.Px9e instead.
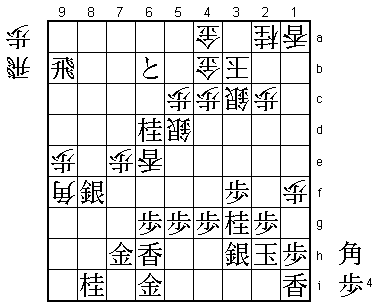
39.P9bx9a+ 04:06:00 04:45:00
40.P7c-7d 04:06:00 04:45:00
41.B7f-6e 04:43:00 04:45:00
42.S2b-3c 04:43:00 05:29:00
43.+P9a-9b 05:10:00 05:29:00
44.P8e-8f 05:10:00 05:29:00
45.R8hx8f! 05:40:00 05:29:00
Good judgment. After the rook exchange the silver seems to be hanging on 8f, so
45.Sx8f is the better looking alternative, but then 46.L*8e L*8g B*9i and black
is in a bit of trouble.
46.R8dx8f 05:40:00 05:48:00
47.S7gx8f 05:40:00 05:48:00
48.L*6d 05:40:00 05:48:00
49.B6e-5f 06:02:00 05:48:00
50.B*7f 06:02:00 05:50:00
51.L*6i 06:33:00 05:50:00
52.P7dx7e?   06:33:00  06:02:00

After the game Habu said that this was the move he regretted most. It looks good,
because he is picking up a vital pawn that he can use to attack, but the attack he
is aiming for is not very effective and the white knight on 9c too valuable to give
up. Better would have been 52.N8e and after 53.Px7d R*8g P7c+ Sx7c R*7e Rx8f+ Rx7c+
B9h+ black may still have the better position, but there is still a long and difficult
fight ahead.

53.+P9bx9c   06:42:00  06:02:00
54.P*8h      06:42:00  06:36:00
55.G7ix8h    06:43:00  06:36:00
56.R*7i      06:43:00  06:36:00
57.R*5i!     06:44:00  06:36:00

Strong defense. White doesn't have enough pieces to give the attack decisive strength.

58.B7f-6e    06:44:00  06:46:00
59.B5fx6e    06:55:00  06:46:00
60.L6dx6e    06:55:00  06:52:00
61.L6i-6h    06:58:00  06:52:00
62.R7ix5i+   06:58:00  07:00:00
63.G4ix5i    06:58:00  07:00:00
64.R*7i      06:58:00  07:00:00
65.R*6i      06:59:00  07:00:00
66.R7ix6i+   06:59:00  07:13:00
67.G5ix6i    06:59:00  07:13:00
68.P3d-3e    06:59:00  07:13:00
69.G8h-7h    07:05:00  07:13:00
70.P3e-3f    07:05:00  07:24:00
71.P3gx3f    07:05:00  07:24:00
72.B*5e      07:05:00  07:24:00
73.B*3g      07:09:00  07:24:00
74.B5e-9i+   07:09:00  07:25:00
75.G6i-7i    07:11:00  07:25:00
76.+B9i-4d   07:11:00  07:26:00
77.+P9c-8c   07:11:00  07:26:00
78.P6c-6d    07:11:00  07:28:00
79.+P8c-7b   07:13:00  07:28:00
80.S6b-6c    07:13:00  07:28:00
81.R*9b      07:25:00  07:28:00
82.S6c-5d    07:25:00  07:28:00
83.+P7b-6b   07:25:00  07:28:00
84.G5b-4b    07:25:00  07:28:00
85.N*5f      07:25:00  07:28:00
86.+B4d-5e   07:25:00  07:28:00
87.G7i-6i    07:31:00  07:28:00
Habu is getting beaten Oyama style in this game. Not being bothered by good shape,
Fujii is moving his pieces in such a way that there are no holes to exploit. This
gold has moved from 4i to 7i to defend vital squares and now is moving back to 6i
to defend square 5i against a rook drop.

88.+B5ex3g   07:31:00  07:30:00
89.N2ix3g    07:31:00  07:30:00
90.P1d-1e    07:31:00  07:30:00
91.N5fx6d    07:32:00  07:30:00
92.P1ex1f    07:32:00  07:30:00
93.P*1h      07:32:00  07:30:00
94.B*9f      07:32:00  07:41:00
95.B*8e!     07:39:00  07:41:00

Fujii has defended for a long time, but he has calculated that the time is right
to attack strongly. Of course, he could have played 95.P*8g here as well.

96.B9fx8e    07:39:00  07:57:00

Or 96.Bx7h+ Gx7h G*4h +P5b R*5i +Px4b Gx4b G*2i and black can stop the white attack.

97.S8fx8e    07:40:00  07:57:00
98.R*8f      07:40:00  07:57:00

A fork on silver and knight, but Fujii is not bothered.

99.+P6b-5b   07:42:00  07:57:00
100.R8fx8i+  07:42:00  07:57:00
101.+P5bx4a  07:42:00  07:57:00

This tokin has done a lion's share of work, taking the route 9a-9b-9c-8c-7b-6b-5b-4a
to win a lance, knight and finally a castle gold. Black wins.

102.K3bx4a   07:42:00  07:57:00
103.G*5b     07:47:00  07:57:00
104.K4a-3b   07:47:00  07:57:00
105.G5bx4b   07:47:00  07:57:00
106.S3cx4b   07:47:00  07:57:00
107.B*4a     07:47:00  07:57:00
108.K3bx4a   07:47:00  07:57:00
109.N6d-5b+  07:47:00  07:57:00
110.K4a-3b   07:47:00  07:57:00
111.+N5bx4b  07:47:00  07:57:00
112.K3b-3c   07:47:00  07:57:00
113.+N4b-3b  07:47:00  07:57:00
114.K3c-4d   07:47:00  07:57:00
115.S*3e     07:47:00  07:57:00
Resigns      07:47:00  07:57:00
Mate after 115.K5e S4f K6d G*7d so Habu resigned here. Even the hanging silver on
the 8th file plays a vital role in the final position. A perfect game by Fujii that
will be used a textbook example of defending. With this he ends an eleven game
losing streak against Habu. More importantly, the match is now level at 1-1 and
considering the strong play Fujii has shown so far, we might have a very interesting
match on our hands.